Patriotic Crafts and Activities for Children
How to Make Crafts for the Fourth of July/Independence Day and Memorial Day
Patriotic Folding Craft Stick Printable Patterns for the Fourth of July or Memorial Day
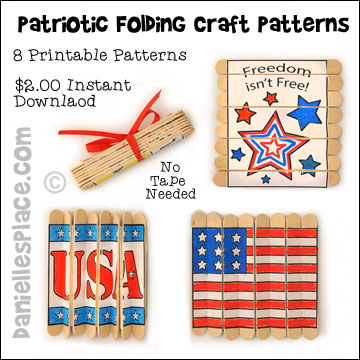
Bring excitement to your Fourth of July and Memorial Day celebrations with a delightful and budget-friendly craft project for your children! This engaging activity features eight unique patriotic patterns for your kids to color and personalize. Once they've added their artistic touch, they can glue the designs onto craft sticks and cut them to create a fun and tidy pile. But that's not all—these patterns are perfect for making stunning craft stick plaques or coasters that will add a festive flair to your tables and walls. Make your celebrations even more memorable and visually captivating with this creative project!

What you will need:
Woodsies Mini Jumbo Craft Sticks -Natural 4.5" 50/Pkg
Uni-posca Paint Marker Pen - Medium Point and Uni-posca Paint Marker Pen - Extra Fine Point - Set of 12 - You can also use colored pencils or regular markers
ALEENES 15599 All Purpose Glue
Clear Contact Paper - Optional
X-ACTO Knife or Box Cutter - Adults Only
How to Make the Folding Craft Stick:
1. Print out the Patriotic patterns onto printer paper. (Patterns available to members or as an instant download below.) Or draw two 4 1/2" x 3 1/2" rectangles on a sheet of paper and draw a patriotic designs on the rectangles.
Instant Digital Download  - Include 8 patterns. This craft is also available with the Bible lesson "He Has Set Me Free".
2. Color and cut out the designs. You need two designs, one for each side of the folding craft sticks. We used paint marker pens because of the vibrant colors, but you can use any markers or colored pencils.
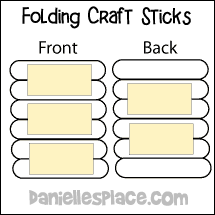
3. Line up eight mini jumbo craft sticks. Use the edge of a ruler to make sure they are lined up evenly.
4. Spread tacky glue evenly over the back of one of the patterns. Do not use extra glue. Use just enough to cover the entire surface and wipe off any excess. You do not want the glue to leak down into the cracks of the craft sticks. Carefully turn over the craft sticks and glue another pattern onto the back of the sticks.
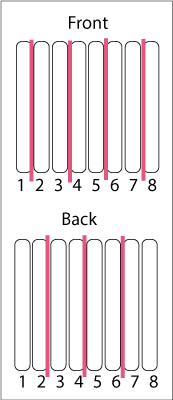
5. After the glue has dried thoroughly use an X-acto knife or box cutter to cut paper where the craft sticks meet. Make sure you only cut the top layer of paper. Do not cut all the way through to the other side. Starting on one side cut the paper in between the 1st and 2nd craft stick. Skip the next two craft sticks and cut the line between the 3rd and 4th sticks. Skip the next two sticks and cut the line between the 5th and 6th sticks, and then the 7th and 8th.
6. Turn the craft sticks over and cut the opposite lines between the craft sticks. Cut the 2nd and 3rd, 4th and 5th, 6th and 7th.
7. Carefully fold back where you have cut the lines, fold up where the sticks are not cut.
If you would like to use this craft as coasters for your Fourth of July party, cover each side with clear contact paper before cutting between the sticks.
Add a ribbon to the top if you want to use them as plaques.
Instant Digital Download  - Include 8 patterns. This craft is also available with the Bible lesson "He Has Set Me Free".
"USA Rocks!" Rock Craft for the Fourth of July
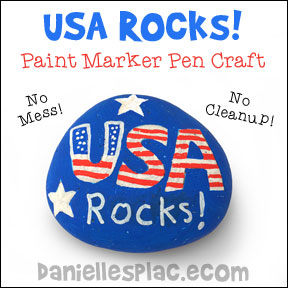
Consider creating patriotic-themed rocks to honor Memorial Day or the Fourth of July. These beautifully decorated rocks can serve multiple purposes, such as paperweights, table decorations, or thoughtful gifts for your loved ones. This is a fantastic project for children, as they can use paint marker pens to personalize the rocks with their own designs, all while enjoying a fun and mess-free experience!
You can easily order these paint markers from Amazon Prime and have them delivered in just two days. Unlike traditional chalk markers, these pens become waterproof once the paint is dry, ensuring that your vibrant colors last. This project is a wonderful way to celebrate and express creativity while being festive!
What you will need:
Uni-posca Paint Marker Pen - Medium Point - The rock pictured was made with the medium point paint markers. If you want to add a lot of words, also buy the extra fine markers.
Uni-posca Paint Marker Pen - Extra Fine Point
Smooth River Rocks - If you don't have these in your area, you can buy them from your local gardening store or landscaping store.
How to Make the "USA Rocks!" Craft:
1. Wash and dry the rocks.
2. Trace your rock on a sheet of paper and draw out a design you would like to use. Write all the words and decide on what colors you would like to use before starting on the rock.
3. When you have your design, draw it on the rock with the paint marker pens. Be careful that you don't smear the paint as you work. You can work on one side of the rock while the other side drys. If you mess up, you can paint over the part you don't like after the paint is dry.
Copyright 2015, Digital by Design, Inc. -See Copyright Information
"Unfurl the Flag" Folding Craft Stick Flag Craft
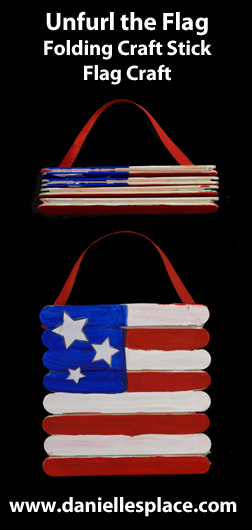
Children can engage in a creative and enjoyable "Unfurl the Flag" activity this Fourth of July by making their own folding craft stick flags. This project allows them to piece together craft sticks and tape them to form a canvas for their flag designs. After they’ve painted their creations, cut alternating strips of tape to enable the flags to be neatly folded into a stack. To finish, add a ribbon, allowing them to easily unfurl and proudly display their flags at the Fourth of July celebration. This activity not only sparks creativity but also provides a memorable way to celebrate the holiday!
What you will need:
Woodsies Mini Jumbo Craft Sticks -4.5" 50/Pkg - Use good quality craft sticks that lay flat. The 5/8" work perfect with the one-inch tape.
*You can use the Woodsies Jumbo Craft Sticks with the 1.5 Inch - 3M Scotch Masking Tape for a bigger Canvas.
3M Scotch Masking Tape, 1-Inch - Other brands will work, but this tape works great! It is the exact color of the craft sticks. (Staple's Tape works better with the washable markers, but it is lighter than the stick and more transparent and doesn't cover the stick as well.)
Uni-posca Paint Marker Pen - Medium Point and Uni-posca Paint Marker Pen - Extra Fine Point - Set of 12 - You can also use colored pencils or regular markers. They are easier to use and a lot less messy than the acrylic Paint or Red, white and, blue Acrylic Paint (Optional)
How to Make the Folding Craft Stick Canvas:
To make this unique unfolding flag craft craft sticks are taped together so they can be folded out "unfurled" to reveal the flag and folded back up to form a compact stack of sticks.
1. If you are using the mini-jumbo craft sticks, cut the one-inch masking into 4-inch pieces.
2. Place two sticks together, side by side, long ways, and tape them together covering both the sticks with the tape.
3. Turn the two sticks over so that they are diagonal to you.
4. Place another craft stick next to and below the two sticks that you taped together. Use another piece of tape to tape the bottom two sticks together.
5. Turn all three sticks over diagonally and place another stick at the bottom of the row and tape the last two sticks together. Keep going until you have a whole row of sticks.
6. You can also cover the first and last stick in the row by placing tape over the stick and then folding it back over the stick. It is easier to write on the tape than the craft stick. The ink soaks into the sticks and blurs.
7. Paint the sticks to look like a flag.
8. To finish glue a ribbon on the top of the row of craft sticks so you can hang the flag.
Watch a Youtube video on how to make this craft:
©2012, Digital by Design, Inc. - See Copyright Information - Bloggers, if you use this craft idea or an adaptation, and link back to this page for the complete directions, let us know and we will put a link to your blog.
Fourth of July Cup Windsock Craft for Kids - Patriotic Windsock
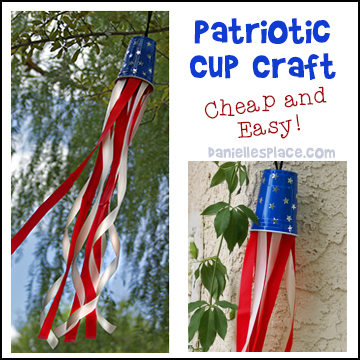
The long red and white streamers on this patriotic craft look like a flag blowing in the wind.
What you will need:
One-inch Red and White Ribbon
18 oz. Blue Plastic Cups
Scissors
String
Tape
How to Make a Patriotic Windsock:
1. Poke a small hole in the top of the cup. Cut a piece of string about two feet long and poke both ends of the string through the hole towards the inside of the cup. Place your hand inside the cup and pull the string ends almost all the way through. Tie the two ends together to make a big knot. Pull the string back out of the cup. The knot should keep the string from coming all the way through.
2. Stick star sticker all over the outside of the cup.
3. To finish cut red and white ribbon into three feet pieces and tape them alternately to the inside of the cup.
Copyright 2009, Digital by Design, Inc. -See Copyright Information
4th of July Fan Craft for Kids
Stay cool this Fourth of July with this fun and easy craft.
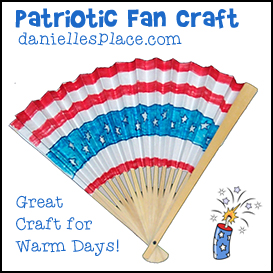
How to Make a Fourth of July Fan:
1. Decorate your fan or piece of construction paper with a patriotic theme: stars, stripes, etc.
2. Fan fold your construction paper by folding up one inch on the short side. Then fold another one inch on the same side but fold in the opposite direction. Keep folding until the whole paper is folded. Staple or tape one end and then open up the other end to form a fan.
Copyright 2007, Digital by Design, Inc. -See Copyright Information
Patriotic Bunny Coloring and Craft Sheet for Kids
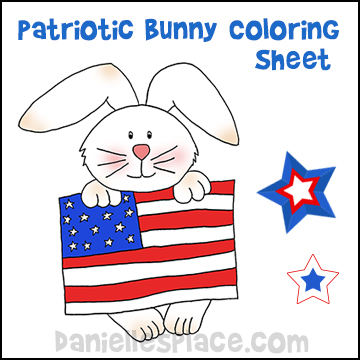
What you will need:
Paper, Crayons, Glue, Sequins, Buttons, Star Stickers, Glitter Glue
How to Make:
1. Print out picture and make copies.
2. Color the picture.
3. To make your picture really sparkle, glue on buttons or sequins. Use glitter glue or star stickers over the stars in the picture or add them to the background.
Copyright 2004, Digital by Design, Inc. -See Copyright Information
Free Patriotic Bunny Holding a Flag Craft
This craft is great for Flag Day, Memorial Day, the Fourth of July or anytime.

What you will need:
Card Stock (Heavy Paper), Crayons or Markers, Drinking Straw or Pencil, Computer Paper, Glue, and Scissors
How to Make the Patriotic Bunny Craft:
1. Print out the bunny pattern and color it.
Free Instant Digital Download - ![]()
2.Print out the USA flag pattern and color it or print out the USA colored flag pattern and cut it out.
3. Glue or tape the flag to a pencil or straw. Cut two slits one above the bunny's hands and one below. Insert the straw or pencil flag into the hands.
Copyright 2004, Digital by Design, Inc. -See Copyright Information
Patriotic Rabbit Pencil Holder
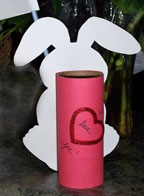
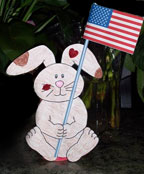
What a great gift for people in the military! Cut out the rabbit pattern and add the flag. Cover a can with paper and then glue the rabbit onto the can to make a pencil holder. This idea was sent in by Dawn.
Copyright 2003, Digital by Design, Inc. -See Copyright Information
Patriotic Bird Feeder Craft
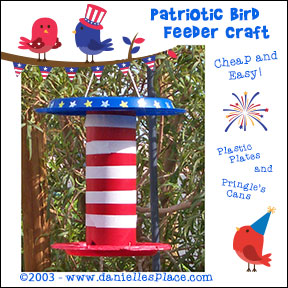
What you will need:
6 3/4 oz. Pringle's Potato Chip Can With a Lid
7-Inch Red Plastic Chinet Plate
9-Inch Blue Plastic Chinet Plate
2-Inch Bolt with Nut - I use this size because you have to put your hand down through the can and it make it easier to reach.
1-Inch Bolt with Nut
Drill with Matching Drill Bits
String for Hanging
How to Make a Patriotic Bird Feeder:
1. Paint the Pringle's can using patriotic colors or cut duct tape into one-inch strips and stick it on the can. Decorate with star stickers.
2. Cut three or four small holes about 3/4" by 1/2" around the bottom edge of the can using a knife. These holes are where the birdseed comes out.
3. Drill two small holes in the top of the can just below the edge of the plastic lid on opposite sides. These will be used to hang the bird feeder.
4. Turn the can upside down and place the small plate on the center of the can. The plate should be upside down on the bottom of the can. Drill a hole through the plate and the bottom of the can. (The drill bit should match the size of your bolt.) Stick the 2-inch bolt through the hole in the paper plate and the hole in the bottom of the can. Screw on the nut from the inside of the can. You may have to find someone with small hands to do this for you.
5. Remove the lid from the can and place it upside down on the middle of the big paper plate. Drill a hole through the middle of the plastic lid and the plate. Stick the 1-inch bolt through the plate and then the lid and screw on the nut. Drill two holes on opposite sides off the lid in the plate.
6. Stick one end of a piece of string through one of the holes in the top of the Pringle's can, over and through the can to the other hole and through the hole. Place the lid with the plate on the can. Now bring both ends of the string up through the holes you punched in the plastic plate. Tie the string ends together at the top.
7. To fill the bird feeder just pull off the lid and let it dangle to the side.
Copyright 2003, Digital by Design, Inc. -See Copyright Information
Patriotic Hearts Coloring Sheets or Posters

Give your children a memorable holiday experience with these free patriotic heart coloring sheets! They'll have a blast creating colorful displays to showcase during the celebrations. Enhance the fun by using vibrant red and blue crayons or colored pencils for a true patriotic touch. Plus, let their creativity shine by adding dazzling decorative items like glitter and beads, making their artwork even more festive and exciting. Get started on this wonderful holiday project today!
Copyright 2003 - 2025, Digital by Design, Inc. -See Copyright Information
I Love the USA Coloring Sheet
What you will need:
Computer Paper
Crayons
Other Decorative Items Such as Glitter and Beads
How to Make:
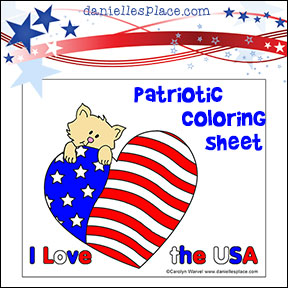
1. Print out the free coloring page. You can just use crayons to color this coloring page or add glitter and beads and other pretty items to make it really stand out.
Copyright 2003, Digital by Design, Inc. -See Copyright Information
Patriotic Crafts on Other Pages


