Christmas Crafts
Bible Christmas Crafts for Sunday School Page 2
Envelope Nativity Craft for Children
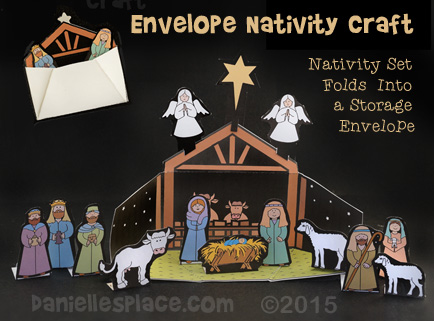
This nativity scene folds into a 3" x 5" envelope in which the pieces can be stored. The patterns come in both black and white and color and have a black background for easy cutting. A tab at the bottom of each piece is folded back to make a stand. This pattern is available to members and as an instant download.
Members 
Instant Digital Download - 
What you will need:
Cardstock (Heavy Paper)
Color or Black and White Printer
Scissors
Star Stickers
Colored Pencil (If you are using the black and white patterns)
What to do:
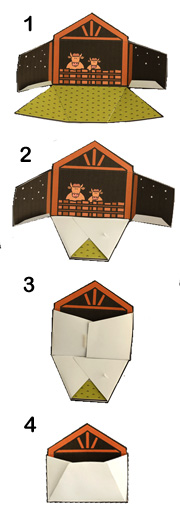
1. Print out the patterns and cut them out. (The patterns have a black background so you don't have to be precise when cutting them out.
2. Fold the nativity scene envelope on the dotted lines, at the sides and at the bottom.
3. To make the display fold out the sides, top, and bottom of the envelope and tape the tab on the bottom of the sides to the bottom of the envelope.
4. To store the piece fold up the envelope as shown in the diagram and tape the tab down with a star sticker.
©2014, Digital by Design, Inc. - *See Copyright Information
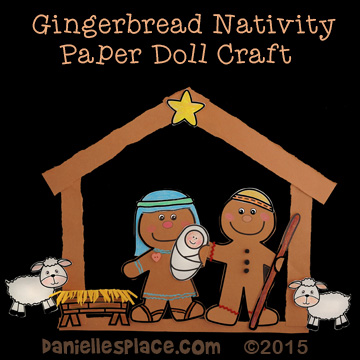
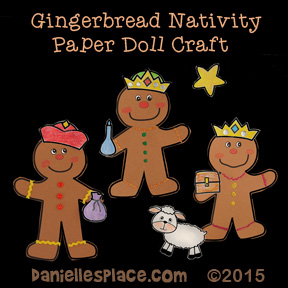
Gingerbread Man Nativity Paper Doll Craft for Children
Use this craft to review the Christmas story. Add craft sticks to make stick puppets and put on a play, or use the figures as Christmas ornaments.
Wisemen Gingerbread Nativity
Paper Dolls Craft
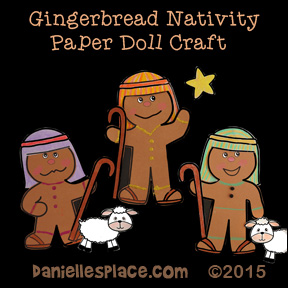
Shepherds Gingerbread Nativity
Paper Dolls
The patterns for this craft are available to members and as an instant download.
They include:
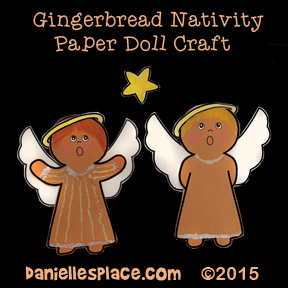
1. Mary and Joseph with Head Coverings and Staff
2. Baby Jesus
3. Sheep and Lamb
4. Manger
5. Star
6. Angels with Wings and Halos
7. Wisemen with Gifts and Crowns
8. Shepherds with Staffs and Head coverings
Member's
Instant Digital Download -
©2015, Digital by Design, Inc. - *See Copyright Information
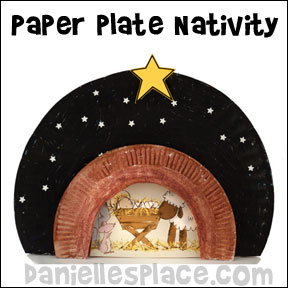
Nativity Paper Plate Craft for Christmas
What you will need:
Dinner-sized Paper Plate (Use the cheap paper plate that don't have the shiny finish.)
Two Lunch-size Paper Plates (Use the cheap paper plate that don't have the shiny finish.)
Black Acrylic Paint or Black Markers
Star Hole Punch or Foil Star Labels from an Office Supply Store.
Glue
Manger Scene (From Old Christmas Cards)
Yellow Construction Paper for the Star
How to Make the Paper Plate Nativity Craft:
1. To make the sky background fold the large paper plate back two inches from the bottom of the plate. (The folded back part will serve as a stand.) Paint the plate black and then use a star hole punch to punch out stars. If you don't have a star punch, you can use Foil Star Labels.
2. To make the nativity scene cut two inches off the bottom of two lunch-sized paper plates. Cut the center out of one of the plates and color and/or paint around the edge.
3. Use the center of the paper plate that you cut out as a template to cut a nativity scene from a Christmas card. Cut the nativity scene a little bigger than the template. If you don't have Christmas cards, you can just draw the nativity scene on the plate.
4. Glue the two small paper plate together top to top, and then glue the plate onto the larger paper plate so that the cut out paper plate and nativity scene are in the front.
©2014, Digital by Design, Inc. - *See Copyright Information
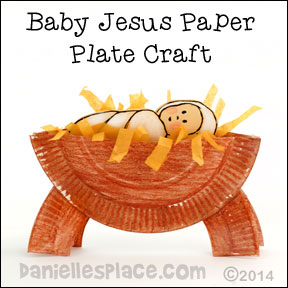
Baby Jesus in a Manger Paper Plate Bible Craft Preschool
Preschool children will love using this nativity craft for role play. Baby Jesus and the hay can be removed and replaced over and over. The paper plate manger stands on its own.
What you will need:
Paper Plates - Snack-sized Paper Plate - Use the cheapest ones you can find. Do not use the ones with the shiny finish. Crayons and paint don't stick to the finish.
Crayons
Brown Water Color Paint
Scissors
Yellow Feathers, Yellow Tissue Paper, or Real Straw
Paper Towels
How to make the Paper Plate Manger Craft:
1. Cut paper plate in half to make the top of the manger.
2. To make the legs of the manger cut another paper plate in half and cut out the center of the halves.
3. Print out or draw pictures of Baby Jesus, or let your children draw a baby and then cut it out.
Member's Pattern
Instant Digital Download -
4. Color the paper plate parts with crayons, covering as much of the plate as possible. Do not use paper plates that have the shiny coating. Crayons and paint don't stick to the finish.
5. Once your children have colored the entire plate, you may want to add water color to fill in where the crayon didn't cover. If you use water color before using the crayon the paper plate will get very soggy and warp. If apply the water color paint on top of the crayon, the paper plate will not get soggy because it will only cover the exposed paper. Wipe off any excess water color paint with a paper towel.
6. When the paint glue the legs together so that the backs are together. this will make the legs separate about one inch.
7. Glue the two half paper plates to the legs as shown in the picture.
8. To finish cut up pieces of tissue paper into strips or use feathers. Place the tissue paper in the "manger" and then place the "baby" inside the manger.
©2014, Digital by Design, Inc. - *See Copyright Information- Please do not publish a finished version of the craft on Pinterest without giving Danielle's Place credit for the craft. Danielle's Place reserves the right to publish copies of any versions of this craft that are published on the web site.
Baby Jesus in a Manger Paper Plate Bible Craft for Sunday School

What you will need:
Paper Plates - Use the cheapest you can find. Do not use the ones with the shiny finish. Crayons and paint don't stick to the finish.
Crayons
Brown Water Color Paint
Scissors
Yellow Feathers, Yellow Tissue Paper, or Real Straw
Paper Towels
How to make the Paper Plate Manger Craft:
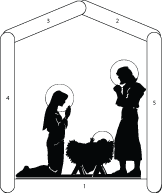
1. Cut 3/4 of the center out of a Paper plate as shown in the picture.
2. Cut out Star Shapes from colored paper (Available to members.)
3. Print out or draw pictures of Baby Jesus, or let your children draw a baby and then cut it out.
Member's Pattern
Instant Digital Download -
4. Color the paper plate with a crayon, covering as much of the plate as possible. Do not use paper plates that have the shiny coating. Crayons and paint don't stick to the finish.
5. Once your children have colored the entire plate, you may want to add water color to fill in where the crayon didn't cover. If you use water color before using the crayon the paper plate will get very soggy and warp. If apply the water color paint on top of the crayon, the paper plate will not get soggy because it will only cover the exposed paper. Wipe off any excess water color paint with a paper towel.
6. When the paint is dry glue feathers, cut up tissue paper or construction paper, or real straw to the bottom of the paper plate.
7. To finish glue the baby picture on top of the feathers and glue a star to the top of the paper plate.
©2014, Digital by Design, Inc. - *See Copyright Information - Please do not publish a finished version of the craft on Pinterest without giving Danielle's Place credit for the craft. Danielle's Place reserves the right to publish copies of any versions of this craft that are published on the web.
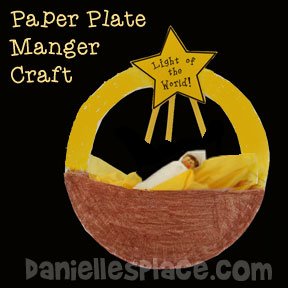
"Light of the World" Paper Plate Manger Christmas Craft
What you will need:
Paper Plates - Use the cheapest you can find. Do not use the ones with the shiny finish. Crayons and paint don't stick to the finish. You can use the dinner-sized paper plates or lunch-sized paper plates.
Crayons
Brown Water Color Paint
Scissors
Yellow Feathers, Yellow Tissue Paper, or Real Straw
Paper Towels
Yellow Paper for the Star and Rays, or Yellow Ribbon
White Tissue Paper, Tissues, or White Cloth Strips
Clothespins, Wooden Peg Dolls, Felt Pieces or Baby Jesus Picture
Glue
How to make the Paper Plate Manger Craft:
1. Cut 3/4 of the center out of a Paper plate as shown in the picture. Cut another paper plate in half to use as the manger.
2. Cut out star shapes from yellow paper and write "Light of the World in the center of the star".
Member's ![]()
3. Color the paper plate with a crayon, covering as much of the plate as possible. Do not use paper plates that have the shiny coating. Crayons and paint don't stick to the finish.
4. Once your children have colored the entire plate, you may want to add water color to fill in where the crayon didn't cover. If you use water color before using the crayon the paper plate will get very soggy and warp. If apply the water color paint on top of the crayon, the paper plate will not get soggy because it will only cover the exposed paper. Wipe off any excess water color paint with a paper towel.
5. When the paint is glue the half paper plate to the whole paper plate to form a pocket.
6. To make Baby Jesus wrap scraps of material, tissue paper, or tissue around a clothespin or craft. Draw on eyes and hair with a marker.
7. To finish crinkle ups squares of yellow tissue paper and place in the pocket, then place Baby Jesus on top of the tissue paper. You can substitute the tissue with strips or material, cut up pieces of yarn, or real straw. Glue strips of yellow paper on the top of the play for rays or use yellow ribbon. Glue a star to the top of the plate over the ribbon.
©2014, Digital by Design, Inc. - *See Copyright Information - Please do not publish a finished version of the craft on Pinterest without giving Danielle's Place credit for the craft. Danielle's Place reserves the right to publish copies of any versions of this craft that are published on the web.
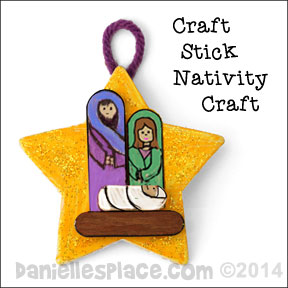
Star Nativity Scene Ornament Craft
What you will need:
Three-inch Wood Star or Star Cut from Cardboard
Mini Jumbo Craft stick
Mini Craft Sticks
Colored Pencils and/or Markers, or Paint
Glue
Glitter Glue
Yarn, Ribbon, or String
How to Make the Nativity Scene Ornament:
1. Color or Paint the star yellow. When it is dry paint it with glitter glue.
2. To make Joseph cut the top off a mini jumbo craft stick so it is two inches long. Cut the other end so it is 1 1/2" long to make Mary. Use colored pencils or markers to draw on the faces and bodies.
3. To make the manger color a mini craft stick brown.
4. Cut the end off another mini craft stick and round out the edge. Draw a face and "swaddling clothes" on the stick to make Baby Jesus.
5. Glue the Joseph and Mary figures onto the center of the star. Then glue the manger and Baby Jesus in front of the Mary and Joseph figures.
©2014, Digital by Design, Inc. - *See Copyright Information - Please do not publish a finished version of the craft on Pinterest without giving Danielle's Place credit for the craft. Danielle's Place reserves the right to publish copies of any versions of this craft that are published on the web.
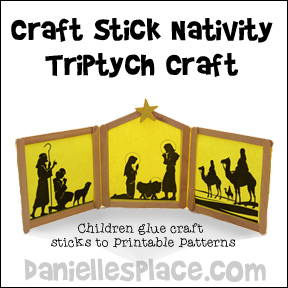
Christmas Craft - Nativity Triptych
What you will need:
Regular-sized Craft Sticks and Mini Craft Sticks (Or regular-sized craft sticks cut in half)
Yellow Paper
Glue
Wooden Stars
Scissors
Light Oil, Paint Brushes, and Paper Towels (Optional)
Colored Pencils, crayons, Markers or Paint
This craft is appropriate for children second grade and older. Children glue craft sticks onto the patterns and then glue the three panels together. To finish they glue a wooden star to the top of the middle panel. (A pattern for this craft is available to members.)
Member's ![]()
Instant Digital Download ![]()
What to do:
You don't have to have a pattern to make this craft, however the pattern makes it much easier for younger children to make the three panels square. If you don't use the pattern, you can have your children draw scenes on each panel.
When your children are finished gluing the panels together, you can have them paint the paper with light oil to make the paper translucent. Have them place the craft on paper towels before adding the oil and then blot any excess oil off with more paper towels.
©2014, Digital by Design, Inc. - *See Copyright Information
Hawaiian Peg Doll Nativity Set Craft
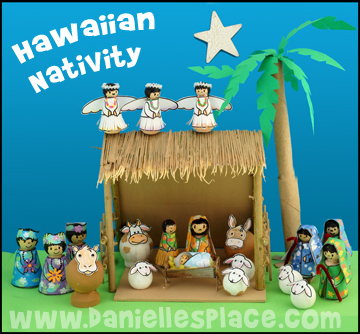
See Hawaiian Nativity Craft Page for Directions and Printable Patterns.
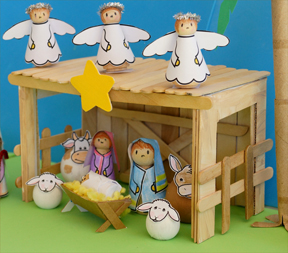
This set is also available without the Hawaiian theme. Children color the patterns, cut them out and tape or glue them to the wood pegs and ball knobs.
Go to the Peg Doll Nativity Craft Page for directions on how to make the peg doll nativity and craft stick stable.
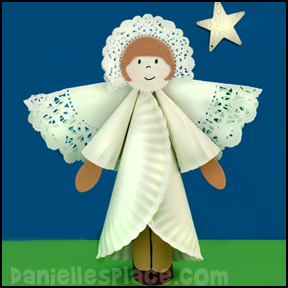
Paper Plate Angel Ornament Craft
What you will need:
Two Nine-inch Paper Plates
Paper Towel Tube
Paint or Magic Markers
Glue
How to Make the Paper Plate Angel:
1. To make the angel's body roll a paper plate into a cone shape and glue it closed.
2. To make the arms cut another paper plate in half and roll down both side on one half of the paper plate and glue the down the rolls.
3. Glue the arms behind the body.
4. To make the wings fold a ten-inch doily in half and glue it to the back of the arms.
5. Cut a paper towel tube in half and glue it inside the angel's body for legs.
6. Glue craft spoons inside the arms to make the hands.
7. To finish glue a four-inch doily on for the head.
8. Use paint or magic markers to draw in the hair, face, feet, and hands.
Note: You can use smaller paper plates and doily to make a much smaller angel to hang on your Christmas tree.
©2013, Digital by Design, Inc. - *See Copyright Information
Christmas Crafts on Other Pages
Bible Christmas Crafts Page 1, Bible Christmas Crafts Page 3, Christmas Crafts Page 1, Christmas Crafts Page 2, Christmas Crafts Page 4, Christmas Crafts Page 5, Christmas Crafts Page 6, Winter Crafts Page