Winter Crafts Page 2
Winter Crafts and Activities for Children
Rock Snowman Craft and Game
Children practice their balancing skills in this fun creative game. Players roll a die to see which snowman part they collect and then race to be the first player to build a complete rock snowman that will stand on its own.
Use the snowman rocks as a fun winter activity. Place the painted rocks on your stoop and encourage your friends to build their own crazy snowman or challenge your friends to build the tallest snowman they can.
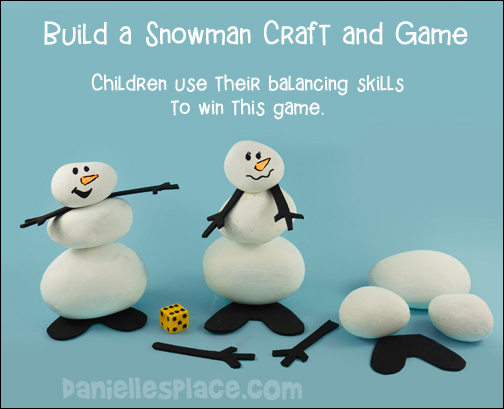
Use these adorable snowmen to play educational games or as fun learning and creative activity.
What you will need:
Smooth Round River Rocks in Three Different Sizes - Use double the amount of set of rocks to make snowmen as the amount of people playing the game. For example, if you have two players, use four sets of rocks. You can buy river rocks at your local garden shop.
Paint Markers or Permanent Markers
A Die
Brown or Black Craft Foam
How to Make the Snowman Game and Rock Craft:
Paint the river rocks white with acrylic paint. Use paint markers or permanent markers to draw on the face features. Cut boot shapes and stick arms from craft foam.
Object of the Game
The object of the game is to be the first player to make a complete snowman that stands on its.
Preparation:
Place the small, medium and large rocks in piles in the middle of the table. Place the craft foam boots and stick arms next to the rocks.
How to Play the Build a Snowman Game:
1. Players take turns rolling the die and doing one of the following activities:
Roll 1 Dot - Player selects a large rock.
Roll 2 Dots - Player selects a medium rock.
Roll 3 Dots - Player selects small head rock.
Roll 4 Dots - Player selects two stick arms.
Roll 5 Dots - Player selects two boots.
Roll 6 Dots - Player can exchange one item for another or pick any item he doesn't already have.
2. If a player rolls a number that corresponds to an item they already have, the player may exchange the item for a different one. For example, if the player rolls a two, he can exchange his medium rock for a different medium rock. Players may try to get their snowmen to stand up as they work on collecting all the items needed.
3. Once a player has everything he needs to complete his snowman, the other players can keep rolling the die until they collect all their items. If the first player cannot get his snowman to stand up on its own, another player still has a chance to win by rolling all he needs and getting his snowman to stand up on its own. If the first player can't get his snowman to stand up, he can start rolling the die again to try to get different rocks to use to replace the ones that don't work.
Snowman Building Activity
Place all the rocks, feet and arms on your patio, stoop or coffee table and encourage your children and their friends to practice making snowmen by balancing the rocks on top of each other.
Our Knowledge is Piling UP! Snowflake Bulletin Board Display Incentive for Learning
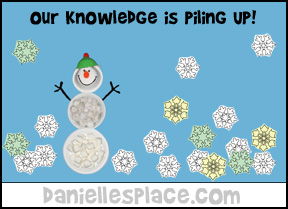
This bulletin board display can help keep your home school from falling into the winter blahs.
Children will get excited about seeing how much they are learning when they see all the snowflakes piling up.
Go to the Snowflake Crafts Page for ideas on how to use this bulletin board display.
And Many More on the Snowflake Crafts for Children Page
Snowman Milk Jug Recycle Craft for Kids
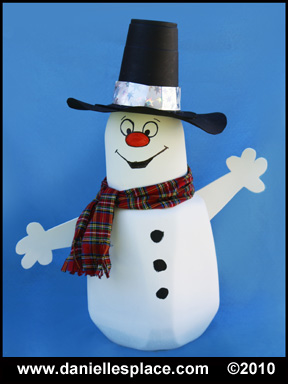
What you will need:
Gallon Milk Jug
2-liter Soda Bottle
Craft Foam
Large Plastic Cup
Material for Scarf
White Acrylic Paint or Spray Paint
Low Temp. Glue Gun
Sand
Black and Red Permanent Markers
How to Make the Snowman Milk Jug Recycle Craft:
1. Clean and dry the milk jug and pop bottle.
2. Pour a few cups of sand in the bottom of the milk jug to add weight to your snowman.
3. Cut off the bottom of the 2-liter bottle about 7 1/2" from the top of the bottle.
4. Glue the top of the bottle to the top of the milk jug with a low temp. glue gun.
5. Spray paint the jugs with white spray paint or use acrylic paint.
6. Draw a face on the snowman with permanent markers.
7. Cut the arm patterns from white craft foam and glue them to the snowmans body. (Use the arm pattern from the Polar Bear Pattern.)
8. Cut a scarf 5 x 24" from the material. Cut 1/4 slits at each end to make the frill. Tie the scarf it to the snowmans neck.
9. To make the hat paint a large plastic cup black. Cut an 8" circle from black craft foam, cut out the center, and glue it to the cup. Glue some ribbon or material around the top of the cup to finish the hat. Glue it to the head of the snowman.
©2010, Digital by Design, Inc. - See Copyright Information
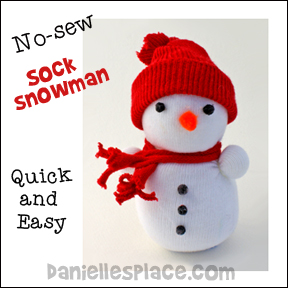
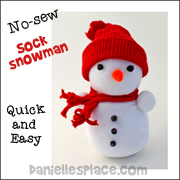
No-Sew Sock Snowman Craft for Kids
What you will need:
Socks (Childrens white stretchy socks and another color for the scarf and hat. the stretchier the better. I used socks that were 75% cotton, 22% polyester and 3% spandex.)
Poly-fil for Stuffing the Socks
Tiny Rubber Bands (You can find this in the hair accessories section of your department store.)
Tiny Black Pompoms for the Eyes and Buttons, Orange Pompom for the Carrot Nose,
Scissors
Low Temp. Hot Melt Glue Gun
How to Make the No-Sew Sock Snowman:
1. Flatten a sock so that the heel part of the sock is facing up.
2. Fill the sock with poly-fil to just below the heel of the sock.
3. To make the arms roll a wad of poly-fil into a ball about one inch in diameter and stick it inside the sock so that it is just below the heel to one side of the sock. Use your pointer finger to press the ball up against the side of the sock so that you can see your finger and ball shape from the outside of the sock. Grab the ball of Poly-fil from the outside of the sock and wrap a rubber band around the ball to form an arm as shown in the picture. Do the same thing to the other side of the sock.
4. Place a rubber band just above the arms to form the neck.
5. Put in more stuffing to form the head and secure the top with a rubber band. Cut off the cuff of the sock just above the rubber band.
6. cut the cuff off another sock of a different color to make the hat. Secure the cut end with a rubber band of the same color.
7. To make the scarf cut a long strip about 1" wide from the same sock. Stretch it out a little and tie it around the neck of the snowman.
8. To finish glue on tiny black pompoms for the eyes and buttons. Cut an orange pompom into a carrot shape and glue it to the face.
To see diagrams of similar sock critters go to the Sock Crafts for Kids Page
©2010, Digital by Design, Inc. - See Copyright Information
What you will need:
Card Stock (thick paper)
Crayons or Markers
Tape
Ribbon
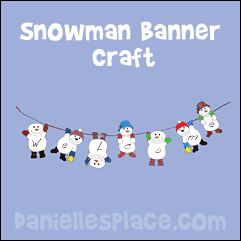
How to Make the Snowman Banner Craft:
1. Draw snowmen so that they look like they are hanging onto a rope. Use the picture above to give you an idea of how to do this. Or print out the patterns, color them, and cut them out. Roll out your ribbon and place the snowmen on the ribbon as shown in the order you would like them to appear.
Member's ![]()
Write letters on their bellies to spell out a message.
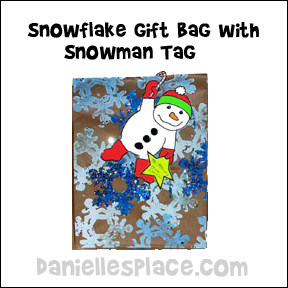
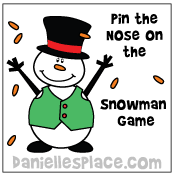
Hanging Snowman Gift Tag
This little snowman is holding a star in one hand and a candy cane in the other.
What you will need:
Card Stock
Scissors
Brown or White Lunch Bag
White and Blue Acrylic Paint
Snowflake Rubber Stamp
Exacto Knife
Tape
Crayons or Markers
How to Make the Snowflake Gift Bag and Snowman Gift Tag Craft:
1. Draw a snowman holding a candy cane in one hand as shown in the picture and then color it. Also draw a star to place in the snowmans other hand. Or print out the pattern (Available to members) and color it. Cut out the snowmen and star.
Member's ![]()
2. Use an Exacto knife to cut out around the thumb on the lower hand.
3. Write "to:" and "from:" on the star and insert it under the thumb.
4. Decorate a
lunch bag with a snowflake rubber stamp and paint. Sprinkle glitter
on the wet paint. Let the bag dry and then place your gift inside.
Fold down the top a couple of times and staple it closed.
Hang your snowman gift tag from the top of the bag. Tape it to the
bag so it won't fall off.
©2005, Digital by Design, Inc. - See Copyright Information
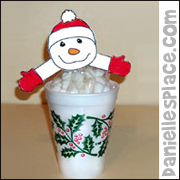
Hot Chocolate Mix with Marshmallow Snowman
What you will need:
Styrofoam Cups
Miniature Marshmallows
Card Stock
Crayons or Markers
Scissors
Tape
Powdered Chocolate Drink Mix
Small 2" x 3" Craft Storage Bags (Wal-mart in the crafts section)
Clear Plastic Party Bags 4 x 9 1/2" or Shorter (Wal-mart in the cake decorating section)
How to Make the Snowman Craft:
1. Draw a snowman head and hands onto card stock and cut them out. Or use the patterns. This pattern comes with a front and back head for each snowman.
Member's ![]()
2. Place enough chocolate mix into the small plastic bags to make one drink according to the directions and seal the bag.
3. Place all the supplies that will be needed (except for the marshmallows and paint and crayons) for each child in a brown lunch bag (see below).
4. Prepare a craft ahead of time so the children can see what they look like.
5. Place a half a cup of marshmallows in the large party bag and seal it with tape. Cut off the excess at the top.
6. Color the head (back and front) and the arms. Tape the arms at the bottom of the head or onto the bag. Tape the head onto the top of the bag. Tape the back of the head onto the back covering up the top of the plastic bag. Write the directions (or have the children write the directions) on how to make the hot chocolate on a piece of paper and place it in the bottom of the cup with the powdered chocolate mix. Place the snowman on top. You can also include a plastic spoon if you would like.
Place the snowman in the cup in a decorated lunch bag (below).
©2005, Digital by Design, Inc. - See Copyright Information
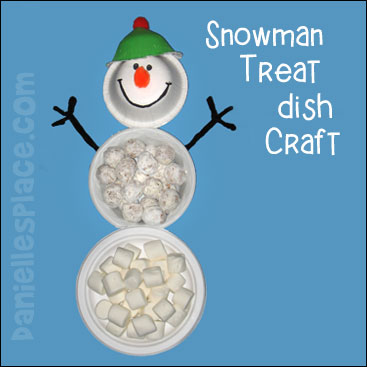
Snowman Serving Dish Craft
What you will need:
2 - 8 3/4" Chinet Premium Strength Paper Plates
1 - 20 oz. Dixie Paper Bowel
3 - 10 oz. Dixie Paper Bowels
Paint
Orange 2" Pompom Ball
Red Pompom Ball
Black Pipe Cleaners
Low Temperature Glue Gun
How to Make the Snowman Treat Dish Craft:
1. Glue the two 8 3/4" Chinet plates together bottom to bottom. This makes the bottom circle of the snowman.
2. Glue the edge of a 20 oz. bowel face up to the paper plates to make the middle circle of the snowman.
3. To make the head, glue two 10 oz. bowels together top to top as shown in the picture. Cut an orange pompom ball into a carrot shape and glue it to the head. Draw on a mouth and eyes with a permanent marker. (Note: You can substitute a large orange gum drop for the orange pompom.)
4. Fold black pipe cleaners into arm and hand shapes and glue them to the middle circle as shown in the picture.
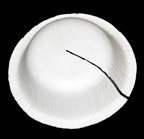
5. To make the snowmans hat. Draw a line from the center of a 10 oz. paper plate to the outside edge as shown in the picture. Cut on the line.
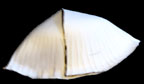 6. Bring the cut edge of the paper plate over the other cut edge to make the hat shape as shown in the picture to the left. Glue it closed with a hot melt glue gun. Smash down the hat a little as shown in the picture. Paint the hat with acrylic paint and let it dry. Glue a pompom on the top. Glue the hat to the head of the snowman as shown in the picture. Fill the snowmans body with goodies. White goodies work best.
©2005, Digital by Design, Inc. - See Copyright Information
How to Make Paper Snowflakes
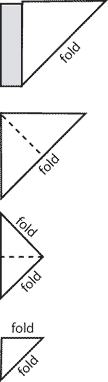
1. Using a standard 8 1/2 " x 11" paper, fold the paper so one corner touches the other side of the paper and is even with the straight edge. Cut away the part of the paper that is not covered by the folded-over edge. If you open up the folded paper you will have a square piece of paper. You can do this with any size paper.
2. Fold the paper in half again. As show in the diagram at the right.
3. Fold the paper in half again. As show in the diagram at the right.
4. There will be one side of the folded triangle that doesn't have any folded edges. This edge will be the perimeter of your snowflake. The other two sides
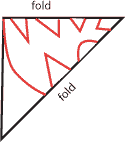
have folds. If you would like a round snowflake, cut the unfolded edge so that it has a rounded shape as show in the diagram below. Cut notches in the folded sides, but do not go all the way through to the other folded side or you will cut your snowflake in half.
5. If you cut a triangle shape from the tip of your triangle, as shown in the diagram, you will make a star shape in the middle of your snowflake.
©2005, Digital by Design, Inc. - See Copyright Information
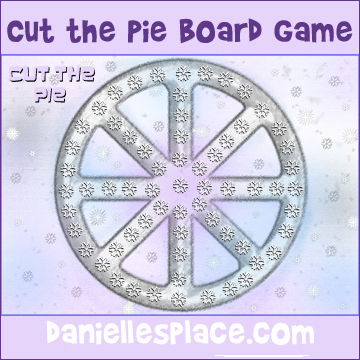
Cut-the-Pie Winter Fun Review Game
Children try to catch other players by landing on the same snowflake.
What you will need:
Card Stock (heavy paper)
Scissors
A Die
Markers or Playing Pieces for Each Player
Tape
How to Make Cut-the-Pie Winter Fun Review Game:
1. Print out the game board patterns onto card stock (heavy paper) and tape them together to make the game board.
Member's ![]()
2. Make up question cards for whatever you are reviewing. Use math fact cards if you are reviewing math facts.
How to Play:
1. This game is played similar to the outside winter game "Cut The Pie". To start players place their markers on any of the snowflakes on the pie shape. Each player must pick a different snowflake. Pick one player to be the tagger by the role of a die. The highest number gets to be the tagger. That player places his marker in the center of the pie.
2. Players take turns answering questions. If a question is answered correctly by a player, that player gets to throw a die and move that many spaces in any direction. When all the players have moved the player that is the tagger throws the die and tries to get the other player out by landing on a player (landing in the same space).
3. The last player left on the board besides the tagger wins and gets to be the new tagger.
4. When you have finished playing this game go outside in the snow and play "Cut the Pie". Make a large pie shape in the snow. One player is "it" and stands in the center of the pie. "It" runs around the pie trying to tag the other players. If a player is tagged, he is then the new "it" and must try to tag another person.
©2010, Digital by Design, Inc. - See Copyright Information
Winter Party Ideas
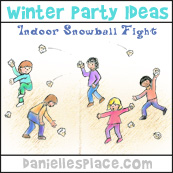
Go to the Winter Party Outreach Page for directions.
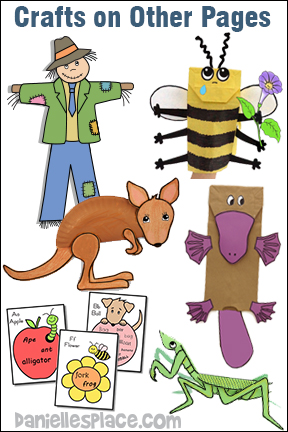
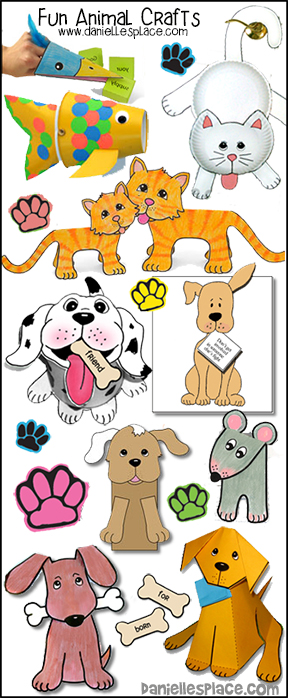
Winter Crafts on Other Pages
Also See
Bible Themes - Christmas Crafts