Bible Mini Golf Course Crafts for Sunday School
How to Make a Paper Mini Golf Courses for Bible School
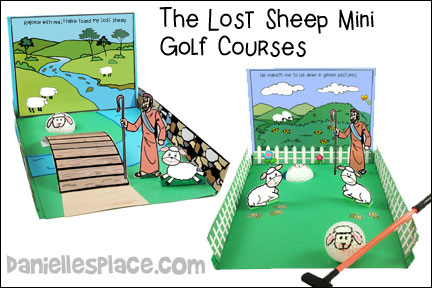
The Lost Sheep Mini Golf Courses availabe in color and black and white patterns. Two pages of patterns for each golf course.
Instant Download - ![]() - Includes both Golf Course Patterns in color and black and white.
- Includes both Golf Course Patterns in color and black and white.
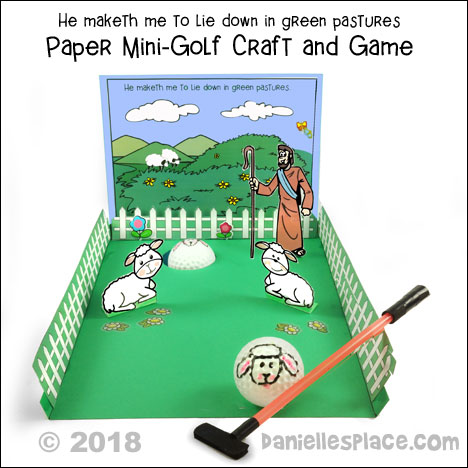
What you will need:
White, Green and Blue Card Stock (Thick Paper)
Elmer's Rubber Cement
Straight Edge Ruler
Drinking Straws and Craft Foam
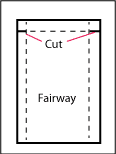
How to Make the Mini Golf Courses:
1. To make the fairway use a pen to mark off 1/2" on three sides of the paper, leaving one of the short sides unmarked. Press down hard when you draw the lines so you score the paper making it easier to fold. Cut a slit at the corners, fold up the sides and glue or tape the corners together.
2. To make the golf course backdrop and stand, print out the pattern onto blue card stock and fold all the lines back forming a small square at one end. Glue the end of the paper to the back of the paper to form the stand. (See the diagram below.)
3. Use the circle pattern to draw a circle on the fairway where your want the hole. Cut out the hole and then glue the fairway to the stand and backdrop as shown in the diagram below. This will give your golf course a slight slant and allow the ball to drop through the hole.
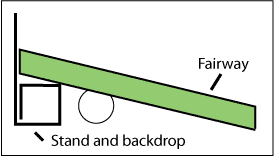
Mini Paper Golf Course Diagram
Fold the back drop and stand paper into a square shape and glue the end to the paper. Glue the fairway to the stand.
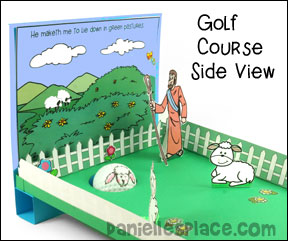
Side View of the Mini Paper Golf Course
4. Print out the green pastures backdrop, fence, sheep and shepherd pattern and cut them out.
Instant Download - ![]() - Includes both Golf Course Patterns in color and black and white.
- Includes both Golf Course Patterns in color and black and white.
5. Fold back the tabs on the bottom of the shepherd pattern and glue the bottom tab to the back of the shepherd pattern to form a triangle shape. Glue the shepherd to the fairway.
6. Fold back the tabs on the sheep and glue them to the fairway.
7. Glue the fence pattern around the edge of the fairway.
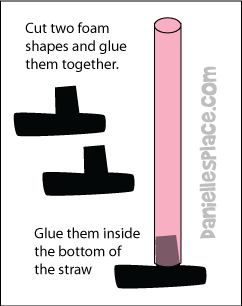
8. To make the straw golf club cut two matching head pieces from craft foam.
9. Cut a stem that you can stick up into the straw to keep the head on the straw.
10. Glue the two shapes together and then glue them inside the straw. Place some tape around the bottom of the straw just above the head. Wind some tape around the top of the straw to make the grip of the golf club.
© 2018, Digital by Design, Inc. -*See Copyright Information
"He Leads Me Besides Still Waters" Mini Paper Golf Course Game
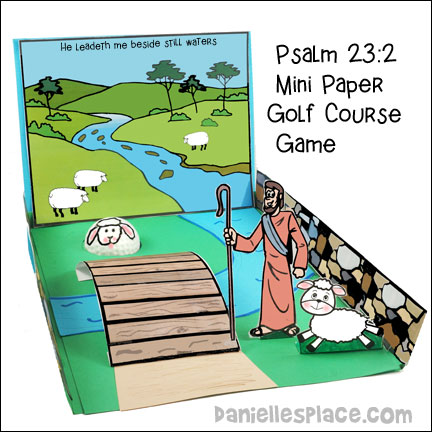
1. To make the "Still Waters" golf course follow the directions above.
(Printable patterns available to members on The Resource Room and as an instant download above.)
2. Cut a piece of blue paper to form the "still waters" that continues the stream from the background picture and goes across the page to the left side. Glue it to the fairway.
3. Glue the rock wall patterns to the sides of the fairway.
4. Cut a path shape from tan paper and glue it to the front of the fairway so it leads to the stream.
5. Fold back both ends of the bridge pattern and glue it to the fairway forming an arch over the stream.
6. Cut a two-inch hole just beyond the bridge.
7. Fold up the back tabs of the sheep and shepherd and glue them to the fairway as shown in the picture.
© 2018, Digital by Design, Inc. -*See Copyright Information


