Fantasy Crafts and Learning Activities for Children
Crafts Relating to Fairies, Dragons and other Fanciful Creatures
"King Bot's Adventure" Printable Learning Math Game
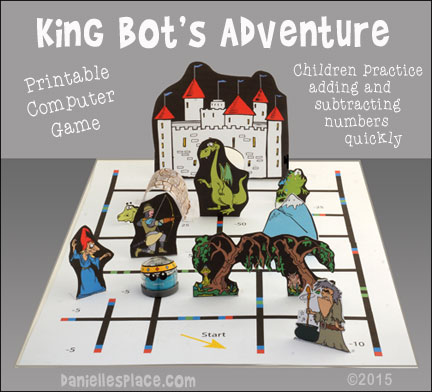
King Bot must find his way back to his castle, but the way is littered with obstacles. Can he avoid the evil wizard who confuses the way, travel through the enchanted forest avoiding the elusive troll and dragon, slide past the nasty witch without being delayed, explore the dark cave and escape without harm, and slay the giant dragon without running away in fear?
You never know which way this little robot king is going to go because he has a mind of his own! Play over and over with different outcomes each time. Children add up the points to see whose robot king can accumulate the most points while making his way back to his castle. This game is a way for children to practice adding and subtracting by positive and negative numbers.
Teachers can write different numbers on the game board to practice different math facts.
What you will need:
®Ozobot - If you don't have an ®Ozobot, you can purchase one from Amazon.com. Ozobot (See below to find out more about ®Ozobot.)
Printer Paper
White Cardstock - Heavy Paper
Scissors
Clear Tape
Colored Pencils
What to do:
1. Print out the Game Pieces, Game Board Pieces, and directions onto cardstock and cut them out.
2. Prepare the Game Board
Cut the end off one printed game board so that they overlap without a white gap. Glue the boards together with rubber cement and tape the back all the way across the middle of the board where they overlap.
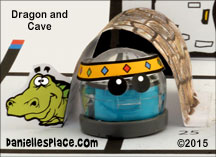
3. Cave
Color the cave pattern to look like rock on the side indicated on the pattern. Fold the tabs on the sides of the cave pattern and the dragon towards the colored side.
Glue the cave pattern onto the board where indicated bending the center of the pattern up to make a tunnel shape. (Make sure the dragon is facing towards the front of the game board.)
4. Dragon
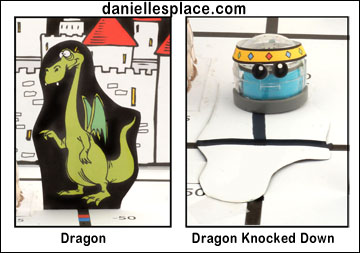
Score the fold on the front and back of the dragon with a sharp object, and then fold back the tab. Glue it to the game board where indicated. When the glue is dry press the dragon down flat on the game board and use the black marker that comes with the Ozobot set to draw a line on the back of the pattern to match up with the line that leads to the dragon just up to the perpendicular line that crosses underneath the dragon.
Draw the perpendicular line on the back of the dragon pattern to match the line below. You will have a large T on the back of the dragon. (If the game piece comes up behind the dragon, it will knock it over and follow the lines on the back of the dragon.)
5. Enchanted Forest
Cut out the pattern making sure to cut very closely to the branches that overhang in the center of the trees. Fold and unfold the hanging branches to make them bendable. Experiment with the ®Ozobot to see if it can pass under the branches without getting caught.
6. All Other Game Pieces
Fold up the tabs on the other game pieces and glue them to the game board where indicated.
7. Crown
Cut out the crown and glue it into a circle shape. Place a tiny rolled up piece of tape on the inside back of the crown so it will stay on the ®Ozobot's head.
Ozobot is a registered trademark of Evollve, Inc.
©2015, Digital by Design, Inc. - See Copyright Information
"The Bog Baby" Pompom Craft Learning Activities
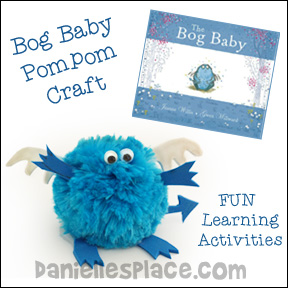
The Bog Baby - by Jeanne Willis and Illustrated by Gwen Millward
"The Bog Baby", a fanciful book about a little blue creature that appears after storms, will appeal to children of all ages. This book not only pricks the imagination of readers, but encourages them to use their imagination to write notes about their own bog babies, and suggests other creative activities to go along with the story.
What you will need:
Large Blue Pompoms
Blue and White Construction Paper
Small Wiggle Eyes
Tacky Glue
How to Make the Pompom Bog Baby
1. Read the story of "The Bog Baby" to your children. Ask them to describe what the Bob Baby looks like.
2. Give them each a pompom, wiggle eyes, and construction paper. Tell them to make their own versions of the Bog Baby or make one that looks like the Bog Baby in the story.
3. Draw the wings, tail, feet, and arms on construction paper, cut them out and glue them to the pompom.
©2015, Digital by Design, Inc. - See Copyright Information
Tissue Paper Bog Baby Picture
This craft goes along with the book "The Bog Baby - by Jeanne Willis and Illustrated by Gwen Millward
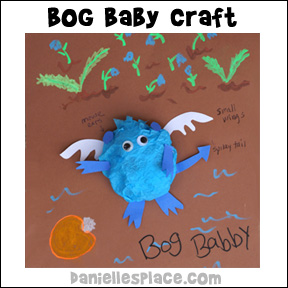
What you will need:
Blue Tissue Paper
Blue Construction Paper or Craft Foam
White Construction Paper or Craft Foam
Brown Construction Paper
Wiggle Eyes
White Glue
Check Jeanne Willis' website for even more creative ideas to use with this book.
"The Bog Baby" by Jeanne Wills
The little girls learn that If they really loved something the Bog Baby, they had to do what was best for him, no matter how much it hurts them. That was real love. So they let the Bog Baby go back where he belonged.
Also See the Dragon Crafts Page

