Bee Crafts Kids Can Make
Bee Crafts, Bee Projects, Bee Unit Study Ideas for Homeschool, Preschools and Daycares
Bee Bookmark Craft with Benjamin Franklin Quote and Writing Activity

This bookmark is a great way to inspire children to do their best. The pattern includes both a back an front panel that fold together.
You can make this craft into a learning activity by having your children write things they want to accomplish on the inside of their bookmarks.
©2014, Digital by Design, Inc. -See Copyright Information
Member's 
Instant Download Pattern - ![]()
Bee Printable Game Cards

Use these bee-themed printable cards to review site words, math facts, and other facts.
Help children develope their concentration and memory skills by playing a match game with the cards.
Use the cards to write facts about bees to play a game using the printable bee game board below.
Member's - ![]()
Instant Download Pattern - ![]()
©2014, Digital by Design, Inc. -See Copyright Information
Collecting Nectar Printable Bee Game Board
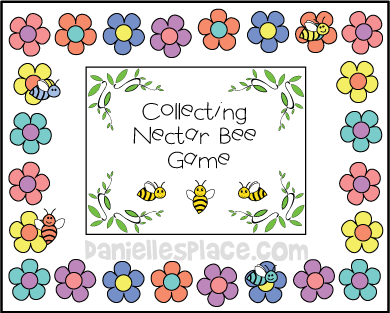
This game board is made from four sheets of card stock taped together with another sheet for the center of the board.
Have your children make up questions about bees and write them on the bee cards, above.
Use a hole punch to punch out at least thirty yellow circles to use as pollen. Place some "pollen" on the center of each flower. You can place more than one pollen circle on some of the flowers.
Use bee pictures as the playing pieces. Give each child a bee pattern and tell him or her to color it and draw a face on it.
To play children place their bees on any of the flowers of the game board. Then they take turns rolling a die and moving that many spaces forward or backward on the game board trying to land on a flower with pollen. If a player answers a question correctly, he or she gets to keep the pollen, if the flower the player landed on still had one. The child with the most pollen pieces at the end of the game wins.
Member's - ![]()
Instant Download Pattern - ![]()
Queen Bee Crown Craft

What you will need:
Yellow Paper
Scissors
Tape or Glue
Magic Markers
Plastic Gems
How to Make the Queen Bee Crown:
1. Before class cut out long strips of yellow paper to make the band twice as wide as you want the band to be. Make sure it is long enough to fit around your child's head. Fold the band in half.
Member's - ![]()
Instant Download Pattern - ![]()
2. Cut out triangle shapes to fit inside the band.
3. Glue the triangle shapes inside the folded band and then glue the crown into a circle shape.
4. To finish glue on gems or draw them on with magic markers.
©2014, Digital by Design, Inc. - *See Copyright Information
Bee Paper Bag Puppet Craft

What you will need:
White Card Stock (Heavy Paper)
Black Markers or Crayons
Scissors
White Paper
Colored Pencils
Tape
How to Make the Paper Bag Puppet Bee:
1. Fold back the corners of the bottom of the bag as shown in the picture and glue them down.
2. Use a marker or a black crayon to draw on the bee's stripes.
3. Fold a black Chenille stem in half and wind the ends around a pencil to make coils. Glue and tape the antennas to the back of the bag.
4. Cut legs from black paper and glue them to the bag.
5. Draw eyes and wings on white card stock, cut them out, and glue them to the paper bag.
Member's - ![]()
Instant Download Pattern - ![]()
©2014, Digital by Design, Inc. - *See Copyright Information
Bee Paper Plate Craft for Kids
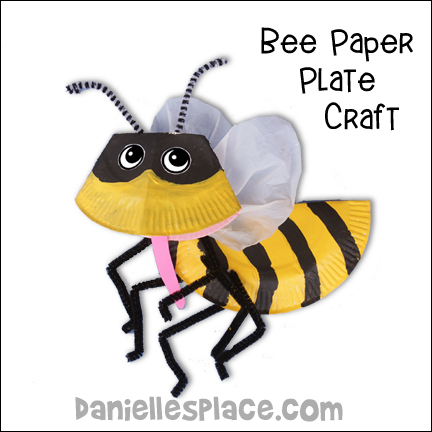
What you will need:
Six-Inch Paper Plates (Lunch Size)
Tissue Paper or White Plastic Grocery Bag
Yellow, Black and Pink Patio Paint
Low Temp Mini Glue Gun or Tacky Glue
Scissors
How to Make the Bee Paper Plate Craft:

1. To make the bee's head fold a 6-inch paper plate in half and then unfold it. Punch holes on the fold line for the antennae. Insert a Chenille stem into one hole and then up through the other. Bend down the ends.
2. Fold the paper plate in half again. Fold back the pointed ends, and then fold them forward.
3. Open up the folded plate a little and push folded sides into the center of the paper plate. Glue the sides together. (See Diagram.)
Member's ![]()
Instant Digital Download ![]()
4. Cut a slit in the back of the head. Overlap the paper plate in the back and glue it together to make a dart. This will make the mouth open slightly. Crease the front, bottom of the paper plate to make the mouth. (See diagram.)
5. To make the bee's body fold a 6-inch paper plate in half. Glue the head to the body.
6. Cut wing shapes from tissue paper or a white plastic bag. Scrunch up the end that connects to the body and glue them under the head.
7. Cut Chenille stems in half, fold them into leg shapes and then glue them to the body as shown in the picture. You can punch holes in the body paper plate and insert the legs into the holes and tape them to the inside of the body.
8. To finish, cut the eyes from the pattern (or draw them) and glue them to the head. Place the Bible verse card in the bee's mouth. Use a piece of tape to secure the card to the mouth.
©2014, Digital by Design, Inc. - *See Copyright Information
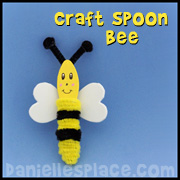
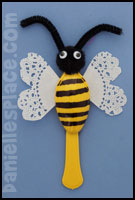
Bee Craft - Bent Spoon Bee Pocket Buddy Craft for Kids
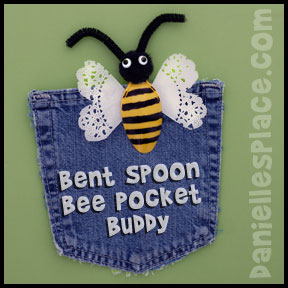
What you will need:
Cheap Plastic Yellow Spoons
Black Sharpie Permanent Marker
Low Temp Mini Glue Gun or Two-Sided Tape, and Elmer's Tacky Glue
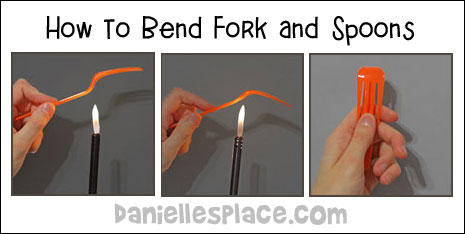
How to Make the Bent Spoon Bee Pocket Buddy Craft:
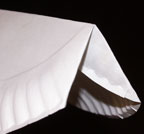
1. Hold a plastic spoon in your left hand (if you are right-handed) so that it is parallel to the table with the concave side facing down (The picture to the right shows a fork, but it is the same technique.)
2. Hold the lighter with your right hand underneath the spoon near the top of the handle where the head of the spoon meets the handle. *Do not hold the lighter too close to the fork because it could catch fire. You only want to heat it up.
(This part of the craft is for adults only. Children should not use lighters.) When the spoon starts to melt and bend remove the lighter and bend the head spoon down so that it meets the handle. Hold it in place for about ten seconds until the plastic hardens.
3. To make the bee's body draw stripes on the spoon with a permanent marker as shown in the picture above.
4. To make the wings of the bee cut heart shapes from the paper doily or just regular paper and glue them to the inside of the spoon.
5. Glue a one-inch black pom pom to cover the bend in the spoon for the bee's head.
6. To finish glue on wiggles eyes and black pipe cleaners for the antennae.
©2013, Digital by Design, Inc. - *See Copyright Information
Examine a Beehive and Make a Beehive and Bee Picture

If possible, bring in an abandoned beehive for the students to examine. Provide magnifying glasses so they can get an up close look!
What you will need:
Old Beehives if Available, or Pictures from the Web
Dark Colored Paper
Black and Brown Marker (We Used the Black and Sharpie Bronze Metallic Fine Point Permanent Markers
Yellow and White Acrylic Paint - Use Opaque Paint
One-Inch Paint Brush
Bubble Wrap with the Small Bubbles
How to Make the Beehive and Thumbprint Bee Picture:

1. Cut a piece of bubble wrap the shape of a beehive.
2. Turn the bubble wrap over to the bumpy side and paint over the area using a large paint brush and yellow paint.
3. Turn the painted side of the bubble wrap over and press it down on a piece of colored construction paper.
4. When the paint is dry trace around the edge of the hive with a dark marker.
5. Draw a tree branch at the top of the beehive using markers or crayons.
6. To make the bees dip your pointer finger in yellow paint and press your it down on the paper around the beehive. Clean off your finger and dip just your finger tip in white paint. Press it down near the yellow fingerprints to make the wings. When the paint is dry outline the bee's wings and draw in stripes with a dark marker.
©2013, Digital by Design, Inc. - *See Copyright Information
Bee with Pollen in Pollen Sacs Printable Picture
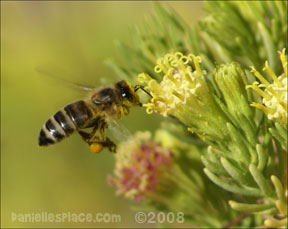
Female bees collect pollen that will be used to make honey. They collect the pollen by combing off any pollen that has stuck to their antennae and hairs on their face. The pollen is then transferred to pollen sacs on the bee's hind legs.
Click on the image to see a larger image online
Print out the image for your children to use with their homeschool projects or reports about bees. Please leave the www.daniellesplace.com and copyright on the image.
Member's ![]()
Free Instant Download - ![]()
©2008, Digital by Design, Inc. - *See Copyright Information
Yellow Carpenter Bee Printable
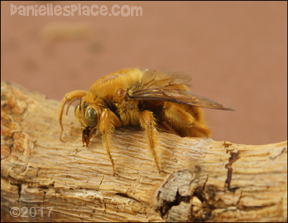
Image of a male Valley Carpenter Bee. The females of this species are metallic black while the males are fuy and golden yellow with green eyes.
They are called carpenter bees because they excavate holes inside trees and wood.
Print out the image for your children to use with their
homeschool projects or reports about bees. Please leave the www.daniellesplace.com and copyright on the image.
Member's ![]()
Free Instant Download - ![]()
©2017, Digital by Design, Inc. - *See Copyright Information
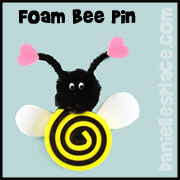
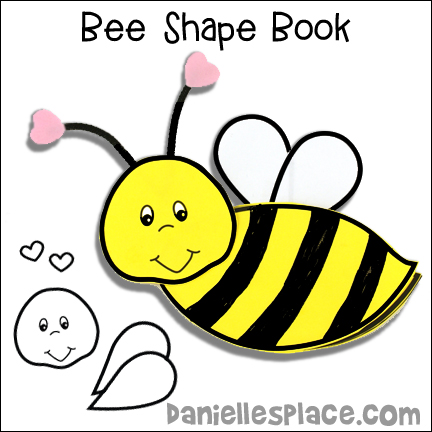
Bee Shape Book Craft for Kids
What you will need:
Yellow Card Stock (Heavy Paper)
White Printer Paper
Tape
Black Crayons or Markers
Black Chenille Stems (Pipe Cleaners)
Small Foam Hearts or Hearts Cut from Pink Construction Paper
How to Make the Bee Shape Book Craft:
1. Draw a bee body shape and head shape on yellow card stock. Do not draw the head and body attached. Cut out the body shape and use it as a template to draw another matching body shape from the yellow card stock. Use the same shape as a template to make the pages of your book. Cut all the body shapes out and staple them together with a yellow body shape on the top and bottom.
Members ![]()
Instant Digital Download ![]()
2. Cut out the head shape and glue it to the front of the bee as shown in the picture above.
3. Draw wing shapes on white printer paper, cut them out and glue them to the back of the book.
4. Fold half a chenille stem in half and tape it to the back of the head. Glue heart shapes to the ends of the chenille stems.
©2009, Digital by Design, Inc. - *See Copyright Information
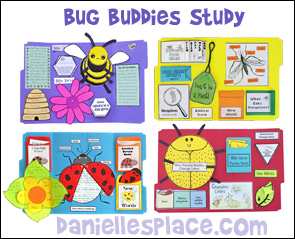
Bee Shape Book Craft for Kids
This craft comes from the Bug Buddies Studies a series of twelve lap books lessons. See below for more crafts and activities from this study.
This book can be used for many purposes. Children can write facts about bees, write words that start with the letter "B", write a short story about a bee, etc.

What you will need:
Printer Paper
Black and Yellow Paper
Crayons
Tape or Glue
Stapler
How to Make a Bee Shape Book Craft:

1. Draw six circles, one each 5 1/2" on black paper, 5 1/4" on yellow paper, 4 1/2" on black paper, 4 1/4" on yellow paper, 3 1/2" on black paper, and one 3 3/8" for the head on yellow paper. Cut out six legs and two antennae from black construction paper. Draw wings on white paper and cut them out. Draw a face on the smallest circle.
Member's - ![]()
Instant Download Pattern - ![]()
2. Place all the circles, except the head, one on top of the other, starting with the biggest black circle. Place each smaller pattern on top of the larger pattern. Align all the circles so that they are even at the top and staple them at the top.
3. Glue the legs onto the black body pieces as shown and the antennae to the head. Glue the head onto the body covering the staple as shown. Glue the wings to the back of the book.
©2008, Digital by Design, Inc. - *See Copyright Information
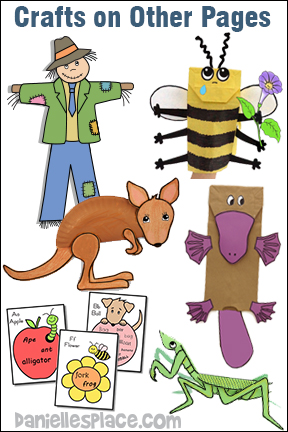
Also See Bee Crafts Page 2