Lighthouse Crafts and Learning Activities
How to Make Lighthouse Crafts
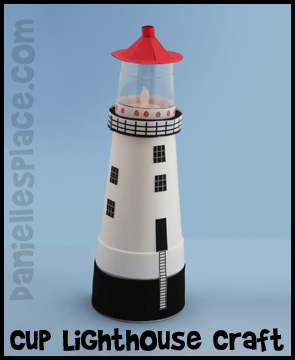
Perch Rock Lighthouse Cup Craft and Learning Activity
What you will need:
Three-20 oz. Styrofoam Cups
Clear Plastic Cup
Red and White Printer Paper
Glue
Black Fun Foam
Scissors
How to make a Lighthouse from Cups:
1. Print out the lighthouse patterns. Print the lighthouse roof onto red paper and the windows, railing, and ladder onto white paper, and cut them out.
2. The clear plastic cup should fit snuggly onto the bottom of the Styrofoam cup like a cap. If you can't find the clear plastic cups that fit on the bottom of the Styrofoam cup you can cut a plastic cup to fit and just tape it to the bottom on one side so that it can be lifted up to turn on and off the light.
3. Cut black craft foam into 1/2" strips and glue the strips around the top of the clear plastic cup making two layers on top of each other. Glue the railing pattern on top of the foam strips with the thicker line towards the top of the cup. The top of the cup will actually be the bottom of the light part of the lighthouse. See the diagram to the left.
4. Color the light shapes red on the light pattern. With the cup upside down, glue the strip right above the railing. See diagram to left.
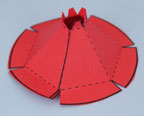
5. To make the roof of the lighthouse cut out the pattern on the dark lines. Fold on the dotted lines. Fold all the dotted lines at the outside of the pattern and on the inside up. Fold all the rays back. Glue the pattern together overlapping the two end sections completely. You should have six sections showing in a circular shape. See picture above.
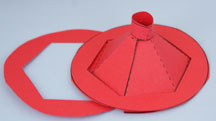
6. Cut out the middle of the circular shapes (roof eaves) and glue one of the shapes over top the flaps that are sticking out to cover them and glue the other to the bottom.
7. To finish curl up the small rectangle shape and glue it to the top of the roof over the tiny flaps. (See picture)
8. To make the bottom of the lighthouse stick three-20 oz. cups together and turn them upside down. Cover the lips of the bottom two cups with black craft foam or paint them black.
9. Glue the windows, door, and ladder in place.
10. To finish place a flameless candle on top and place the top of the lighthouse over the candle.
©2012, Digital by Design, Inc. - See Copyright Information
Paper Lighthouse Craft
This lighthouse is made from poster board, paper and plastic cups, a paper plate, and a screw band from a Mason Jar (canning jar). It was painted with acrylic paint and small rocks were glued to the paper plate base.
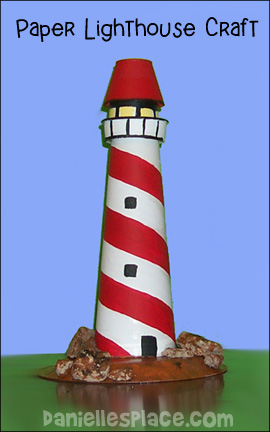
description
What you will need:
White Poster Board
1 - 9 oz Paper Cup
1- 5 oz. Juice/Dessert Plastic Cup (It should be much wider at the top than at the bottom.)
1- 6 oz. Juice/Dessert Plastic Cup (It should be pretty straight.)
A Heavy Duty Paper Plate
Regular-sized Screw Band from a Mason Jar (canning jar)
Acrylic Paint
Hot Melt Glue
Rocks
How to Make the Lighthouse:
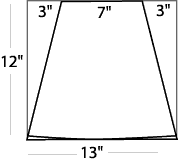
1. Cut the poster board to form the base of the lighthouse. On a piece of white poster board draw a quadrangle.
To make the quadrangle draw a rectangle that is 13" wide and 12" high. Measure 3" in from the top on each side of the rectangle (as shown in the illustration).
Draw lines from the 3" marks down to the bottom corners as shown in the picture. The top of your quadrangle should be 7" wide and the bottom should be 13" wide.
Cut the quadrangle out.
2. Glue the sides together to make a cone shape.
3. Cut the bottom so that it sets on the table flat. (If you are going to add stripes, you may want to paint them on before you glue the sides together.) Glue the bottom of the base to the middle of a heavy duty paper plate.
4. To make the railing, cut 1" off the top of the 9 oz. paper cup. Discard the rest. Place the screw band and inside the the paper cup top so that the rim of the screw band and the rim of the paper cup are both facing up. They should fit snugly together. Glue them together. Slide them down over the top of the lighthouse poster board base. Glue them in place.
5. To make the windows where the light comes through place the 6 oz. plastic cup upside down inside and on top of the screw band and lid and glue down.
6. To make the roof of the lighthouse, glue the 5 oz. plastic up upside down over the 6 oz. plastic cup.
7. To finish paint the lighthouse and base with acrylic paint. Glue on rocks to the base.
©2005, Digital by Design - See Copyright Information
Lighthouse Picture with Frame
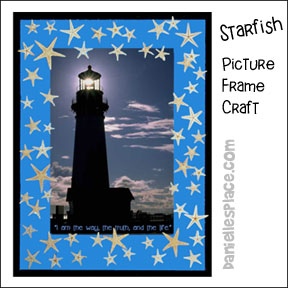
What you will need:
Paper
Color Printer
Card Stock (Heavy paper)
White Glue
Mini Starfish in natural colors and multi colors or assorted Seashells.
How to make:
1. Print out a lighthouse picture and cut it out.
2. Glue the picture to a piece of cardstock that is about one inch bigger on each side.
3. Glue the picture to the cardstock. Glue sea shells or star fish to the frame to finish.
Books About Lighthouses


