Caterpillar Crafts and Learning Activities Page 2
How to Make Crafts and Learning Activities Relating to Caterpillars
Pool Noodle Caterpillar Craft and Learning Activity
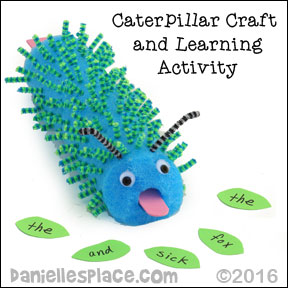
Not only do these caterpillars make a great craft, but they are a great learning tool. The tongue of the caterpillar can be moved in and out to make it look like it is eating. Use the caterpillar to review sight words, letters, numbers and much more.
What you will need:
Chenille Stems (About 12 per Caterpillar)
Pink Craft Foam
Scissors or Wire Cutters
Googly Eyes
Serrated Knife (Bread Knife)
Electrical Tape or Washi Tape (optional)
Small Stickers (Optional)
Pompoms
How to Make the Caterpillars:
1. Cut off a 8" - 9" piece of pool noodle with a serrated knife. Round the edges at one end to make the face. (Note - Instead of making a head shape, you can just have your children glue large pompoms onto the front of the noodle for a head.)
2. Cut the Chenille stems into one-inch pieces. Cut two longer pieces for the antennae. (If you don't have Chenille stems,you can have your children use Washi tape or electrical tape and/or stickers to decorate their caterpillars.)
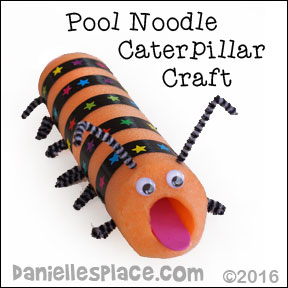
3. Have your children poke the Chenille stem pieces into the pool noodle to cover the entire noodle.
(To make this an educational activity ask your children to estimate how many pieces they think they will need to complete the caterpillar, and then have them count the pieces as they place them in the foam.
Compare their estimation to the actual number of pieces they used.)
4. To finish glue googly eyes to the face. Cut a piece of pink craft foam for the tongue just wide enough to fit in the hole of the noodle and longer than the noodle so that it can be slipped in and out easily.
More Educational Activities:
1. Review words, letters, and numbers - Write words, letters, or numbers on paper leaf shapes. If a child can say the word, letter, or number he gets to feed it to the caterpillar. If the child feeds the caterpillar and doesn't know the word, or says it wrong, the caterpillar spits it out and the child must try again. Have the child place the paper leaf with the word on the tongue of the caterpillar, pull the tongue in from the end of the caterpillar to make it look like it is eating it. Let the word fall out the back of the noodle into your hand if the child was correct. If he was incorrect, push the tongue back out with the leaf still on the tongue.
2. Creative Play - Read "The Hungry Caterpillar" to your children and then have them use their caterpillars to make up their own stories. They can draw small pictures of things the caterpillar might eat, cut them out, and use them as props for their stories.

This is a preschooler tested craft!
Aliya enjoyed making the caterpillar craft, and found playing with it even more satisfying. She discovered placing the Chenille stem pieces in the caterpillar wasn't difficult, but was satisfied with using just a handful of them in strategic places.
Watch how Aliya, age 3, makes this craft on our Youtube Channel to see how your children might like this craft.
©2016, Digital by Design, Inc. -*See Copyright Information
Coffee Filter Butterfly Craft
Food Coloring and Ear dropper or a Small Paint Brush or Water Color Paint
Chenille Stems - Pipe Cleaners for the Antennae
How to Make Coffee Filter Butterfly:
1. Paint two crafts spoons on one side.
2. Glue eyes on the front of the spoon and antennae onto the back of one spoon.
3. Flatten both coffee filters and cut one so it is smaller than the other.
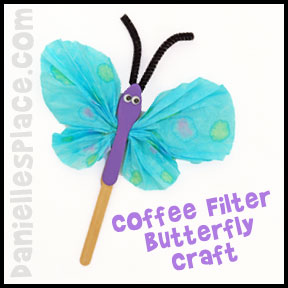
4. Bunch up both coffee filters in the center to form wings. The large coffee filter makes the top of the wings and small coffee filter makes the bottom of the wings. Glue both filters onto the craft spoon to form the butterfly as shown. Glue the larger filter just below where the head of the caterpillar will be with the bunched up center of the filter on the craft spoon. Glue the smaller filter below the larger filter so that it is center on the craft stick. Glue the craft stick onto the bottom of the spoon for a handle.
5. Glue pipe cleaners behind the head for the antennae. Then glue the other painted spoon onto the back of the butterfly.
6. Place water in three or four cups. Add drops of food coloring to each cup. (The more food coloring you use and the less water the brighter the butterfly).
7. Place the butterfly on a paper towel. Now using the ear dropper drop the colored water onto the butterfly to make a pretty design. Let dry.
If you don't have food coloring you can just use water color paint. Add large drops of water to the paint so that you have a puddle of colored water. Then dip your paint brush into the water and then let it drip over the coffee filters.
8. When the butterfly is dry glue on wiggle eyes.
I pre-paint the wooden spoon with a glitter paint, and hot glue the coffee filters to the back of the spoon after first stapling the filter scrunched in the middle. I only use two colors of food coloring, and let the children use Q-tips to apply the color instead of paint brushes. I also glue on loose eyes ahead of time and use pipe cleaners for the antenna. In class I let the kids stick on little butterfly stickers or stars onto the wings after they dry.
I also use a pipe cleaner to make a caterpillar. I bend the pipe cleaner over and over until it is about 1 1/2 " long and wrap the remainder around it and use a black marker to put little eyes at the top. Then I bend it to look like an inchworm and give one to each child!!! They just love it! God Bless, Lorie Kelly
©2007, Digital by Design, Inc. -*See Copyright Information
Caterpillar Changing to Butterfly Folded Paper Craft
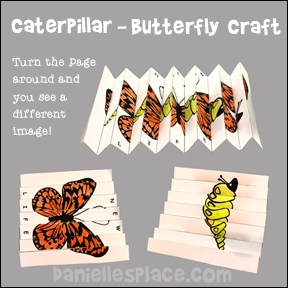
This picture looks like a picture of a caterpillar when you look at it from one direction and a butterfly when you turn the paper around and look at it from the opposite direction.
The pattern is printed out onto legal-sized paper. Children color the picture and then fan-fold the paper.
A printable pattern for this craft is available to members.
©2007, Digital by Design, Inc. -*See Copyright Information
Watch a Caterpillar Turn into a Butterfly in Timelapse
Inchworm Activities
Inchworm Crawl
Place both hands on the ground. Try to keep your knees stiff and legs straight. Walk forward with you hands as far as you can and then walk forward with your feet to meet back up with your hands.
Inch Along
An inch is a unit of measurement (noun or a thing) but it can also be a verb or something that show action. To inch along means to move very slowly. Let's see how slowly we can move. Tell the children to line up against one wall and on the word go they are to try to inch along as slowly as they can. They must keep moving forward but move as slowly as they can.
©2007, Digital by Design, Inc. -*See Copyright Information
Inch, Little Inchworm, Inch Along
Written by Carolyn Warvel
(Sing to the tune of "Hush Little Baby"
Inch, little inchworm, up a tree,
Measuring everything you see.
Measuring's fun, don't you agree?
Inch by inch, one, two, three.
Inchworm, please, won't you measure me?
Up my leg and over my knee.
Oh, please, stop. You're tickling me.
©2007, Digital by Design, Inc. -*See Copyright Information
Craft Spoon Butterflies Craft
What you will need:
How to Make Craft Spoon Butterflies:
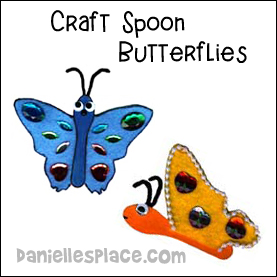
1. Print out free pattern and trace on to felt foam sheets or paper that has been painted and folded over to make paint blobs. Use the foam sheet if you want a firm body.
These are great for hanging on a mobile for example. Use felt pieces if you want a flimsy body that is good for a butterfly puppet. Just add a craft stick to the bottom of the butterfly. The wings will flap back and forth when the butterfly is waved up and down. The paint blob paper is good to use for refrigerator magnets because it isn't as heavy. If you are making the sideways butterfly, use only half of the pattern.
2. Paint two crafts spoons for each butterfly with desired color and let dry. You only need to use one for the refrigerator magnet.
3. Glue the painted spoons onto the middle of the wings one on each side. Glue on eyes chenille stems for antenna and anything you want to decorate the butterfly with. If you are making the puppet glue a craft stick on the bottom of the first spoon and then add the other side. Add a magnet to the back if you are making the refrigerator magnet.
©2007, Digital by Design, Inc. -*See Copyright Information
Also see Caterpillar and Butterfly Crafts Page 1

