Egyptian Crafts and Learning Activities for Children
How to Make Egyptian Crafts and Activities

Egyptian Costume Craft
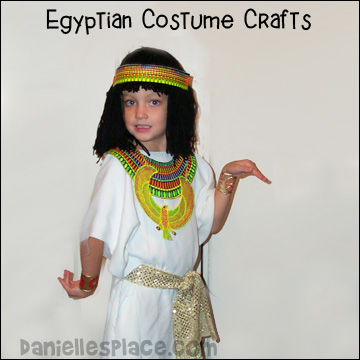
What you will need:
White Material that Doesn’t Fray
Scissors
Shiny Material for Belt
Black Wig
Black Eyeliner
See below for other material for the head band, bracelets, etc.
How to Make an Egyptian Costume:
1. To measure the amount of material you will need measure your child from floor to neck and double the length. Have your child raise his or her arms out parallel to the floor. Measure from elbow to elbow. That is how wide you will need the material.
2. Fold the material in half lengthwise.
3. Cut a small half circle in the middle of the fold just big enough for the neck.
4. Cut a slit about 3 inches down from the neck toward the back of the costume. See if it fits over your child’s head. If it doesn’t, make the slit longer. You can hem the costume if you would like, but it isn’t necessary.
5. Cut a shiny piece of material for a belt and tie the costume closed with the belt. Have your child wear white clothes underneath the costume.
6. Add a black wig and the other accessories below. Your child will love helping you color them and decorate them. For any extra touch use glow in the dark paint.
©2008, Digital by Design, Inc. - See Copyright Information
Egyptian Headbands

What you will need:
Card Stock
Scissors
Highlighter Markers
Yarn
Pony Beads
Hole Punch
Beads
How to Make Egyptian Headbands:
1. Print out the patterns and cut them apart. If you are making this for a small child, you will only need one pattern. If you are making it for an adult or older child, you will probably need one pattern plus half of another. Tape the two together. You don’t want the headband to reach all the way around the head. It will be tied on with yarn in the back.
Member's ![]()
Free Digital Download 
2. Use highlighter markers to color the armband and headband.

3. Punch two holes at each end of the headband.
4. Cut a piece of yarn at least 24” long. String one piece of yarn through both holes and pull it through so that the yarn lengths are even.
5. Tie a knot about one inch from the end of the headband. String on 3 or four beads putting the beads through each string as shown.
6. Tie a knot after the beads. String on some more beads, 6 - 10 and tie another knot at the end. Cut the yarn so it is even. Do the same thing on the other end of the band. Tie the band on your head so that the bead hang down your back.
©2007, Digital by Design, Inc. - See Copyright Information
Egyptian Bracelets
What you will need:
Card Stock
Three Dimensional Paint
Gold Spray Paint
Scissors
Tape
How to Make Egyptian Bracelets:
1. Print out the patterns.
Member's ![]()
Free Free Digital Download
2. Use three-dimensional paint to outline the shapes.
3. When the paint is dry use gold spray paint to paint over the entire bracelet. Add more 3D paint on top.
4. Cut out the bracelet to fit your arm or ankles and tape them on.
©2007, Digital by Design, Inc. - See Copyright Information
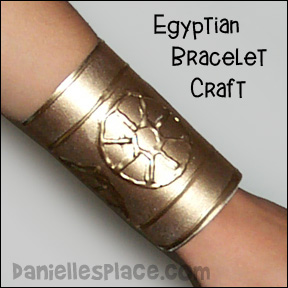
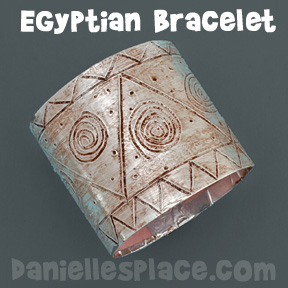
Silver Tape Egyptian Bracelet Craft
What you will need:
Utensils to Engrave the Tape Such as a Ballpoint Pen, Straws, the End of a Paintbrush, and the Tines of a Fork
Card Stock Paper (Heavy paper)
Scissors
Black Acrylic Paint
Velcro Brand Sticky Back Coins
How to Make a Silver Tape Egyptian Bracelet:
1. Cut a piece of craft foam to fit around your wrist and 1/2" - 1" narrower than the tape you are using.
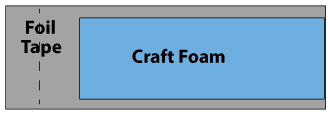
2. Cut the aluminum foil tape the length of the craft foam plus two inches. Pull the backing away from the foil tape and stick it on the craft foam piece so that the edges are overlapping on each side except for one of the short sides.
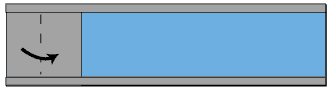
3. Fold the extra two inches of tape over onto itself at one end of the bracelet to make a one-inch tab at the end of the bracelet.
4. Place a piece of craft foam under the one-inch tab you created by folding the tape and then engrave the tape bracelet with a ball point pen or other blunt object pressing down on the foil tape with blunt objects.
5. To make the bracelet look old paint black acrylic paint over the entire surface, then pat off the extra paint with a dry folded paper towel.
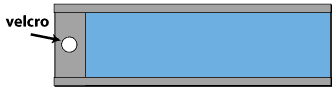
6. To finish place velcro tabs on each end of the bracelet.
©2010, Digital by Design, Inc. - See Copyright Information
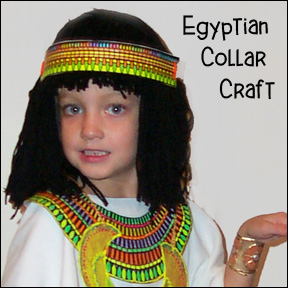
Egyptian Collar (Wesekh) Craft for Kids
What you will need:
Legal Sized Paper
Crayons or Markers (Highlighter Markers Work Great)
Hole Punch
Yarn
Tape
How to Make an Egyptian Collar (Wesekh):
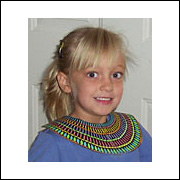
1. Print out the pattern and cut it out.
Member's ![]()
Free Free Digital Download
2. Color the two halves of the collar.
3. Tape them together as shown. Punch a hole on each side and tie two pieces of yarn in the holes.
4. Tie the collar on with the yarn. If you don’t want to punch holes, you can tape or staple the yarn on.
5. I strongly recommend using the Highlighter brand (don't get the cheap ones) markers for this craft. Every collar made will come out beautiful. These work great because they don't cover up the black of the pattern. A child who is not good at coloring can color wherever they like and they will still look beautiful. They can color a whole row at one time or color individual spaces. Also overlapping two colors makes a new color. These markers may be more expensive but they last a very long time.
Printing Instructions - If you would like to change the size of the patterns or print them as big as possible do the following:
1. Click on File and then Page Setup in Internet Explorer at the very top left-hand side of the page under the web address. Change the paper size to legal.
2. Delete the characters in the Header and Footers so that the web site address does not print. Click OK.
3. Then click on the link to the pattern above. When the pattern appears in a new window click on Print Preview at the top of the page. In Print Preview move the margin arrows at the top of the page as far left and right and up and down as possible by clicking on them and moving your mouse in the direction you want them to move. Set the print size to Custom and type in 135%. This should blow the patterns up to about as big as you can print them on legal-sized paper. Make sure you have legal-sized paper in your printer. Click on Print or the printer icon at the top left-hand side of the page.
If your printer doesn’t allow this, print out the patterns and cut them out. Glue each side on the middle of a sheet of paper. Place them in a copy machine and copy them at 135% or bigger.
Paper Plate Egyptian Collar
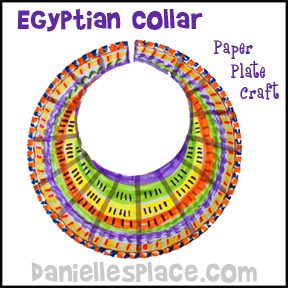
What you will need:
9-inch or Larger Paper Plates
Scissors
and Markers (highlighter markers work well)
What to do:
1. Before class cut a 4 1/2" circle at the top of a paper plate one inch from the top.
2. Show your children pictures of authentic Egyptian collars and then have them color their paper plates with markers and highlighters.
©2007, Digital by Design, Inc. - See Copyright Information
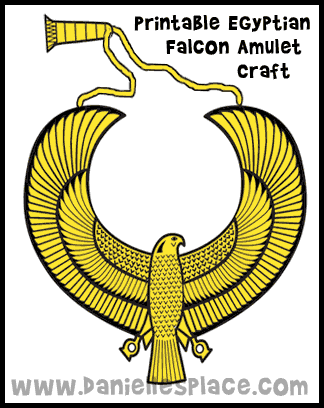
Egyptian Falcon Amulet Craft for Kids
What you will need:
Heavy Card Stock (Yellow or Gold Color Works Best)
Scissors
Yarn
Gold Paint (DecoArt Patio Paint worked great)
Tulip Pearl Dimensional Fabric Paint or Something Similar
Glitter 3D Paint
How to Make an Egyptian Falcon Amulet:
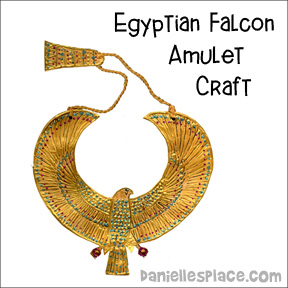
1. Print out the pattern onto card stock.
Member's ![]()
Free Free Digital Download ![]()
2. Paint the pattern all over with the gold patio paint or similar paint. Don’t paint it on too thick. You want to be able to see the lines.
3. When the paint dries use the dimensional paint to give the amulet a 3D look. Outline the pattern and go over all the lines.
Fill in the belly of the falcon with dots. Use other colors of 3D paint to paint the eyes and make dots to look like gems.
4. Punch holes in the wings of the falcon at the top and one in the smaller piece. Tie yarn as shown. The smaller piece hangs down your back.''
©2007, Digital by Design, Inc. - See Copyright Information
Egyptian Straw Bracelet Craft for Kids

What you will need:
Straws
Yarn
Gold Paint
Needles
Scissors
How to Make an Egyptian Straw Bracelet:
1. Cut the straws up into 1 1/2” pieces or whatever size you would like.
2. Cut a long piece of yarn. Place a needle on each end of the yarn.
3. Insert one end of the yarn through one of the straw pieces and pull the yarn through so that the straw is at the half way point of the yarn.
4. Insert one end of the yarn through another straw piece and push the straw down so that it touches the other piece. Insert the other end of the yarn through the opposite end of the straw piece that you just put on and pull the yarn tight.
5. Keep going like this until you have enough pieces of straws on your bracelet to fit around your arm.
6. When you are finished tie the ends of the yarn together.
7. Cut a short piece of yarn and thread it through the first piece of straw you put on. Tie the ends together.
8. Spray paint the bracelet gold.
©2007, Digital by Design, Inc. - See Copyright Information
Camel Textured Crafts and Learning Activity
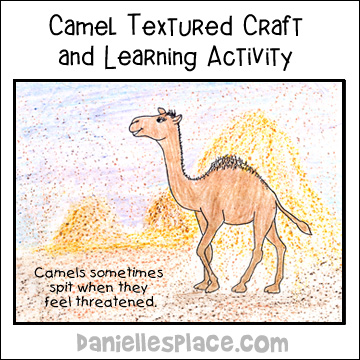
Children place sand paper underneath the camel picture and then place a crayon without its wrapper on its side and rub over the picture. A sand texture will appear on the paper. They can make sand dunes and other desert features. Experiment with different grits of sand paper.
After studying about camels have your children write a fun fact about camels on their finished papers.
Available to members and as an instant download.
Member's
Instant Digital Download -
©2007, Digital by Design, Inc. - See Copyright Information
Egyptian Papyrus
Use real Egyptian papyrus paper to write Egyptian hieroglyphics!
10 Blank Egyptian Papyrus Sheets for Art Projects and Schools 8x12in 20x30cm
Use this unique paper to make Egyptian crafts such as bookmarks and covers for books.
Study how Egyptians made paper from the papyrus plant. After harvesting the long reed-like stalks, the Egyptians peeled away the outer fibers leaving the soft inner core. They soaked the remaining strips in water for about three days which made the fibers softer and translucent. After three days the strips were rolled flat and cut to the desired length. Then the strips were pounded flat and placed side by side. Another layer of strips were placed on top of the first layer in the opposite direction. The sheet is pounded again to force the fibers closer together and placed under a heavy weight until it is dry. The sugar (starch) in the fibers act as a glue bonding the fibers together.