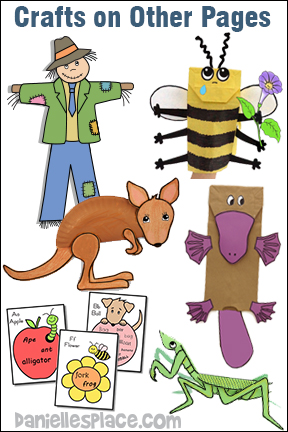
Snake Crafts and Activities for Kids
How to Make Crafts and Activities Relating to Snakes
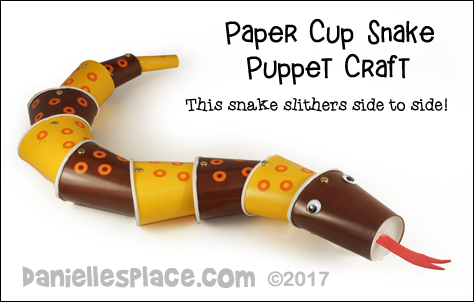
Paper Cup Snake Puppet
What you will need:
9 oz. Brown Paper Cups and 9 oz.Yellow Cups or Any Color
Reinforcement Labels or Round Labels
Scissors
Low Temperature Glue Gun
How to Make the Paper Cup Snake:
1. Attach the head cup to the body cup.Punch holes on opposites sides of the top of the head cup. Place the head cup on the first body cup so that the top of the head cup is about one inch covering the bottom of the first body cup. Use a sharp object to punch a hole through the holes on the head cup and down through the body cup. Use brass fastenesr to attach the cup.
Watch our "View it and Do it! Craft video to see how me make an alligator cup puppet which is similar to the snake. Follow the directions below to see how the snake is made differently.
2. Punch holes in the first body cup about 1/2" from the top of the cup. Place another cup inside the first body cup and attach it the same way you did the head.
3. Attach at least three more cups in the same manner to make a long body.
4. To make the snakes body taper down at the end of its body cut the next cup a little smaller. Cut the white edge off the top of the cup. Cut lines down opposite sides of the cup all the way to the bottom. Attach the cup in the same manner with the cuts at the sides of the snake and the holes for the brass fasteners at the top and bottom. Do not glue the sides of the cups together yet.
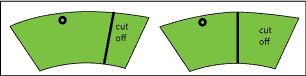
5. The next to tail cups need to be much smaller. Cut the next two cups as follows: Cut off the top edge of the cups and down the side of the cups and then cut off the bottom part. Open up the cups.
Cut 1/4 off the first cup and 1/3 off the second cup. Punch a hole at the top, center of the wide end.
6. Attach the second end cup to the first end cup that is already on the alligator. Punch a hole at the top of the first tail cup on the snake and place the second tail cup under the first one matching up the hole. Place a brass fastener through the hole of both cups and spread out the legs of the fastener. (The last two cups will only be attached at the top and not the bottom.
7. Add the last cup in the same manner.
8. Once all the end cups are attached, glue the sides of the cups into a cone shape making sure the second end cup is inside the first one. Then glue the second end cup into a cone shape making sure the last end cup is inside the second. Glue the last end cup into a cone same.
9. Cut a snake-shaped tongue from red craft foam and glue it to the top of the head cup with a glue gun.
10. To finish glue on to googly eyes and just reinforcement labels or circle labels to decorate your snake. If you don't have labels you can use permanent markers.
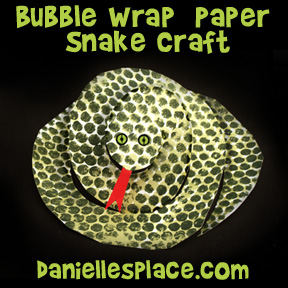
Bubble Wrap Print Paper Snake Craft for Kids
What you will need:
Card Stock (Heavy Paper)
Bubble Wrap with Small Bubbles
Acrylic Paint
Red Paper
Black Marker
Scissors
One-inch Paint Brush
How to make the Bubble Wrap Snake Craft:
1. Cut the biggest circle you can from the card stock. Cut a piece of bubble wrap the same size as the circle. You may want to experiment with different color combinations so make more than one circle. You can use the spiral snake pattern if you prefer. Just print it out on card stock (Heavy Paper) and then cut bubble wrap to match the size of the pattern.
Member's ![]()
Free Digital Download ![]()
2. Squirt paint into a container and fill your brush or paint roller with paint.
3. Spread the paint over the bumpy side of the bubble wrap. Cover only the top of the bubbles with the paint. Add a lighter color for accents.
4. Place the painted side of the bubble wrap on the pattern paper and press down on the bubble wrap to press the paint onto the paper.
5. Slowly peel the bubble wrap off the pattern paper and let the paint dry.
6. You can add another accent color over the first color after the first colored has dried. Paint the accent color lightly and randomly over the bubble wrap, and then press it over the first bubble wrap print. You can also try just using both colors of paint on the bubble wrap.
7. When the paint is dry cut out the snake out, and add a red snake tongue and eyes.
©2012, Digital by Design, Inc. - See Copyright Information
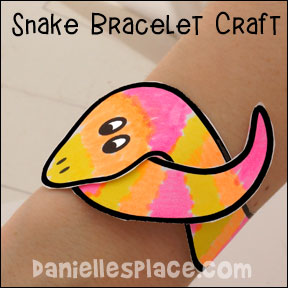
Snake Bracelet Craft for Kids
What you will need:
Card Stock (Heavy Paper)
Crayons or Markers
Tape or Velcro Dots
How to make:
1. Print out the pattern onto card stock.
Member's 
Instant Download Pattern - 
2. Have your child color the snake.
3. Cut the snake pattern out and tape it around the child's wrist, or use Velcro dots so that the child can remove the snake bracelet and reuse it.
©2007, Digital by Design, Inc. - See Copyright Information
Snake Pattern Color Sheet
Learn about patterns. Have your child color the snake using a certain pattern.
This worksheet comes from the ABC, I Believe lessons. You can find even more animal worksheets and Bible lessons to go along with them on the ABC, I Believe lessons.
©2007, Digital by Design, Inc. - See Copyright Information
Snake Puzzle Learning Activity
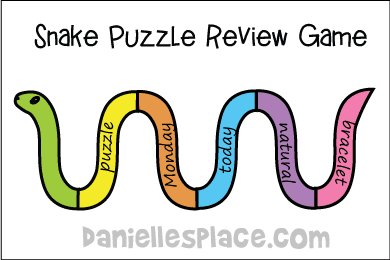
This pattern can be used to review just about anything you happen to be studying. Children will love this activity because they can get down on the floor and move around while making a great big snake. By writing the problem on one piece and the answer on another piece, your child will have fun matching up the correct pieces and making a long snake. You can use addition, subtraction or multiplication facts, or a question from your lesson. You can reduce the pattern and practice spelling words by writing one letter on each piece. Your child puts the pieces together to spell out a word.
You can also laminate the pieces so that you can use a dry erase marker and change the letters to spell new words, instead of making all new pieces.
You can also work on reading skills. Make up sentences with words your child is studying. Write one word on each snake puzzle piece. Read the sentence to your child and have him put the snake together according to the sentence you just read.
You can also use this snake for anything that your child is studying that has an order such as numbers, letters, books of the Bible, counting by certain numbers, alphabetizing, etc.
How to make:
Before class print out the snake
pattern. and cut the snakes body shapes from different colors
of construction paper. Line up the body parts as shown in the picture.
If you are reviewing math facts write the problem on one end of a
snake pattern and then the answer on the corresponding end of the
next snake pattern. On the same piece that you wrote the first answer,
write the next problem on the other end. So you will have a problem
and an answer on each puzzle piece, like Dominoes.
Member's ![]()
Great, Big, Sidewalk, Snake Review - If you have a child who has a hard time sitting still, this is a great way to review facts and get a little exercise at the same time. Go outside and draw a giant snake on your drive way or sidewalk with chalk. Make the snake wide enough to walk on.
Tell your child that the snake wants to eat him up. Have him stand at the head of the snake. If he answers a question correctly, he gets to move into the snake. You can make up the amount of steps he can take into the snake each time he answers correctly. The snake only likes correct answers. If he answers wrong, the snake will spit him out and he has to start all over again. When your child answers correctly, make a slurping sound like the snake is eating him. If he answers wrong make a sound like the snake is spitting him out or he tastes bad so he knows that his answer is wrong and he has to start all over again.
©2007, Digital by Design, Inc. - See Copyright Information
Snake Shapes Activity Worksheet for Preschool Children
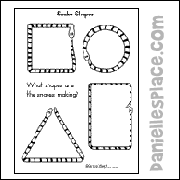
Make a pipe cleaner snake out of two different colors of pipe cleaners.
Print out the Snake Shape Worksheet and help your child form the different shapes on the work sheet.
This worksheet comes from the ABC, I Believe lessons. You can find even more animal worksheets and Bible lessons to go along with them on the ABC, I Believe Lessons.

©2007, Digital by Design, Inc. - See Copyright Information
Free Snake Shapes Printable Book
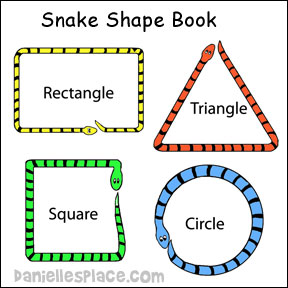
Print out the pages and staple them together. Have your children trace the snake shapes with their fingers and then trace them with highlighter markers. Read the story to your children and have them repeat what you say pointing to each word as you speak until they can read the book by themselves.
Member's ![]()
Free Digital Download ![]()
Make pipe cleaner snakes by twisting two different colors of pipe cleaners together. Have your children twist their snakes into the shapes to match the book.
©2007, Digital by Design, Inc. - See Copyright Information
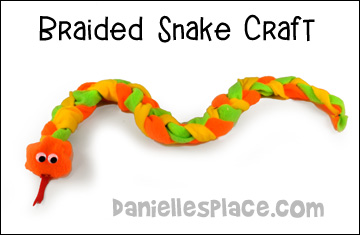
Braided Snake Craft for Kids
Older children will enjoy making this craft.
What you will need:
Scrap Material about Three Feet Long.
Googly Eyes
Red Material for the Tongue
Small Rubber Band or String
Glue
How to Make the Braided Snake Craft:
1. Cut pieces of material into strips of about one yard by three inches. Cut the strips so that they are tapered at one end.
2. Place three strips together and tie them together at the tapered end. This will be the tail end. To make it easier to braid, secure the knotted end to a table or chair with tape. Or pair up the children and have them take turns holding the tail of their partner's snake and braiding.
3. Show your children how to braid the three strips together.
4. When they are finished tie two of the strips together at the end. Wrap the end of the third piece around the knot and tuck in the edges to make a face.
5. Use a tiny rubber band to secure the head. Use another small rubber band to secure the tail end. Glue on wiggly eyes and a tongue.
See how to make this craft on our "View it and Do it!" Video.
©2003, Digital by Design, Inc. - See Copyright Information
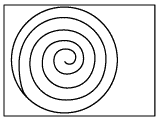
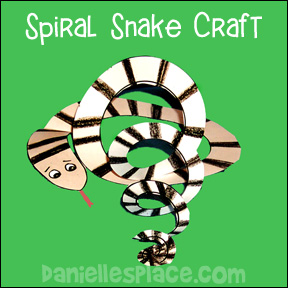
Paper Spiral Snake Craft for Kids
These snakes look great hanging from the ceiling. These are fun to make and use as decorations for any age.
What you will need:
Paper
Scissors
Tape
Colored Pencils, Crayons, or Paint
Googly Eyes (Optional)
Red Paper for the Tongue
How to Make the Spiral Snake:
1. Print out the pattern or cut out a circle shape from a piece of paper.
Member's
Instant Download Pattern -
2. Color or paint the snake pattern or the circle which ever you are using.
3. Cut out the pattern or cut the circle shape. Start cutting around the edge of the circle in a spiral fashion making your cut smaller and smaller towards the middle of the circle. The skinnier you make the snake the longer it will be.
4. To finish add googly eyes and a tongue cut from red paper.
We made the "Paper Spiral Snakes", but let the kids cut their circles out of craft foam and then decorate them with gems, paint and markers. They were pretty neat, and also made cool decorations hanging down around our foyer and fellowship hall! ~Randi

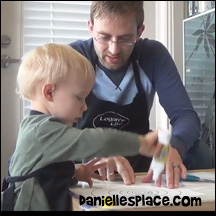
This is a Toddler-tested Craft
Two-year-old Logan makes a spiral snake with his dad. He enjoyed making this craft, especially adding googly eyes to the finished snake.
You can watch this video on "Logan's Life" on Youtube to get an idea of how this craft will work with your toddler.
©2003, Digital by Design, Inc. - See Copyright Information
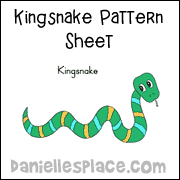
Practice Printing and Writing the Letter "K" for King Snake
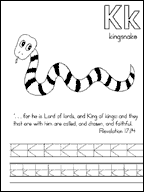
This worksheet comes from the ABC, I Believe lessons. Children practice writing the letter K in print or cursive, or write the complete Bible verse in cursive or print, or print the word "king snake".
If you would like more information about these lessons, go to the Home School Page for more information. You can even print out a free sample lesson. These lessons are great for home school use.