Printing Patterns and Instructions
All patterns are available in pdf format. You will need the free Adobe Reader to print these patterns. Go to the Adobe Website to download the free app.
Do not use Internet Explorer. It is no longer supported. If you are still using Explorer download Chrome or Windows 10 Edge and use it instead.
Printing PDF Patterns
1. If the files won't load, make sure you don't have two versions of Adobe Reader. When updating Adobe Reader make sure the old version isn't still there.
2. Some of the pdf files are very large so make sure you don't have too many temporary files stored on your computer. Delete cashed files. (See below.)
3. If you do not see the pattern after clicking on the link, or the pattern won't print, try restarting your computer.
*4. If you are using Chrome and the images aren't loading properly try this:
Go to Preferences > Show Advanced Settings, and under "System", uncheck the box that says "Use hardware acceleration when available". Restart Chrome to apply this setting.
Deleting Cached Files
Chrome
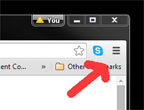
First close Danielle's Place Windows. Click on the "Hamburger" the three small bars (or three small dots) at the top, right side of your browser window. Then click on "More Tools" on the drop down window. And then click on "Clear Browsing Data". Select "Browsing History, Download History, and Cashed images and files" Then click on "Clear Browsing Data" button at the bottom of the drop down menu. Then restart your computer.
Printing Lessons or Text Using Chrome
Use Chrome to print the lessons from The Resource Room. If you don't have Chrome, you can get it Here. (Note: If you try to print the sample lessons from Danielle's Place, you will not be able to use the right-click and print of copy feature.)
1. Select the text you want to print.
Select the part of the lesson you would like to print using your mouse, left-click in front of the text you want to copy, hold down the left click and drag over everything you want to print so that it is highlighted. Of you can left-click at the beginning of the text and then hold down the shift key and click at the end of the text you want to select. The text should be highlighted.
If you want to print everything on the page, don't worry about this step.
2. With the text highlighted, left-click on the three little bars at the top, right-hand side of the screen. (Use can use the right-click and print instead on The Resource Room.)
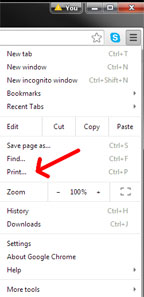
3. When you click on the three bars a drop down menu will appear. Click on "Print", and the page you want to print will show up on the right-hand side of the page with the printer set-up on the left.
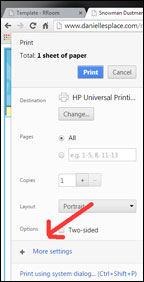
4. Click on the "+More Settings" and select "Selection only" under Options so that only the text you selected will show up, the rest will disappear.
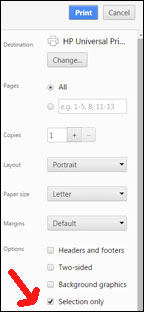
5. Then click on the blue "Print" button.
6. If you do not select the text you want to print, everything on the page will print.
Printing Jpeg and Gif Patterns (Explorer)
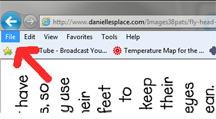
1. Click on the link to the pattern so that the pattern is the only thing on your screen. Then click on "File" at the top of the screen.
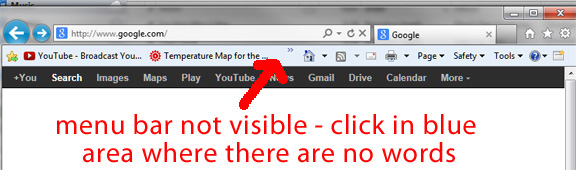
2. If you do not see “File” or "Edit" at the top of your screen, your menu bar is hidden. To make it show up right-click on a blank area of the tool bar at the top of the screen.
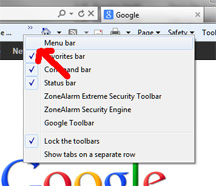
A drop down menu will appear. Select the “Menu Bar”. A bar will show up that includes: File, Edit, View, Favorites, Tools, and Help. Return to Step 1.
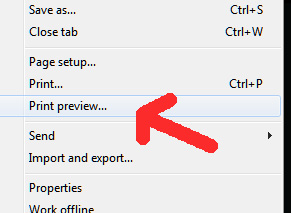
3.Select Print Preview.
4. Then check to see if the whole image is showing. If it isn't, you can do several things:
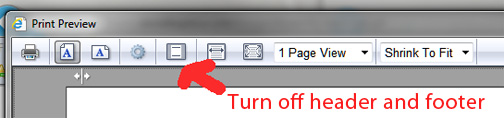
5. Change the page setup so that it doesn't print the date and page numbers (Header and Footer). Click the icon on the top of the page that looks like a rectangle with a line at the top and a line at the bottom.
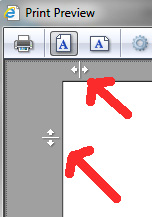
6. Set your top, bottom, left, and right margins to the smallest your printer will allow. There are arrows at the top, bottom, and sides of the picture move them all the way out so that more of the picture will show.
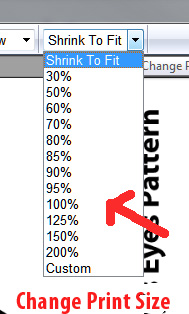
7. Change the print size - You can pick a percentage or type one in yourself.
8. When you can see the whole pattern, click on the printer icon to print the page. If you have a matching pattern, just make sure you print it the same size.
If this doesn’t work, you can try printing the picture from another program such as Microsoft Imaging found under accessories. Just right click on the pattern you want and click on “Save a copy”. Pick where you want to save it to and then open that file up in Imaging and print from Imaging, not your browser. If you want to copy and print the directions, you much highlight the material you want to print and then click on "File" at the top of the page, and under "File" click on "Print" and then "Print Selection".
*Note - We are in the process on putting all patterns in the easy-to-print PDF format. If you are having problems printing and would like a pattern in PDF format that hasn't yet been added, let us know and we will put one up.
How To Print from Microsoft Imaging
1. Right click with your mouse on the file you would like to print. And then click on "Save Picture As" or "Save A Copy" . Make sure you are saving it as a .jpeg or .gif and not a bitmap. Save it in a folder on your computer. Remember which drive you put it on and in which folder.
2. Open Microsoft Imaging. To do this click on your "Start" button at the bottom left hand corner of your screen. Click on "Programs" and then "Accessories" and find "Imaging" and click on it to open it.
3. In Microsoft Imaging click on "File" and then "Open". Find the drive and folder where your stored the pattern. Double click on the pattern to open it or click on the file to open it and then "Print".
If you click on a link that says, “File not Found”, restart your computer and try again, if it still doesn't show up, contact us immediately and we will fix the problem.
If the image shows up and you can’t print it, check the following:
1. Make sure your browser is up to date - Go to https://www.whatismybrowser.com/ to check your browser capabilities and ensure that you have downloaded the latest version of your browser.
2. Make sure your printer driver is up to date.
3. Clear your browser cache and cookies - First make sure any pages of Danielle’s Place of Crafts and Activities are not open. Open Internet Explorer and click on “Tools” at the top of the Page. Under “Tools” click on “Internet Options” then under “Browsing History” click on “Delete”. Select “Temporary Internet File” and “History” then click on “Delete” at the bottom of the pop up.
4. Restart your computer.
5. Try from a different browser. Google Chrome and Mozilla Firefox are both compliant with the latest web standards.
6. Disable any browser extensions one by one. An extension can sometimes cause unexpected conflicts.
7. Temporarily disable any ad blocker software you have running.
8. Connect your computer directly to the Internet instead of a wireless router.
9. Try printing it from a different computer.
Printing Instructions and Lessons
from Danielle's Place and Members-Only Section
The crafts and activities on Danielle's Place are copyrighted. You may print out and copy the material for your personal use, for your class, or home school, but you cannot publish them in any form without permission (copy and place on another web site or blog, etc.) See the Copyright Notice for more details.
Printing Instructions - To print out the craft directions left-click and highlight what you would like to print. (See directions above to print out pattern pages.) Click on "File" at the top of your browser window. Then click on "Print", under "Page Range" select "Selection". This will print only the material that you have highlighted.
Copying Instructions - You may copy this material for your personal use. (Do not copy it and post it on another web site or blog.) To copy left-click and select what you would like to copy. Click on "Edit" at the top of your browser window and then "Copy".
If you do not see “File” or "Edit" at the top of your screen, your menu bar is hidden. To make it show up right-click on a blank area of the tool bar at the top of the screen. A drop down menu will appear. Select the “Menu Bar”. A bar will show up that includes: File, Edit, View, Favorites, Tools, and Help.
Saving Files to Microsoft Word or Publisher Document
If you can't get the patterns to print in your browser, you can save them to a file on your computer, and then print them from the file instead of the Internet.
To Save a Pattern Page to Word Document
1. Right-click on the pattern you want to copy and select “Save Picture As”. Pick a place you want to save the picture to on your computer and remember where you saved it.
2. Open up Word and click in your document where you want the picture. You should see at the top of the page tabs that say: File, Home and then Insert. Then click on “Insert” at the top of the page.
3. Then select “Picture”. In 2010 version you will see a icon of mountains and a sun with the word Picture underneath. Then find the file that you just saved and click on it and then the “Insert” button at the bottom of the drop down. The picture should show up in your document.
To Copy a Lesson into a Word Document - On The Resource Room Only
1. Select (highlight) the part of the lesson you would like to copy with the left-click and drag of the mouse and then right-click on the highlighted area and select "Copy" from the drop down menu.
2. Open your Word Doc. and click on the page where you want to copy it to, and then right-click and select "Paste".
(If you are not in a members-only section, you will have to highlight the text you would like to copy and then click on "Edit" at the top of the page and then "Copy".
Assembling Itty Bitty Books

1. Print out the patterns.
2. Cut around the book pages. Do not cut apart the cover and back page of the book, pages 1 and 2, 3 and 4, 5 and 6, etc.
3. Fold the cover page and all the other pages in half so that the print is showing. Stick pages 1 and 2 inside the cover page so that the folded edge of the pages is facing out. Do this for all of the pages, putting them in order as you go. The folded edge of the cover should be on the left and the folded edges of the other pages should be on the right when assembled.
4. Staple the pages together along the folded edge of the cover.