Christmas Crafts for Kids
Christmas Crafts Kids Can Make - Page 2
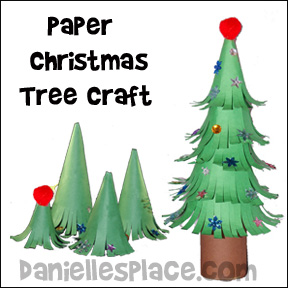
Paper Christmas Tree Craft for Kids
What you will need:
One TP Roll (or paper rolled to the size of a TP roll)
Green Paper
Scissors
Glue
Sequins or Other Decorative Items.
How to Make Paper Christmas Tree Craft:
1. Cover a TP roll with brown paper to make the trunk of the tree.
2. Make five cone shapes each a little smaller than the other using green paper.
Member's ![]()
3. Cut one-inch slits all the way around the bottom edge of each cone and curl up the edges by winding the edges around a pencil.
4. Place the largest cone shape on top of the TP roll. Then stack the remaining four on top of the largest, placing the smallest on top. Glue them all together.
5. To finish glue a star or pompom to the top of the tree and glue sequins to the branches of the tree.
©2007, Digital by Design, Inc. - See Copyright Information
Secret Message Christmas Craft For Kids
The receiver of this beautiful Christmas tree takes the branches apart to reveal a Christmas message.
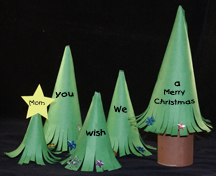
1. Follow the directions as above, but do not glue the pieces together.
2. Glue a star to the top of the tree and write the person's name to whom you will give the tree. Write words on the cones where they will be covered up by the cone that is placed on top.
The first word of your message should be on the next to smallest cone. The last word/words should be on the largest cone.
©2007, Digital by Design, Inc. - See Copyright Information
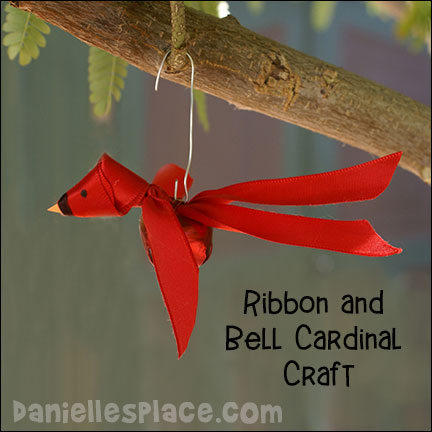
Ribbon and Bell Cardinal Craft for Kids
What you will need:
5/8" Polyester Ribbon, Scissors, Glue, Bright Orange Card Stock, 3/4" Jingle Bell, Black Sharpie Marker, and Wire
How to Make Ribbon and Bell Cardinal Craft:

1. Cut a piece of ribbon 14 inches long and fold it in half. Glue the folded sides together at the folded end. Fold over the folded end of the ribbon to make a triangle shape as shown in the picture to the right. Glue the triangle down.
2. Make a loop at the same end like you are going to make a knot at the end, tucking the folded end into the loop. Also shown in the picture to the right.
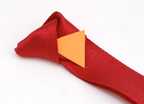
3. Cut a small triangle-shaped beak from orange card stock and insert the beak through the back of the head and push it all the way through to the hole in the front as shown in the picture to the left. Press the knot flat and place a little glue inside to keep it together.
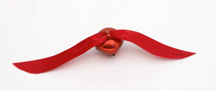
4. To make the wings cut another piece of ribbon about seven inches long and insert it in the top of the bell, and pull it half way through.

5. Place the headpiece you already made on top of the bell and wing ribbon. Tie the headpiece to the bell using the wing ribbon with a single knot. Cut the ends of the wings so they are curved as shown in the picture above.
6. Cut the tail feathers in a V-shape. Attach a wire to the knot on the bell to hang up the bird.
7. Use a black Sharpie marker to draw in the eyes and black around the beak.
©2007, Digital by Design, Inc. - See Copyright Information
3D Feather Christmas Tree Craft for Kids

Kids will absolutely love making this eye-catching feather Christmas tree! It's a fun and creative project that requires just a few materials: vibrant green feathers and some decorative elements that look like Christmas ornaments.
Begin by gluing the feathers around the base of a cone-shaped structure, gradually working your way up until every inch is covered. For the finishing touch, let their imaginations run wild! They can add sparkling glitter pom-poms, colorful sequins, or even use glitter glue to create dazzling accents. This project is not just a craft; it's an opportunity for kids to express their creativity and celebrate the holiday spirit!
What you will need:
Card Stock (Heavy paper)
Glue
Sequins, Buttons, etc to Decorate the Tree
How to Make Feather Christmas Tree Craft:
1. Role a piece of card stock up into a cone shape and secure it with a stapler of tape. Cut off the bottom so it sits flat on a table.
2. Glue green feathers to the cone shape starting at the bottom of the cone. Make one row of feathers all the way around the bottom placing the feathers so that the end of the feathers extend over the bottom of the cone as shown in the picture. Made another row of feathers just above that row, placing the feathers so they overlap the bottom row about half way.
3. Keep placing rows of feathers until you get to the top of the cone. Glue decorative items on top of the feathers to finish.
©2007, Digital by Design, Inc. - See Copyright Information
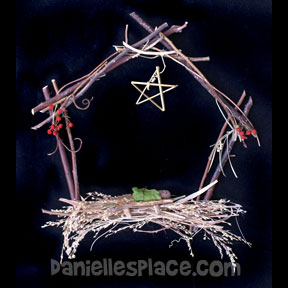
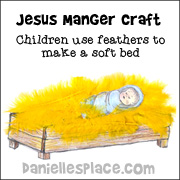
Stick Nativity Scene Craft for Kids
What you will need:
Sticks
Vines
Berries
Dried Grass
Natural Decorative Items
Glue Gun
Rock and Leaf
How to Make Stick Nativity Scene:
1. Glue dried grass or grains to the bottom of the1. Start by making the house shape. Use your widest sticks first. Cut them to about 8" and glue them together to form the 5-sided shape. The bottom sticks are about 7" long. Glue another layer or two of sticks around the shape. You can also use vines to wrap around the sticks. The star in the picture is hanging from the curled up end of a vine. shape for hay.
2. Baby Jesus is made from a rock that was wrapped in a leaf. He is laying bark manger.
3. The star was made from a long piece of reed. It was bent into the star shape and glued together.
4. Add berries and other decorative items to finish.
©2007, Digital by Design, Inc. - See Copyright Information
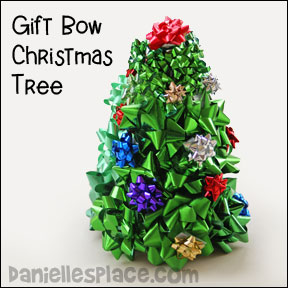
Bow Christmas Tree Craft for Kids
What you will need:
Green Bows of Different Sizes
Tiny Colored Bows
Card Board or Green Poster Board
How to Make Bow Christmas Tree:
1. Form a cone shape from a piece of green poster board that is about 8 inches tall.
2. Tape or glue green bows on the cone shape starting at the bottom of the cone with the biggest bows. Finish at the top with the smallest bows you have. When you have the whole cone covered add some tiny bows onto of the green bows to look like ornaments.
©2008, Digital by Design, Inc. - See Copyright Information
Christmas Butterfly Craft for Kids

How to Make Feather Butterfly:
1. Cover the butterfly with white glitter glue. Use a stiff paintbrush to even the glue out. let it dry.
2. Cut the feathers to fit on the butterfly and glue them to the butterfly with tacky glue. Let it dry.
3. Cut the looped ends off the butterfly antennae. Stick beads on the antenna. Apply tacky glue to the end of the antennae and stick pearl beads on the end.
4. Add jewels, gemstones, and pearl beads to the butterfly's wings.
5. Stick rhinestones on the butterfly's body.
©2007, Digital by Design, Inc. - See Copyright Information
Christmas Crafts On Other Pages
Heart Christmas Tree with Poem Craft for Kids
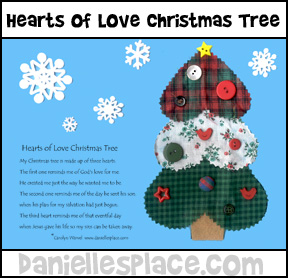
Hearts of Love Christmas Tree
Written by Carolyn Warvel
I made
my tree with three special hearts:
The first one reminds me of God's love for me.
He created me just the way he wanted me to be.
The second one reminds me of when he sent his son.
His wonderful plan for my salvation had just begun.
The third heart reminds me of that eventful day
when Jesus gave his life so my sins can be taken away.
To request permission to copy this material for any other use contact me by e-mail.
What you will need: Computer paper or card stock, Christmas fabric with different designs or green construction paper, brown construction paper or brown material or felt, button, sequins, stars, pompom balls or other decorative items, and stickers.
How to Make Heart Christmas Tree with Poem:
1. Print out the Poem and Tree Pattern onto blue paper. Print the Heart Patterns onto computer paper. Cut out the hearts and use them to cut hearts from green construction paper or different patterns of material. Cut the rectangle from brown paper or material. Glue the patterns on to the poem sheet starting at the bottom with the tree trunk and then the largest heart. Glue sequins, buttons, or pompoms onto the tree to decorate it.
Member's ![]()
2. Glue or stick snowflakes in the sky or use them as a border.
©2006, Digital by Design, Inc. - See Copyright Information
Christmas Crafts on Other Pages


©2006, Digital by Design, Inc. - See Copyright Information
For Even More Christmas Ideas Check Out These Pages:
Bible Themes - Christmas Crafts