Christmas Crafts and Activities Page 5
Christmas Crafts and Learning Activities for Children
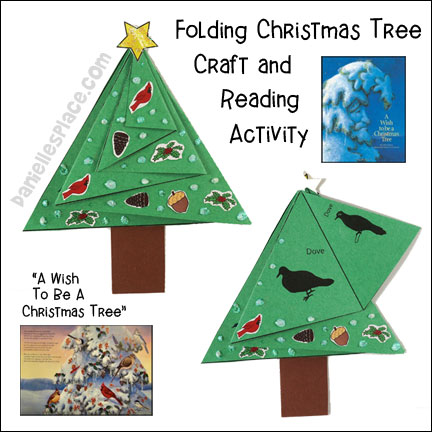
Folding Christmas Tree Craft and Reading Activity
A beautiful story about being the best friend you can be "A Wish to Be A Christmas Story" book teaches children what Christmas is all about. Use the folding Christmas tree craft below to review the story. Children decorate the tree using the same items that the animals did.
What you will need:
Green Paper, White Paper, Brown Paper, Scissors, Glitter Glue, Tape, and Glue
How to Make the Folding Christmas Tree:
1. Print out the Christmas tree pattern onto green paper. Print out the star, and other decorations for the tree onto white paper.
Member's ![]()
Instant Digital Download ![]()
Watch a "View it and Do it! video to see how to make this craft:

2. Read the book "A Wish To Be A Christmas Tree" by Colleen Monroe. Watch the story being read by Mitch Albom on Youtube.
3. Show your children how to cut out the tree pattern, trunk and decorations for the tree.
4. Show them how to fold the tree starting with the smallest section. Fold the section forward and crease. Turn the pattern over and fold the next section forward and crease. Keep turning the pattern over and folding the sections forward until the entire tree is folded.
5. Tape or glue the trunk to the back of the tree.
6. Glue the star to the top of the tree. Have your children decorate the tree like the animals did in the story with berries, pinecones, acorns, and birds.
7. Tell your children to open the largest section of the tree. Ask them what the animals hidden behind the section did in the story, or have them find the animal in the book. Keep opening sections until you have reviewed the complete story.
8. To finish have your children write what they think the moral of the story is on the back of the tree. You can cut out white, lined paper the shape of the tree to make it easier for them to write.
©2016, Digital by Design, Inc. -*See Copyright Information
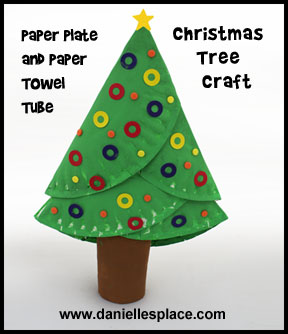
Paper Plate Christmas Tree Craft for Kids
What you will need:
Paper Plates
Paper Towel Tube
Paint, Markers, or Crayons
Decorative Items such as Stickers, Beads, Pompoms, Buttons, Glitter Glue, etc.
Glue
Scissors
How to Make the Paper Plate Christmas Tree Craft:
1. To make the top of the Christmas tree fold a paper plate in half to find the center.
2. Measure from the top, center of the plate out to the left 1/2" and mark it.
3. Measure from the bottom, center out to the right 3 3/4" and mark the spot.
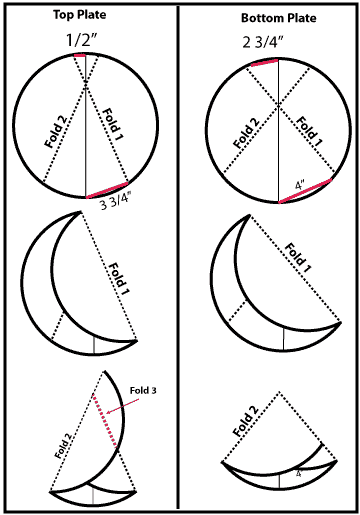
4. Draw a line from mark to mark.
5. Measure and draw another line on the opposite side.
6. Fold the first line to the left and fold the left side of the plate on the second fold line over the first fold.
7. Fold back the part of the paper plate that over laps the first fold line and glue it down.
8. Do the same thing with the bottom paper plate only use the 2 3/4" measurement at the top and 4" at the bottom. The second fold will match up with the first fold so you won't have to fold over any extra.
9. Glue the bottom plate inside the bottom plate.
10. Cut a paper towel tube in half. Press one end flat, place some glue on the flat end and insert it into the bottom paper plate for the trunk of the tree.
11. To finish paint the tree and add decorative items.
©2012, Digital by Design, Inc. -*See Copyright Information
"Have a Very Beary Christmas" Bear Christmas Ornament Craft

What you will need:
Colored Paper (Optional) or White Card Stock (Heavy Paper)
Glue - (Elmer's paper glue works best, but young children can use white school glue.)
White Pompoms - About 1/2"
Ribbon for hanging the ornament - 1/4"
Colored Pencils or Crayons - (If you use colored paper to print the patterns, you will only need a white colored pencil or crayon.) You can also use white paint.
How to Make the Bear Christmas Ornaments:
Member's ![]()
Instant Digital Download - ![]()
1. Print out the bear patterns onto brown construction paper or brown card stock (Heavy paper). If you are using construction paper, you may have to cut off about 1/2" from the side of the paper to make it fit in your printer. Cut out the patterns. (This pattern makes 2 or 4 ornaments. Print two pages for every one hat pattern page you print. Print three for every one gift pattern page you print.)
2. Print the hat patterns onto red card stock or construction paper. Color or paint the rim of the hat white, and then cut them out. Glue a pompom to the end. (This pattern makes 4 or 8 ornaments)
3. Print out the Christmas gift patterns onto green or yellow construction paper and cut them out. (This pattern makes 6 or 12 ornaments.)
4. Glue all the pieces together. If you would like the ornament to have the same picture on the back as on the front, glue the opposite pictures together starting with the gift patterns.
5. To finish cut a piece of red ribbon about eight inches long, fold it in half, and tie a knot at the open end. Glue or tape the ribbon to the back of the ornament. If you are making the ornament that has a picture on both sides, glue the ribbon in the center of the two pictures.
This pattern is also available in one piece just print them out onto white card stock, cut them out, color them, and add a pompom and ribbon.
They are also available in color colored patterns cut them out, glue on pompoms and ribbons, and hang.
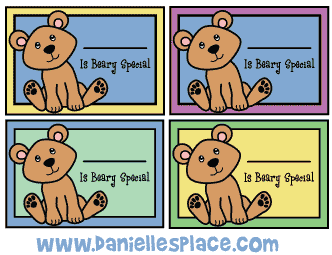
Other Beary Special Printables
©2012, Digital by Design, Inc. -*See Copyright Information
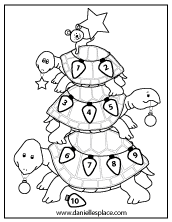
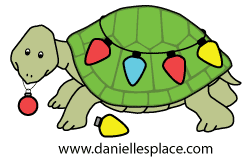
Turtle Christmas Tree Coloring Activity Sheets, Learning Activities, and Bulletin Board Printouts
Celebrate the Christmas season with these turtle-themed printouts!
1. Turtle Christmas Tree Coloring Sheet

Printable color sheets including a sheet with all three turtles forming a Christmas tree, and the three separate turtles on a separate pages that can be cut out and glued together to make a larger turtle Christmas Tree.
Patterns for these printable sheets and bulletin board display printouts are available to members.
Member's ![]()
2. Turtle Christmas Tree Learning Activity Sheet
Printable activity sheet that can be used to review numbers 1 - 10. Have children count the Christmas lights and then write a number on each light.
This sheet can also be used to review colors. Write the names of colors on the Christmas lights and then have your children color the Christmas lights the corresponding colors.
Patterns for these printable sheets and bulletin board display printouts are available to members.
Member's ![]()
3. Turtle Christmas Tree Bulletin Board Display

Printable patterns in both color and black and white. The three turtles can be printed out separately, cut out, and glued together to make a 15-inch high display, or you can use the 10-inch color pattern which needs no cutting or assembling.
Use the Christmas light patterns to make a string of lights as a border for your bulletin board display. Print the patterns onto different colors of paper cut them out, and staple them to your bulletin board. Draw a black line or use a black string to connect the lights to make the string of lights.
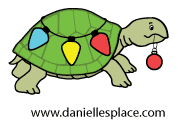
Patterns for these printable sheets and bulletin board display printouts are available to members.
Member's ![]()
4. Christmas Tree Lights Printable Cards
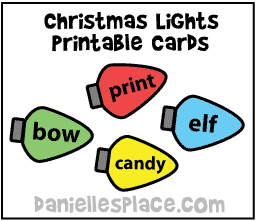
Print out the Christmas tree light Patterns onto different colors of card stock (heavy paper) and cut them out. Use them for the following activities:
Member's ![]()
A. Writing Spelling Word - Have your children write their spelling words on the lights and then staple them to a string, or make them into a book. Your children can wear them as a necklace or hang them on a tree.
B. String of Lights Spelling or Sight Words Review Game - Write your child's spelling words or sight words on the lights. If your child spells or says a word correctly three times in a row, he can staple the lights to a string. Keep playing until you have a long string of lights. Hang them up to decorate your home for Christmas.
C. Matching Spelling Words - Write out all of your child's vocabulary words the lights twice. Turn over all the lights. Ask your child to find the lights that match. Keep playing until your child has matched all the lights.
D. Learn New Christmas Words - Have your child think of words relating to the Christmas season, and then write them on the lights. Play a review game with the lights.
E. Search for Christmas Lights - Write your child's vocabulary words on the lights. Hang them on your Christmas. Ask your child to find all the lights and say the words printed on the lights.
©2012, Digital by Design, Inc. -*See Copyright Information
Paper Cone Christmas Tree Kids Can Make
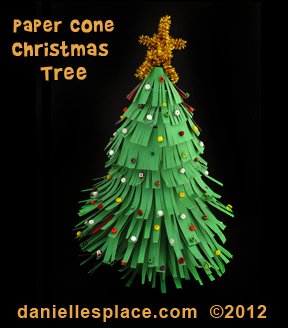
What you will need:
Green Construction Paper
Low Temp Mini Glue Gun or Aleene's Tacky Glue or Clear Tape
Scissors
Gold Chenille Stems
Bead or Gems
How to Make the Paper Christmas Tree:
1. Roll a piece of construction paper into a cone shape and tape it closed.
2. Cut a long strip of green construction paper 2 1/2" wide and cut slits two inches long along the length.
3. Start at the bottom of the cone and tape the strips around the cone in rows.
4. Cut more strips making them a little shorter for each row until you get to the top.
5. Bend a chenille stem into a star shape and attach it to the top of the tree.
6. To finish glue beads or gems on the paper branches.
©2012, Digital by Design, Inc. -*See Copyright Information
Beaded Snowman Christmas Ornament
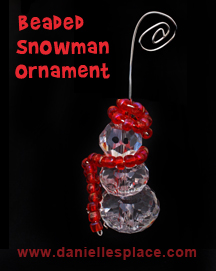
What you will need:
Clear Faceted Beads in Three Different Sizes - Purchased from ConsumerCrafts.com The two bottom beads are flat on the top and bottom. The head bead is rounded. If you don't have the flat-top-and-bottom beads, you can use all rounded faceted beads.
Wire: 20-gage and 28-gage
Little red perler beads
Sharpie Markers
Pliers
How to Make the Beaded Snowman Ornament
1. Cut 20 gage wire a bit longer than desired length for the snowman. Make a curly que with pliers at the end of the wire for the bottom bead to rest on.
2. Pick one large bead, one medium bead, and one smaller bead and attach them on the wire starting with the large bead on the bottom and the small bead on top. Bend the top of the wire into a curly que, leaving enough straight wire in between the snowman and the curly que so you can hang the ornament on the tree. Cut off any extra wire.
3. Cut 28-gage wire a bit longer than the desired length for the scarf. Make a little curly que at the end of the wire to keep beads on the wire. String red perler beads onto wire. Make another curly que at the end to keep the beads from falling off. Bend the scarf around the neck and twist the wire to hold the scarf in place.
4. Cut 28-gage wire a bit longer than desired length for the hat. Make a little curly que at the end of the wire to keep beads on the wire. String red perler beads onto wire. Make another curly que at the end. Wrap the beaded wire into a hat shape. Slip around the snowman ornament so that the hat sits on the snowmans head. You may want to use a dab of glue to keep it in place.
5. Use a sharpie marker to draw on eyes and a nose.
©2012, Digital by Design, Inc. -*See Copyright Information
More Christmas Craft Links
Bible Themes - Christmas Crafts
Bible Themes - Christmas Crafts Page 2
Bible Themes - Christmas Crafts Page 3