God Made Me Bible Lesson 1
My Guarded Mouth
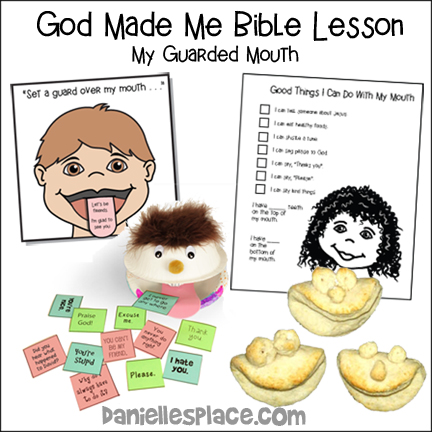
The following crafts and activities come from the Bible Lesson - "God Made Me - My Guarded Mouth" for children's Ministry.
In this lesson, children learn that their mouths are created for good things not bad. God can help them control their tongues and to say only what is good and true. (A complete lesson is available to members only on The Resource Room.)
Member's ![]()
Instant Digital Download ![]() - Includes everything on this page, KJV and NIV.
- Includes everything on this page, KJV and NIV.
"Say Good Things" Bible Activity and Coloring Sheet
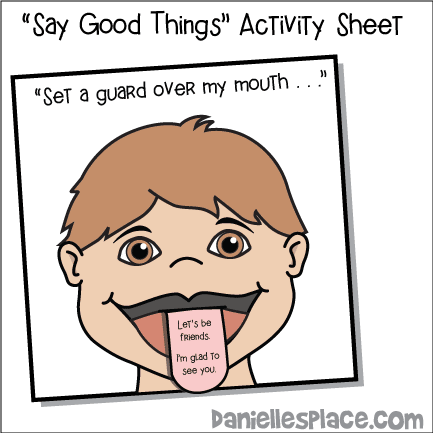
The tongue is pulled down to reveal good things we should say. If you don't have much time in class, you can just have your children color the face and then write "good" words in the mouth.
If you have preschool children, just let them come up with something good they can say, and then write it in the mouth for them. You can also cut out the mouth area and glue the whole picture onto another piece of paper forming an envelope. Glue just around the sides of the paper.
Help your children come up with "good" things they can say, write them on a sheet of paper and then stick them in the mouth.
Member's ![]()
Instant Digital Download ![]() - Includes everything on this page, KJV and NIV.
- Includes everything on this page, KJV and NIV.
God Made Me - Mouth Book Page
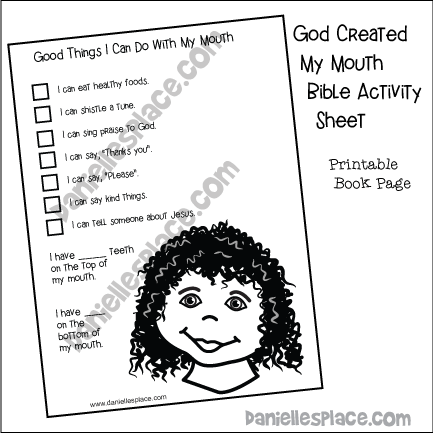
Children select the activities on the sheet that are good to do with their mouths. They count the number of teeth they have on the top of their mouths and on the bottom and write the number on the activity sheet.
Member's ![]()
Instant Digital Download ![]() - Includes everything on this page, KJV and NIV.
- Includes everything on this page, KJV and NIV.
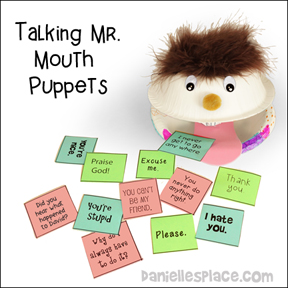
Make Talking Mr. Mouth Puppets

What you will need:
10 oz. Paper Bowls
Sticky Eyes
Feathers or Crepe Paper
Pink Craft Foam
Pompoms
Your children will enjoy making these cute puppets. The mouths open and close when you move the paper towel tube up and down.
How to make:
1. Before class, glue two-10 oz. paper bowls together using one-inch square pieces of fun foam. Place the bowls together, one on top of the other. Glue the one-inch square piece of fun foam to the edge of the top bowl and to the bottom bowl forming a hinge as shown in the picture at the right.
2. To make the handle cut one-inch slits about one-half inch apart all the way around one end of a paper towel tube, as shown in the picture at the right. Fold out the cut tabs and place glue on each of the tabs. Press them down to the bottom of one of the bowls. I(You don't have to use the handles for this craft. You can make the heads and let your children store good words or the Bible verse in their mouths.)
3. Hair - You can use tissue paper or feathers for the hair. If you are going to use tissue paper, cut or rip it into 2" x 2" pieces. Pour tacky glue into cups. Show your children how to crinkle up the tissue paper, dip it in the glue, and then press it onto the top of a bowl to make hair.
4. Feathers are much easier to use than tissue paper and are a lot less messy. If you are going to use feathers, poke tiny holes in the top of one of the bowls with a toothpick or large needle. In class, have your children push feathers into the holes to make hair. (I used eleven feathers on the pink Mr. Mouth craft.)
5. Glue on googly eyes and pompoms for the nose and ears. You can cut tongue shapes from construction paper or fun foam to glue inside the bowls. Your children may also want to add ears.
Smiling Biscuits
What you will need:
2 Cups All-purpose Flour
1 Tablespoon Baking Powder
3/4 Teaspoon Salt
1/2 Tteaspoon Baking Soda
5 Tablespoon Chilled Solid Vegetable Shortening
1 Cup Buttermilk
How To Make:
1. Preheat oven to 425°. Sift together the flour, baking powder, salt and baking soda.
2. Cut the shortening into the flour mixture using a pastry blender or 2 knives until coarse crumbs form.
3. Add the buttermilk, tossing with a fork until a dough forms.
4. Turn the dough out onto a lightly floured surface. Gather into a disk. Knead lightly a few times just until smooth.
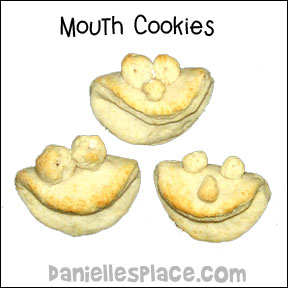
5. Roll out the dough to about 1/2 inch thick. Using a round biscuit cutter, cut out the dough. Fold the circles in half and place 2 inches apart on an ungreased baking sheet. Gather the left over dough trimmings and form into small balls to form eyes and a nose. Using your finger put an indent into each biscuit where the eyes and nose will be. Dip the balls into an egg white that has been slightly beaten and place in the indents. Use toothpicks to secure the eyes to the head. 6. Bake the biscuits until golden 12 to 15 minutes. Remove the toothpicks carefully. Serve hot with butter..
Make Apple Marshmallow Mouths
Have you children make Apple Mouths using marshmallows and apples.
©2007, Digital by Design, Inc. - See Copyright Information
Guarded Mouth Learning Activity
1. Before class, print out the sayings and cut them apart. Place them in a Mr. Mouth craft that has been prepared ahead of time.
Member's ![]()
Instant Digital Download ![]() - Includes everything on this page, KJV and NIV.
- Includes everything on this page, KJV and NIV.
2. Ask your children if they know what a guard does. Tell them that a guard watches over something. A guard in a prison watches over his prisoners. He makes sure they don't escape. We have to guard our mouths so that bad words don't escape. David prayed for God to help him guard his mouth. He asked God to help him know when he should speak and what he should say. He prayed this prayer, "Set a watch, O LORD, before my mouth; keep the door of my lips." (Psalm 141:3) Today we are going to practice guarding our mouths.
3. Let your children take turns picking out a piece of paper with a saying on it. Read what the paper says and ask the child who picked the paper if he should let those words come out of his mouth. If the paper says something good, let your child keep it. If it says something that should stay in the mouth, fold it up and put it back in. Keep playing until all your children have had a chance to pick a piece of paper.
I have used several of your craft ideas for children's church and my preschool class. I have just finished preparing for my next children's church. I am so excited. I can barely wait to work with the children on this project.("Help One Another" Gal.5:13) I also plan to use this with my preschool class. I teach three year olds at a Christian School. I decided to use stick glue for the wiggly eyes and also punch holes for the antenna. My membership to The Resource Room has been money well spent. Thank you all for GREAT ideas. Dawn