
Thanksgiving Crafts - 2
Cheap and Easy Crafts for Thanksgiving Kids Can Make
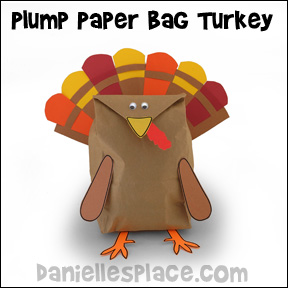
Plump Paper Bag Turkey Craft
What you will need:
Paper Lunch Bags
Construction Paper
Plastic Bags or Newspapers
Wiggle Eyes
Scissors
Glue
What to do:
1. Stuff a paper lunch bag with about seven crinkled up plaster grocery bags to about 2 1/2" from the top of the bag. You can also use crinkled up newspaper or recycled papers.
2. Fold the sides together and flatten the top of the bag.
3. Fold the corners on the top of the bag down at about two inches in from both sides. (See diagram)
4. Fold down the top of the bag right under the folded down corners and glue it down.
5. Cut out a beak, waddle, legs, and wings from construction paper and glue them to the bag. The tail feathers pictured above are woven into a tail pattern to make a tail that is a single piece.
Member's ![]()
6. To finish glue on wiggle eyes.
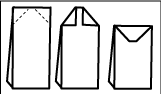
Spice Painting Pumpkin Poem Activity Sheet
Pumpkin pie paint makes a great sensory craft for children!
What you will need:
Ginger, Cinnamon, Nutmeg, or Pumpkin Pie Spice
Orange Paint
Paper
Colored Pencils
How to Make the Spicy Paint Picture:
1. Mix the spices into any orange paint.
2. Print out the Pumpkin Pie Activity Sheet with the Poem, or print the poem onto a sheet of paper and have your children paint pumpkins and pumpkin pie to go with the poem.
Member's  ($23.95 per year membership)
$2.00 Instant Downloadable Pattern - 

Little Pumpkin
(Written by Carolyn Warvel)
I’m just a little pumpkin sitting in the hay,
Waiting to be picked for a very special day.
Take me home and cook me,
And you’ll see what I can be.
If you add a little sugar and just the right spice,
I’ll turn into something that taste quite nice.
©2014, Digital by Design, Inc. -See Copyright Information Do not publish this poem or a derivative of this poem any where without permission.
"Count Your Blessing" Folding Craft Stick Thanksgiving Craft for Kids
What you will need:
- Use Good Quality Craft Sticks that Lay Flat. The 5/8" Work Perfect with the One-inch Tape. *You Can Use the Woodsies Jumbo Craft Sticks with the 1.5 Inch - 3M Scotch Masking Tape for a Bigger Canvas

3M Scotch Masking Tape, 1-Inch- (Other brands will work, but this tape works great! It is the exact color of the craft sticks. Staple's tape works better with the washable markers, but it is lighter than the stick and more transparent and doesn't cover the stick as well.)
Permanent Markers, Red Acrylic Paint
How to Make the Folding Craft Stick Canvas:
1. If you are using the mini-jumbo craft sticks, cut the one-inch masking into 4-inch pieces.
2. Place two sticks together, side by side, long ways, and tape them together covering both the sticks with the tape.
3. Turn the two sticks over so that they are diagonal to you.
4. Place another craft stick next to and below the two sticks that you taped together. Use another piece of tape to tape the bottom two sticks together.
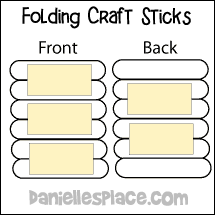
5. Turn all three sticks over diagonally and place another stick at the bottom of the row and tape the last two sticks together. Keep going until you have a whole row of sticks.
6. You can also cover the first and last stick in the row by placing tape over the stick and then folding it back over the stick. It is easier to write on the tape than the craft stick. The ink soaks into the sticks and blurs.
7. Write "Count Your Blessings" on the top craft stick and then number the rest of the craft stick. List your blessings on each stick and then decorate the sticks.
9. Glue a ribbon on the top of the row of craft sticks.
Watch a video on how to make the folding craft stick canvas.
©2012, Digital by Design, Inc. -See Copyright Information-Bloggers, if you use this craft idea or an adaptation, you must link back to this page for complete directions. If you use this technique, let us know and we will put a link to your blog.
Thanksgiving Turkey Craft for Kids
Fun creative Thanksgiving craft for children!
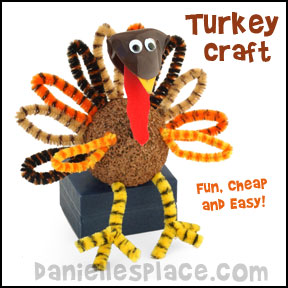
What you will need:
Two-inch Foam Balls
Chenille Stems - (The ones pictured are from Hobby Lobby)
Brown Plastic Spoons
Brown Spray Paint that is Made for Plastic, or Brown Acrylic Paint
Wiggle Eyes
Red and Yellow Craft Foam
Heavy Duty Scissors
Butane Lighter with Long Stem
How to Make the Thanksgiving Turkey Craft:
1. Cut a sliver off of one side of the foam ball so that it will sit flat on a table. Paint or spray paint the ball brown and let it dry.
2. Cut six Chenille stems into four-inch pieces.
3. To make the turkey's tail feathers fold ten of the four-inch pieces in half and poke them into the foam to form the tail feathers.
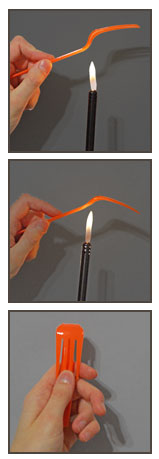
4. To make the turkey's head use a butane lighter to soften the plastic spoon in the middle of the scoop. Hold the flame just below the center of the scoop and move it back and forth until the plastic softens. (The diagram pictured is not a spoon, but is shows how to use the lighter to soften the plastic.) As soon as the plastic softens fold down the tip. Hold it in place a few seconds until the plastic cools. Cut off the handle of the spoon leaving about two inches for the neck. Stick the spoon into the foam ball.
5. Bend two more four-inch Chenille stems into wing shapes and stick them into the foam ball.

6. To make the legs cut two, two-inch pieces of Chenille stems and fold them in half. Use a four-inch piece and wrap one end of the four-inch Chenille stem around a folded two-inch piece at the fold leaving one-inch of the stem to form one of the turkey's toes (see diagram).
7. To finish cut a waddle from red craft foam and a beak from yellow or orange craft foam and glue them under the bent part of the spoon. Glue on wiggle eyes.
Copyright 2013, Digital by Design, Inc. -See Copyright Information
Noodle and Pompom Thanksgiving Turkey Craft for Kids
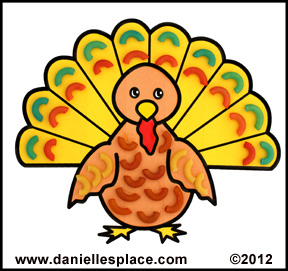

Children will enjoy decorating pictures of turkeys to display for Thanksgiving. A wide variety of items can be used to decorate pictures of turkeys including: pompoms, colored noodles, buttons, dried seeds, and Fruit Loop cereal.
Printable Patterns in both color and black and white are available to members.
Member's ![]()
Also available as an instant download with the Beat the Greedies Bible Lesson.
Instant download for $2.95 - ![]()
![]()
Copyright 2013, Digital by Design, Inc. -See Copyright Information
Turkey Puzzle Pieces Pin
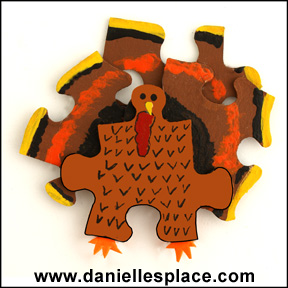
What you will need:
Puzzle Pieces
Blank Puzzles Pieces or Larger Puzzle Pieces
Craft Foam
Ccrylic Paint
Permanent Markers
Magnet or Pin
How to Make the Thanksgiving Turkey Puzzle Piece Pin:
1. Find one puzzle piece for the body that has three bumps, one for the head, and two for the wings. You will need three more puzzle pieces to make the turkey's tail.
2. Paint the puzzle pieces with acrylic paints.
3. When the paint dries use a permanent marker to add the details and glue the pieces together.
4. Cut turkey claw shapes from craft foam and glue them to the body.
5. To finish glue a pin or magnet to the back of the turkey.
Copyright 2012, Digital by Design, Inc. -See Copyright Information
Thanksgiving Turkey Popcan Craft for Kids
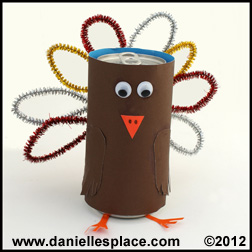
What you will need:
Empty Soda Cans or other Cans You Want to Recycle
Brown and Orange Construction Paper
Different Colors of Pipe Cleaners
Googly Eyes
Scissors
How to Make the Pop Can Turkey:
1. Cut a piece of brown construction paper to fit around the pop can and tape of glue it to the can.
2. Cut wings, feet, and beak shapes from the construction paper and glue it to the turkey body.
3. Bend pipe cleaners in half and glue them to the back of the turkey.
4. To finish glue on google eyes.
Created by Corrin Burner
Copyright 2010, Digital by Design, Inc. -See Copyright Information
Thanksgiving Turkey in a Glass Jar with Foliage Pens
This is a Great Craft to Use in a Doctor's or Veterinary's Office.
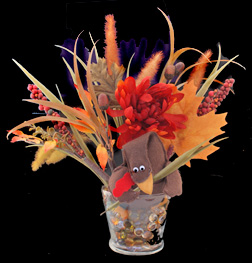
What you will need:
Brown, Red, and Gold Felt Squares
Googly Eyes
Fall Silk Foliage
Polyfil
Hot Melt Glue
Brown Floral Tape or Duck Tape
How to Make the Thanksgiving Turkey in a Glass Jar with Foliage Pens:
1. Print out the pattern for the turkey. Cut the turkey's body and wings from the brown felt, the beak and feet from the gold felt, and cut a wattle shape from red felt. You will not need the front and back pouch patterns for this craft. The pattern for the turkey is available as an instant digital download, below.
2. Pin the two beak pieces together and sew them together using a very small stitch. Cut around the edge of your stitching close to the seam.
3. Pin the two body pieces together in the middle. Place the beak inside the two pieces at the head and pin the pieces together. Place the top edge of the two feet in the inside of the body pieces and pin them in place. Sew the pieces together leaving an opening on one side to fill it with the polyfil. Stuff the head and the rest of the body, but not the neck. Then sew the body closed.
4. Place two wing patterns together and sew all the way around leaving a one-inch opening. Stuff a small amount of polyfil in the wing and then sew it closed. Do the same thing for the other wing. Glue the wings to the body.
5. Bend down the head as shown in the picture and glue on googly eyes and a wattle.
6. Place silk fall foliage on the pens and wrap them with floral tape or duck tape to secure them to the pens. Note: You don't have to use pens, you can just push the silk foliage into the rocks and use the craft as a Thanksgiving dinner table center piece.
7. Place glass rocks in the glass container, and the turkey on top of the rocks. Push the pens into the rocks behind the turkey making a nice arrangement. Glue some foliage on the turkey's wings so it looks like it is holding them.
Copyright 2010, Digital by Design, Inc. -See Copyright Information
Chenille Stem Thanksgiving Turkey Pencil Topper or Broach
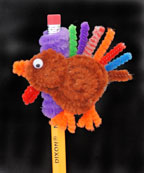
What you will need:
Chenille Stems
Brown, Red, Orange, and Other Colors
Wire Cutters
Googly Eye
Hot Melt Glue
Pin Back (Optional)
How to Make the Thanksgiving Turkey Pencil Topper:
1. To make the body roll one end of a brown Chenille stem into a circle about 3/4 of the way. To make the head roll the other end into a circle to meet the first circle.
2. Cut an orange Chenille stem one inch and fold it in half to make the beak. Glue it to the head. Cut a red Chenille stem one inch and fold it in half to make the waddle. Glue it to the head. Glue on a googly eye.
3. To make the feet cut an orange Chenille stem two inches long and another one inch long. Fold the two inch stem in half and wind it around the one inch stem. Make two of these and glue them to the body. Cut one-inch lengths of different colors of Chenille stems and glue them on for the feathers.
4. To make the pencil topper wind another Chenille stem around the top of a pencil and glue it to the pencil. Glue the turkey to the Chenille stem on the pencil.
5. To make the broach glue a pin back to the back of the turkey.
Copyright 2010, Digital by Design, Inc. -See Copyright Information
Thanksgiving Turkey in a Pot with Feather Pens
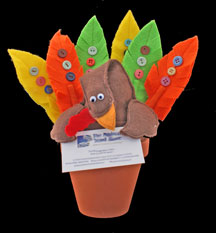
What you will need:
Brown, Red, Green, Orange, and Gold Felt Squares
Googly Eyes
Terracotta Pot
Small Decorative Glass Stones
Pens
Polyfil
Hot Melt Glue
Buttons
How to Make the Thanksgiving Turkey in a Pot with Feather Pens:
1. Print out the pattern for the turkey. Cut the turkey's body and wings from the brown felt, the beak and feet from the gold felt, and cut a wattle shape from red felt. You will not need the front and back pouch patterns for this craft. The pattern for the turkey is available as an instant digital download, below.
2. Pin the two beak pieces together and sew them together using a very small stitch. Cut around the edge of your stitching close to the seam.
3. Pin the two body pieces together in the middle. Place the beak inside the two pieces at the head and pin the pieces together. Place the top edge of the two feet in the inside of the body pieces and pin them in place. Sew the pieces together leaving an opening on one side to fill it with the polyfil. Stuff the head and the rest of the body, but not the neck. Then sew the body closed.
4. Place two wing patterns together and sew all the way around leaving a one-inch opening. Stuff a small amount of polyfil in the wing and then sew it closed. Do the same thing for the other wing. Glue the wings to the body.
5. Bend down the head as shown in the picture and glue on googly eyes and a wattle.
6. Cut feather shapes from different colors of felt. Sew two feathers together in the middle and leave an opening for the top of the pens. Glue or sew buttons to the top of the feathers. Slide the feathers on the pens.
7. Place glass rocks in the pot, and the turkey on top of the rocks. Push the feathered pens into the rocks behind the turkey. Glue a business cards, sign, or other object on the turkey's wings.
Copyright 2010, Digital by Design, Inc. -See Copyright Information
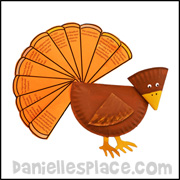
Thanksgiving Paper Plate Turkey Craft for Kids
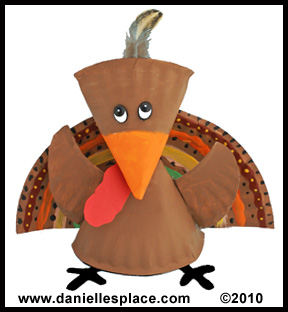
What you will need:
Small Lunch-size Paper Plates
Paint
Glue Gun or Stapler
Feather
Eyes
How to Make the Turkey Paper Plate Craft:
1. Fold a small paper plate in half and cut on the fold line.
2. To make the head roll one half of the plate into a cone shape overlapping the sides about 1/3 of the plate. Glue the cut side closed.
3. To make the body roll the other half of the paper plate into a cone shape overlapping the side only about one inch at the edge. Glue the cone closed on the cut edge. Fold the tip of the cone down about 1/2" and glue the head to the folded tip. Paint the head and body.
4. Cut another paper plate in half and use one half for the back tail feathers and the other half for the wings and feet. Paint the tail feathers and wings and then glue them to the body as shown in the picture.
5. Glue on the eyes. To finish glue a feather to the top of the head and cut a wattle from red paper and glue it to the underside of the beak.
Copyright 2010, Digital by Design, Inc. -See Copyright Information
Treat Holder Thanksgiving Turkey Craft for Kids
What you will need:
TP Roll or Card Stock Rolled into a Toilet Paper-sized Roll
Brown, Red, and Orange Craft Foam or Construction Paper
Brown Felt
Fake Fall Leaves
Sticker Eyes
Glue Gun or Stapler
How to Make the Turkey Treat Holder Craft:
1. Cut a two-inch piece off a TP roll or make a two-inch roll using card stock.
2. Cover the roll with brown felt. Start by closing up the bottom. Place the roll on the felt and trace around the bottom of the tube about one-half inch from the edge. Glue the circle on the bottom of the tub by bringing the extra half inch up over the sides of the tube and gluing it to the sides. Cover the entire side of the tube with the felt.
3. Print out the turkey pattern and cut from brown craft foam. glue the wings to the back of the body as shown in the picture. Cut the wattle from red craft foam and the beak from orange craft foam and glue them to the face. Glue on eyes or use eye stickers.
Member's ![]()
Free Digital Download ![]()
4. Glue three large leaves to the back of the tube to make the turkey's tail features, and glue two tiny leaves to the bottom of the tube for its feet.
5. Place candy corn or other treat in the TP roll holder.
Copyright 2010, Digital by Design, Inc. -See Copyright Information
Silver Tape Thanksgiving Napkin Rings Craft for Kids
What you will need:
Card stock or light card board, craft foam, black acrylic paint,Aluminum Duct Tape(You can find this tape at a Lowe's or other home improvement store in the heating and air conditioning section. It costs about $7.00 for 120 yards. It is not Duck tape.), and utensils to engrave the tape such as a ballpoint pen, the end of a paintbrush, and the tines of a fork.
How to The Thanksgiving Napkin Rings:
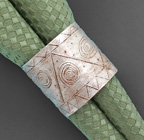
1. Cut pieces of duct tape 7" long. Cut card stock in 6 1/2" by 1 1/2' pieces.
2. Place the duct tape pieces on a piece of craft foam and use utensils to engrave a design. The craft foam makes it easier to engrave because it is soft and springy.
3. Remove the backing on the pieces of engraved tape and stick them to the card stock pieces folding over the edges.
4. To make the rings look old paint black acrylic paint over the entire surface then pat off the extra paint with a dry folded paper towel.
5. When the paint is dry roll the pieces to form a ring and glue the rings closed using hot melt glue.
Copyright 2010, Digital by Design, Inc. -See Copyright Information
Thanksgiving Turkey Napkin and Silverware Holder Craft
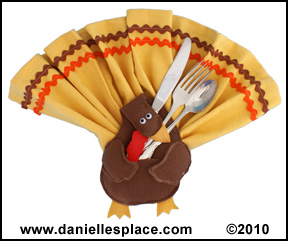
What you will need:
Brown, Red, and Gold Felt Squares
Googly Eyes
Cloth Napkins
Small Rock or Heavy Object
Polyfil
Hot Melt Glue and Gun
Rickrack
How to Make the Thanksgiving Turkey Napkin and Silverware Holder Craft:
1. Print out the pattern. Cut the turkey's body and wings from the brown felt, the beak and feet from the gold felt, and cut a wattle shape from red felt.
Member's ![]()
Instant Download - $2.00 ![]()
2. Pin the two beak pieces together and sew them together using a very small stitch. Cut around the edge of your stitching close to the seam.
3. Pin the two body pieces together in the middle. Place the beak inside the two pieces at the head and pin the pieces together. Pin the front and back pouch to the front and back of the body. Place the two feet in the inside of the body pieces and pin them in place. Sew around the head and about two inches of the neck on both sides. Insert a small rock or other heavy object in the head and then continue sewing all the way around the body.
4. Place two wing patterns together and sew all the way around leaving a one-inch opening. Stuff a small amount of polyfil in the wing and then sew it closed. Do the same thing for the other wing. Glue the wings to the body.
5. Bend down the head as shown in the picture and glue on googly eyes and a wattle.
6. If you are using a plain napkin, sew rickrack or other decorative items such as lace on the edges. Fan fold the napkin, iron it, and then fold the fan-folded napkin in half. Insert the napkin in the back pouch of the turkey and spread out the napkin to make a fan shape. Place silverware in the front pouch and then fold the head down over the silverware.
Copyright 2010, Digital by Design, Inc. -See Copyright Information
Thanksgiving Paper Bag Turkey Craft
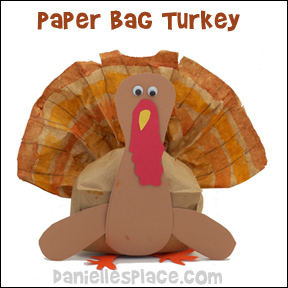
What you will need:
Brown Paper Lunch Bags
Newspapers or Plastic Grocery Bags
Water Color Paint, Oil Pastels, Crayons, or Colored Pencils
Markers
Red, Orange, Brown, and Yellow Construction Paper
Glue
Rubber Bands or Chenille Stems
Tape
How to make the Thanksgiving Paper Bag Turkey Craft:
1. Print out the Pattern for the wings, feet, wattle and beak and cut the shapes from construction paper.
2. Crinkle up one page of newspaper and stuff it into a brown lunch bag. Plastic grocery bags also work very well.
3. Close up the bag by crinkling the sides together about 2/3 of the way down from the top of the bag. Wind a rubber band or Chenille stem around the bag just above the stuffed newspaper or grocery bags.
4. Cut from the top of the bag down to the rubber band or chenille stem in the middle of the back of the bag.
5. Spread the bag out at the top to form the turkey's tail feathers.
6. Paint or color the tail feather and let them dry.
7. Glue or tape on the turkey's body parts.
Copyright 2000, Digital by Design, Inc. - See Copyright Information
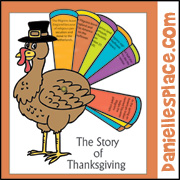
More Thanksgiving Crafts

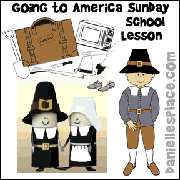
Going to America Sunday School Lessons with Crafts and Activities


