Apostle Paul Bible Crafts and Activities for Sunday School
How to Make Crafts and Activities Relating to the Apostle Paul and His Life
Paul's Early Life as a Pharisee
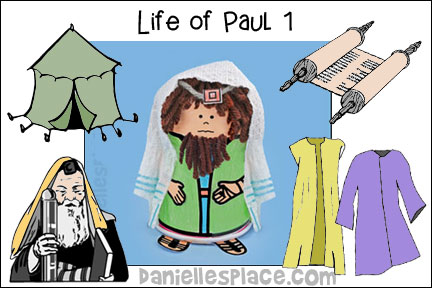
Pharisee with Forehead and Arm Phylacteries Craft
The purpose of this craft is to show your children how ritualistic the Pharisees were, and how they let their rituals become more important to them than following God.

What you will need:
9-oz. Party Cups
Yarn for Hair and Beard
Paper
Colored Pencils
Glue
Scissors
5" x 5" Pieces of Cardboard
White Paper Towels or Cloth
What to do:
A Pharisee was one of the three major Jewish religious groups at the time of the New Testament. The word Pharisee means "separated ones". They were also known as chasidim which meant "loyal to God or loved by God". They sought to obey God, but they eventually became so extreme in some parts of obeying the laws that they didn't realize they were missing other parts. They also added many laws of their own. Their rituals became more important to them than serving God. When they saw how much power Jesus had they were very jealous of him, and when Christianity starting spreading, they became one of its biggest opponents. Paul was a pharisee.
1. Glue the body pattern onto the cup and then glue on the arms and feet. Explain what the phylacteries were and why the Pharisees used them.
Member's ![]()
Pharisee took Deut. 6: 8 literally and tied boxes filled with God's words on their foreheads and arms. Phylacteries are cube-shaped leather cases with scripture verses in them. The phylactery that was tied on the inside of the left arm was placed near the elbow so that when the arm was bent the phylactery would rest over the heart. The knot fastening it to the arm was in the form of the Hebrew letter yodh (Y) and the end of the sting wound around the middle finger.
2. Make the Hair and Forehead Phylactery - To make the hair loosely wind yarn around the 5" x 5" pieces of cardboard about 25 times and then pull it off. Tie the yarn together in the middle with another piece of yarn. Cut the looped ends to make a pompom. Glue the pompom to the bottom of the cup for the hair, and then give the Pharisee a haircut. Children may also want to glue pieces of yarn to the beard.
Explain that the Jewish people only wore their hair long if they were carrying out a vow. A few had a lifelong vow, but most would only let their hair grow for a short period of time, weeks or a month. Some religious groups would not cut their beards, but some would.
3. Make the prayer shawl or tallit - Cut 5" off the end of a paper towel. Use the entire length of the paper towel. Cut fringes at each end of the shawl. To do this cut a rectangle shape out of each end leaving about 1/2" of paper towel on each end. (See diagram below) Have your children draw blue lines through each tassel. (Numbers 15:37-41) (See the link below to read about why the Jews don't put the blue line in the tassels today.) (Deut. 22:12)
The Talmud contains Jewish law, ethics, philosophy, customs, and history, and gives detailed explanations of how the tassels should be made (Manmade law). They were supposed to use four strands folded in half to make eight. Those four strands were supposed to be made of eight fine threads. They also had detailed instructions on how to tie the knot to make the eight strands. They were also supposed to include a strand that was dyed blue with a specific dye (God's instructions), but the source of the dye has been lost so they no longer use the blue strand. Pointing out these facts will help your children understand how the religious leaders made the laws so complicated to follow that following the made-up laws became more important than following God's laws. Check out Wikipedia under Thread and Knots - http://en.wikipedia.org/wiki/Tzitzit
The fringes on the Pharisees robes were supposed to be a constant reminder of God's commandments (Number 15: 38-41), but the Pharisees made the fringes extra-long, putting on a show wanting to look more spiritual than others. In Matt. 23:5 Jesus scolded the Pharisees for making their fringes longer to look more important.
Pictures of Phylacteries - http://emp.byui.edu/SATTERFIELDB/Tefillin/phylacteries.htm
The Tallit or Prayer Shawl - http://www.templesanjose.org/JudaismInfo/faq/tallit.htm - This is very interesting reading and explains what the blue stripe means and why they don't put them on the tassel any more.
The Life of Paul 2 - Paul Sees the Light
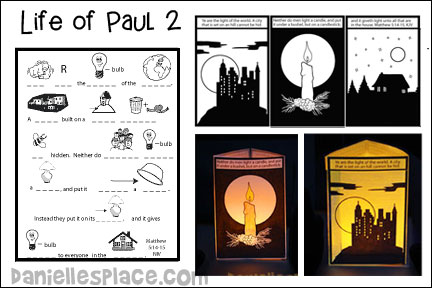
Paul Sees the Light Bible Verse Luminary

Each panel on this three-sided luminary depicts part of the Bible verse.
Matthew 5:14-15 "Ye are the light of the world. A city that is set on an hill cannot be hid. Neither do men light a candle, and put it under a bushel, but on a candlestick; and it giveth light unto all that are in the house." This craft goes along with the Bible lesson "Paul Sees the Light" on The Resource Room.
Member's ![]()
Life of Paul 3 - Paul Escapes Over a Wall
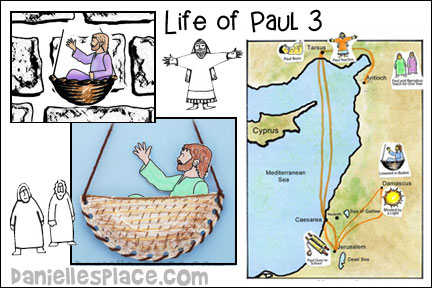
Color a Bible Map of Paul's Journey
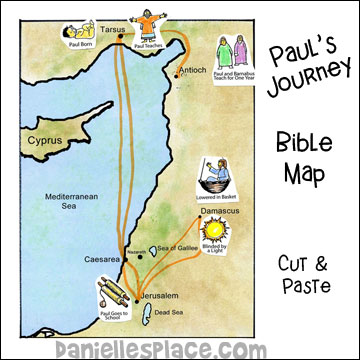
The printable map and pictures for this activity is available to members of The Resource Room on the lesson "Paul Escapes Over a Wall".
Member's ![]()
Children color the map and pictures and then cut the pictures apart.
If you have younger children you can use the colored map as a visual during the lesson and have them make Paul in a basket craft below. As you review the lesson have your children glue the pictures in the appropriate place on the map.
The Pictures Include:
1. Paul as a baby - Glue to the city of
Tarsus
2. Scroll picture - Paul studies to be a Pharisee. Glue to the city of Jerusalem
3. Sun picture - Glue to Damascus where Paul is blinded by the light.
4. Paul teaching - Paul teaches in Damascus.
5. Paul in a basket - Glue to the city of Damascus.
6. Picture of Paul and Barnabas - Glue to Antioch
"Help Paul Escape" Review Game
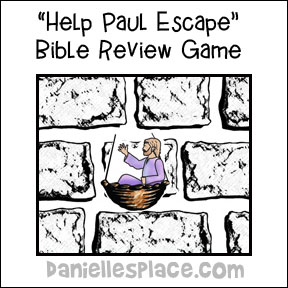
In this game children compete to be the first team to "lower Paul over the wall and bring him safely to the bottom".
The teams take turns answering questions.
If a team gets the question correct, the teacher moves the Paul in a basket picture down one row of stones.
The team whose picture of Paul reaches the bottom of the wall first wins.
Member's ![]()
©2012, Digital by Design, Inc. -* See Copyright Information
I just used your resource room materials for the first time this month. So far I found it very helpful. I am the SS Superintendant for my church and I really find it time consuming the other way I used to prepare for the prek/kindergarten class. Your site helps me save time. I loved the stories and the craft ideas, well, I never would have thought of such cute ideas. The kids love it too. We started this year with the stories of God creating the world, then, animals (even spiders..yuck). We have had a great time with them and we like to keep their lessons simple and crafts simple as well. Thank you for sharing your talent God has given you, I'm very happy with everything I find on your website. Peace, Blessings and Joy, Laura J.
Paul Lowered in a Basket Bible Craft for Sunday School
Acts 9:25 - Paul's followers took him by night and lowered him in a basket through an opening in the wall.

What you will need:
Snack-Sized Paper Plates
Scissors
Hole Punch
Yarn
Colored Pencils
Card Stock (Heavy Paper)
What to do:
1. Cut paper plates in half. Place to halves top side to top side to form a basket, and glue them together. Punch holes around the edges.
2. In class have your children color the "baskets" and then thread yarn through the holes leaving about one foot of yarn on each side of the basket. Tie the ends together over the basket.
4. Have your children draw and color a picture of Paul and place it in the basket.
5. Use the craft to act out the story.
Member's ![]()
©2012, Digital by Design, Inc. -* See Copyright Information
Paul Shipwrecked Sunday School Snack Craft
Give each child a plastic banana split bowl and have them put a pre-sliced banana inside. Used canned whipped cream to spread whipped cream on to of the banana. Place two teddy grahams in the whipped cream; one for Paul and the other for Silas. You can also put half of a straw down into the banana with a sail attached to it. This makes a really cute craft for the 2's through 5 year olds. They can close the top of the bowl and float it or eat it first. Either way, they have a boat and a sail to play with and it is very inexpensive. This went over really well ! Yum !!! Sent in by Connie
Paul Bitten by a Snake Sunday School Craft
Make a snake with plastic bottle caps from soft drink products and two corks for the head and tail.
Drill a hole in the center of each cap and the corks. String red plastic cord through one small cork then 25 plastic caps per snake and end with the other small cork.
Tie off at the tail end. Leave some of the cord hanging out for the tongue on the other end. I spray painted the caps green. When it dried I put wiggly eyes on the tongue at the head end. Also, if you want to, you can assembly the first two caps open side to open side and put a couple of beans in it, then hot glue them together. This way the snake rattles. We used this craft for VBS when Paul was bitten by the viper. The 5th and 6th graders enjoyed making their snakes and painting them. Connie
For other snake crafts go the the Snake Crafts Page.
©2007, Digital by Design, Inc. -* See Copyright Information
Paul and Silas Rejoice
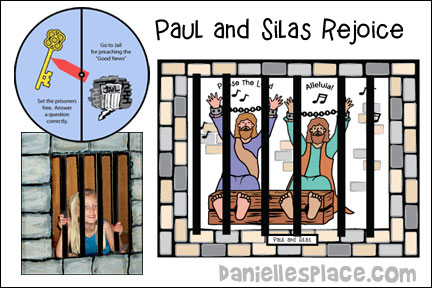
Work on the Coloring Sheet "Paul and Silas"
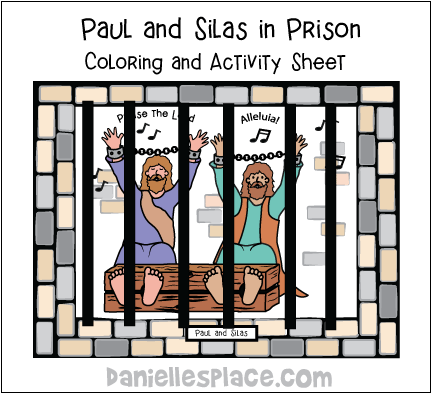
Before class print out the Paul and Silas Pattern and make copies. Print out the Jail Pattern and make copies. Cut out the center of the pattern, and cut up thin strips of black construction paper. In class have the children color both pages and then glue the black strips of paper to the back of the Jail Pattern. Staple the Jail Pattern over the Paul an Silas Pattern on the left hand side.
Member's ![]()
Make Paper Chains and Act Out The Story
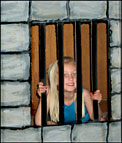
Cut up black construction paper into 3/4" x 4 1/2" pieces. Cut up pieces of construction paper 7" x 1 1/2" for the wristbands. In class have the children glue the smaller pieces together to make a chain. When they are finished, tape the larger pieces of construction paper to the chain at both ends by placing pieces of tape through the end loops of the chain and taping them to the middle of the larger pieces. You will be taping the wristbands (end pieces) to the child's wrist at the end of the lesson.
Act out the Bible Story - Divide the children in half. From half, pick a child to be the jailer and one to be Paul and one to be Silas (Children who like to sing). Have the rest of the children be prisoners. The second half of the children will be the audience and sound effects people.
Tape the paper chains around the prisoner's wrists and tell them to get in the jail. Have the jailer lie on the floor off to the side and pretend to be asleep. Tell the children that Paul and Silas will start to sing (If the children don't want to sing, just tell them they can pretend to pray) and when they hear a banging noise they should stomp their feet and pound on the table to make it sound like an earthquake. The prisoners in the jail should pull apart their chains and act very surprised. When the earthquake has stopped tell the jailer to wake up and look frightened and to draw his sword. At this point Paul should yell, "Don't hurt yourself! We are all here!" The jailer then goes up to Paul and asks, "What must I do to be saved?" Paul answers, "Believe in the Lord Jesus, and you will be saved."
Play "Go to Jail" Review Game
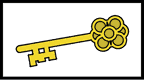
1. Before class make a set of Key Cards with questions about the lesson.
2. Make a spinner board and glue it to a thick piece of cardboard. Cut a spinner and attach it to the middle of the spinner board with a paper fastener.
3. Designate one part of your room as the jail. You can set up chairs in a square with an opening or make a jail out of cardboard boxes.
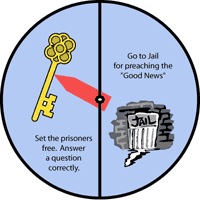
Have your children take turns spinning the spinner. If the spinner stops on the jail side, the child has to go to jail. If it stops on the key side, he gets to answer a question. If he answers it right, he frees everyone who is in jail.
Member's ![]()
©2002, Digital by Design, Inc. -* See Copyright Information
Dear Daniellesplace, I just would like to let you know that our church has enjoyed this site very much. I was working at a day care when I found your site. I enjoyed it so much that I asked my pastor if we could use it for our Sunday School lessons and he agreed. Our children have been so happy with new lessons and our teachers too. I thank the Lord that I found this site and hope and pray that he sends blessing on you each and every day. Please let me know when it's time to renew my membership. Once again thanks ,God bless. Mary
I am a new subscriber here but I have truly enjoyed your site. I have done the Jonah lesson and the lost sheep and this past Sunday we did the Jesus knows My Name lesson. The children really enjoy not only the crafts but that can also understand the meaning of the lessons more easily. Thanks again for a wonderful site. Barbara
I am a new subscriber here but I have truly enjoyed your site. I have done the Jonah lesson and the lost sheep and this past Sunday we did the Jesus knows My Name lesson. The children really enjoy not only the crafts but that can also understand the meaning of the lessons more easily. Thanks again for a wonderful site. Barbara