The Bible - Sunday School Crafts
Books of the Bible, Bible Verse Memorization Crafts, and Reading The Bible Crafts, Bible Study and Games for Sunday School
Books of the Bible Cereal Box Review Games
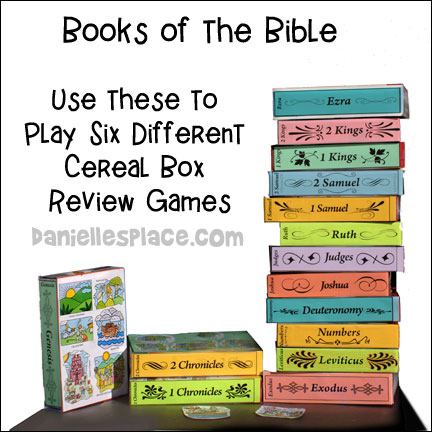
These hand-on games and activities are a great way to review the books of the Bible. Children will enjoy stacking and organizing the boxes. (If you don't have cereal boxes, you can just print out the labels onto card stock, and use them as cards. If you laminate them and stick Velcro tabs on the backs, you can use them on a felt board.)
A complete set of labels is available to members on The Resource Room.
1. Order the Stack Game
Break your children up into teams of two or three and have the teams take turns stacking the boxes in order. Give them a certain amount of time to stack. Mix up the boxes after each team takes a turn. The team that stacks the most boxes in the correct order wins.
2. Tallest Tower
Break up your children into teams of two or three and have the teams take turns stacking the boxes in order. Have the other children count the boxes as the team works. The team members may not touch any of the boxes they already stacked to straighten them out. If any of the boxes fall off the stack the game is over and another team gets to try. The team that stacks the most boxes wins.
3. Books of the Bible Relay Race
Break up your children into teams. Place the mixed-up boxes and one team at one end of the room. Have the teams take turns picking up boxes racing to the other end of the room and placing them in order. Time how long it takes each team to complete the task. The team that completes it the fastest wins. Or you can play using the whole class as one team. Time them to see how long it takes. Have them repeat the game to see if they can beat their time.
4. Match the Bible Story to the Book of the Bible Game
Break your children into teams and give each team five boxes and ten or more Bible pictures that goes with each book of the Bible. See which team can place the pictures in the correct boxes in the shortest amount of time. Let them use their Bibles to find out where they should place the pictures.
5. Which Book is Missing?
Pick five to ten consecutive books of the Bible and display them in front of the class. Pick one child to remove one of the books (Boxes) while the other children close their eyes or turn around. Have the children all turn around at the same time and see who can discover which book is missing first. The child who answers correctly first gets to take a turn and remove a book.
6. Other Uses for the Books of the Bible Boxes
These boxes can also be used as a visual when you teach your lessons. Display all the boxes in the front of your room, and have your children find which book of the Bible your lesson comes from each week. Have them open the box and remove any Bible story pictures or items that also go with that book of the Bible and see if they can identify the stories you have already covered in previous weeks. You can also have them place other things in the boxes that relate to the story such as toys, completed crafts, and pictures they have drawn.
©2012, Digital by Design, Inc. -*See Copyright Information - Bloggers, if you use this craft idea or an adaptation, and link back to this page for the complete directions, let us know and we will put a link to your blog.
Folding Craft Sticks Books of the Bible Craft
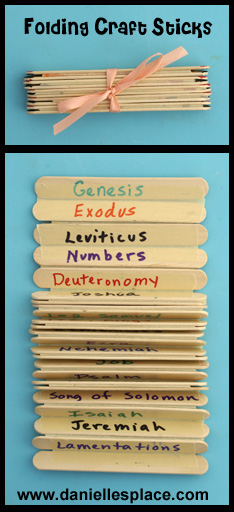
The craft sticks are taped together so that when the craft sticks are pushed together from the top and bottom of the stack they fan fold up into a compact stack of sticks for storage. This craft is great to use as a memorization tool. Children can test themselves by unfolding one section at a time to reveal the next part of the verse.
What you will need:
Woodsies Mini Jumbo Craft Sticks -4.5" 50/Pkg - Use good quality craft sticks that lay flat. The 5/8" work perfectly with the one-inch tape. *You can use the Woodsies Jumbo Craft Sticks with the 1.5 Inch - 3M Scotch Masking Tape for a bigger Canvas.
3M Scotch Masking Tape, 1-Inch - Other brands will work, but this tape works great! It is the exact color of the craft sticks. (Staple's Tape works better with the washable markers, but it is lighter than the stick and more transparent and doesn't cover the stick as well.)
Permanent Markers, Crayons, or Colored Pencils - (The washable markers don't work well because they smear.)
How to Make the Folding Craft Stick Canvas:
1. Cut the one-inch masking into 4-inch pieces.
2. Place two sticks together, side by side, and tape them together covering both the sticks with the tape.
3. Turn the two sticks over so that they are diagonal to you.
4. Place another craft stick next to and below the two sticks that you taped together. Use another piece of tape to tape the bottom two sticks together.
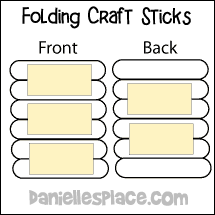
5. Turn all three sticks over diagonally and place another stick at the bottom of the row and tape the last two sticks together. Keep going until you have a whole row of sticks.
6. You can also cover the first and last stick in the row by placing tape over the stick and then folding it back over the stick. It is easier to write on the tape than the craft stick. The ink soaks into the sticks and blurs.
Children can use permanent markers, pens, or colored pencils to write the Bible verse on the sticks and then decorate them. They can also draw a picture on the back of the sticks that represent the Bible verse or the Bible story.
If a child messes up while working on his canvas, you can pull off the tape where he messed up and replace it with new tape.
These folding craft stick canvases can also be used for other purposes. You can also be used to make greeting cards for Mother's Day, Father's Day, or birthdays.
The sticks can be reused by just pulling off the tape and placing new tape over the sticks.
Watch a video on how to make the folding craft stick canvas.
©2012, Digital by Design, Inc. -*See Copyright Information - Bloggers, if you use this craft idea or an adaptation, and link back to this page for the complete directions, let us know and we will put a link to your blog.
Books of the Bible Mini Book
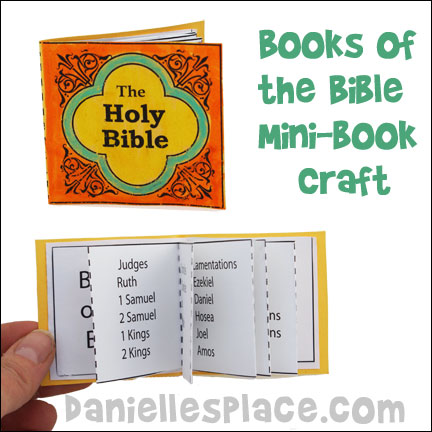
This is a great craft for older children who are learning the books of the Bible.
The mini books can be stored in a pocket or backpack and taken wherever the child goes.
The only supplies needed are card stock (Heavy paper), regular printer paper, colored pencils, and highlighter markers.
©2013, Digital by Design, Inc. -*See Copyright Information
Fall Leaves Books of the Bible Game and Bulletin Board Display
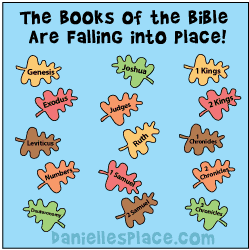
Use these leaf patterns as a review game and bulletin board display.
What you will need:
Bulletin Board Paper
Color Paper
Scissors
Tape
What to do:
1. Before class print out the leaf shapes and write one book of the Bible on each leaf. Make enough sets so that every two children have a set. Print out the bulletin board words, cut them apart and tape them to the bulletin board.
2. In class tell your children that on the word "go" they are to find the books of the Bible in order and place them in a pile. The team to finish first wins. You can let them look in their Bibles if they need help.
When all the teams are finished have them staple the leaves in order from the top of the bulletin board to the bottom. Have the words "The Books of the Bible are Falling into Place" written at the top.
(You can also make this activity a craft by printing out the leaves onto white paper. Have your children color the leaves and then write books of the Bible on them.)
This games goes with the Bible Lesson "The Holy Bible". You will find a complete lesson, with crafts, worksheets, and review games on The Resource Room.
Review the Books of the Bible Cube Game
What you will need:
Card stock (Heavy Paper)
Elmer's Paper Glue or Low Temp. Glue Gun
Scissors
What to do:
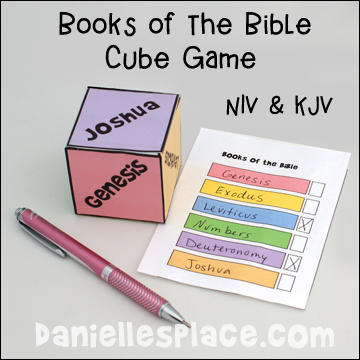
1. Before class print out the color-coded books of the bible cards and cut them apart.
2. Print out the books of the bible cube pattern, Genesis - Joshua, cut it out, fold up on all the lines and glue it together on the side tabs.
Member's ![]() - Includes all books of the Bible - New Testament and Old Testament
- Includes all books of the Bible - New Testament and Old Testament
Free Digital Download - ![]() - The first five books are free.
- The first five books are free.
Purchase all Old Testament and New Testament Cubes - ![]()
3. Have your children write each book of the Bible in order on their cards. If you have younger children write the words on the cards before class. The words in the colored boxes should match the colors on the cube.
4. In class have your children take turns throwing the cube. If the cube shows the first book of the Bible, they can mark that book off on their cards. If not, they must try again on their next turn. The children can only mark off the books in order. (If you have younger children, you can have them mark off the books in any order.) The child who marks off all their books in order first wins. If the cube lands so it shows a book that is not the next in order, (or has already been marked off) the child loses his turn and must try again next time.
Books of the Bible Review Toss Game
Before class, write the books of the Bible you are studying on a large poster board. Color code the books. Create cards that match the poster. For example, if Genesis is on a red square, make a red card with Genesis written on it. Make a set of cards for each team. Have the teams take turns throwing a beanbag onto the poster board that is placed on the ground. If the beanbag lands on a square with a book of the Bible that that team doesn’t already have the child who tossed the beanbag gets to pick up the matching card for their team and place the card in order. The team that gets all the cards in order first wins.
Books of the Bible Hangman Game Review
(Older Children) Play like "Hangman" but use only the books of the Bible.
Hide and Seek
(Younger Children) Before class, hide the books of the Bible written on sheets of paper around the room. (Tape them under chairs and tables, hang them from the ceiling with thread, etc.) On the word go, have the children look for the books. When they have all been found have the children work on putting them in order.
Books of the Bible Match Game
(Any age) Make two cards each for each book of the Bible you are studying. Turn the cards over and have the children take turns turning two cards over to see if they match. If they match, the child gets to keep the cards. If not, the child turns the cards back over and the next child takes a turn.
Books of the Bible Memory Card Game
(Any age) You can also make up a memory game. Write some of the books of the Bible on cards, start with three or four books. Turn over the cards and have the children take turns turning them over. They must first look for the first book in your series. If you are using Genesis, Exodus, Leviticus, Num. and Deut, they must first find Genesis. If a child finds Genesis, he takes another turn and tries to find Exodus. If he finds Exodus, he can take another turn and try to find Leviticus. He keeps turning over cards until he gets one out of order. He must then turn all the cards back over. Don’t mix up the cards. The other children should be watching carefully so they can remember where the cards are. Keep playing until a child can turn over all the cards in order. For younger children, to make it a little easier, color code the cards, make each card a different color and make a sample of all the cards in order so your children know what they are looking for. You can read the cards for them as they turn them over. They will be learning the books when they hear you saying them over and over.
Bible Verse Memorization Aids on Other Pages
My Bible Dictionary - Bible Study Tool for Children's Ministry

See the Bible Verse Review Activities Page for more information on this activity.
Folding Craft Sticks Bible Verse Memory Game
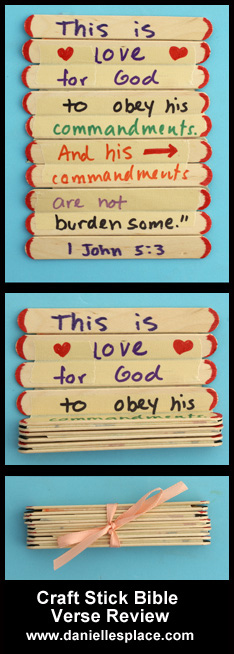
See the Bible Verse Review Activities Page for more information on this activity.


