Christian Homeschool Art Lesson Line
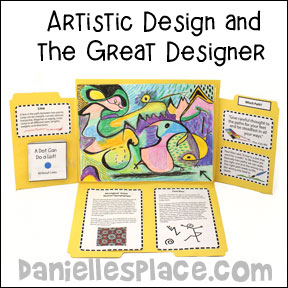
Artistic Design and the Great Designer Lessons
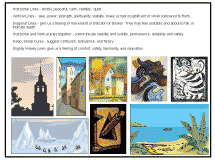
Art Lessons on The Elements and Principles of Design from a Biblical Perspective. Children learn about God through art. Each lesson teaches an element of design and a biblical principle that relates to that design element. Children study famous artists and art movements, practice artistic techniques, and learn to express themselves through art.
The complete lesson with printable patterns is available to Members on The Resource Room and as an instant download:
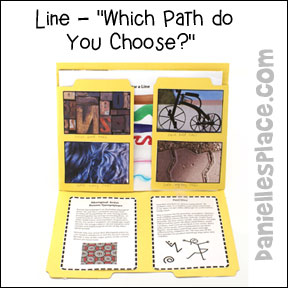
Members ![]() - Line – "Which Path do You Choose?"
- Line – "Which Path do You Choose?"
Instant Download - ![]()
The Lesson
In our last lesson we learned that the first elements of design are point and dot. A blank piece of paper or canvas has no meaning until the artist puts something on it. A simple dot gives the canvas meaning; it tells us about the artist, and makes us begin to ask questions. We may wonder why the artist made the dot or if there is more to the picture?
We also learned that we are God’s workmanship or masterpiece, created to do good works. When God created us he put a little “dot” in us that makes us question who we are, where we came from, and what’s our purpose. Everything God has made points to him. We can know he exists by seeing his creation. Just like we can know an artist existed or exists when we see his masterpiece.
“Since what may be known about God is plain to them, because God has made it plain to them. For since the creation of the world God’s invisible qualities—his eternal power and divine nature—have been clearly seen, being understood from what has been made, so that people are without excuse.” Romans 1:19-20, NIV
(Hand out blank pieces of paper and ask your children to quickly draw two dots on their paper.) When we see two dots on a page we automatically want to make a connection between the two dots. We unconsciously see a line between them. Do you see a path between the dots you made?
The next element of design is line. A line is the path between two points, a mark or stroke that is longer than it is wide, or a point moving in space. Paul Klee, a famous abstract artist said, “A line is a dot that went for a walk.”
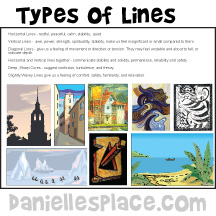
Lines can be straight, curved, vertical, horizontal, diagonal, or zigzag. Lines come in all different sizes, lengths, weights, and directions. I would like you to draw a line between the two dots on your paper. Before you draw try to picture the path in your mind. Do you want it to be a straight line that goes directly from dot to dot? Or a zigzag line that can’t seem to make up its mind? Or maybe a slightly wavy line that seems to rock you to sleep? Or you might feel like connecting the points with a long, high, diagonal line that drops off again at the top like a tall roller coaster. Or you might like to draw a line that takes you all over your paper through loops and sharp turns and choppy waves like in a leaf blowing in a storm. Once you decide what type of path you would like to draw, pick up your pencil and connect the two dots with a path.
(After your children have drawn their lines have them share their pictures with the class. Ask them why they decided to make that particular type of line, and how they feel about the line.)
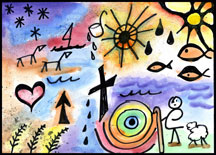
Did you know that the Bible talks a lot about paths? When the Bible talks about paths it is referring to the decisions we make in life and the consequences of those decisions. According to the Bible there are basically two paths; the right one and the wrong one. The right path leads to life, the wrong one lead to death. When we make good decisions we choose the right path. When we make bad decisions we choose the wrong path. The Bible describes what the right path and the wrong path look like, tells us how to find the right path, stay on the path, and avoid the wrong path.
This is what the Bible tells us that the right path looks like this:
The right path leads to peace (Pr 3:13-17, delight (Ps 119:35), joy, life, rest for your soul, upward (Pr. 15:24). It is level, smooth, secure, straight (Pr. 4:11), narrow (Matthew 7:14) and shines ever brighter (Pr 4:18).
Now that sounds like a great path, doesn’t it? Does the path you drew remind you of this path? (Let your children compare the path they drew to the description.)
The Bible tells you to “Give careful thought to the paths for your feet and be steadfast in all your ways.” (Pr. 4:26)
So how do we stay on the right path?
“Trust in the Lord with all thine heart; and lean not unto thine own understanding. In all thy ways acknowledge him, and he shall direct thy paths. Pr 3:6
God helps us along the right path. The Bible says:
God makes known to us the path of life. (Ps 16:11)
God guides us along the right path. (Ps. 23:3),
God lights our path. (Ps. 119:105)
God teaches us his ways and leads us in a straight path. (Ps 27:11)
The wrong path, on the other hand, is dark and slippery (Ps. 35:6), evil (Ps. 119:101), crooked and devious (Pr 2:15), leads to the spirits of the dead (Pr. 2:18), the gate is wide and the road is broad, leads to destruction, many will enter through it (Matthew 7:13) (It’s the easy way.), and doesn’t lead to peace (Isaiah 59:8). That doesn’t sound like a very good path, does it? But according to the Bible, it is the easy path, many people follow it, even good people sometimes take a wrong turn and go down the wrong path. That is why the Bible tells us to “Give careful thought to the paths for your feet and be steadfast in all your ways.” (Pr. 4:26)
Give your children another sheet of paper and tell them to think about how the Bible describes the right and wrong path, and tell them to try to picture how the paths might look. Go over all the verses and descriptions of the paths. Have them draw a picture to illustrate how those paths might look, and then share their drawings with the class.
Bible Verse: "Give careful thought to the paths for your feet and be steadfast in all your ways." Pr. 4:26
Teaching Concept:
A line is a path between two points. Lines can have many different characteristics. They can be straight, curved, fat, or skinny.
The Bible talks a lot about the paths we take, referring to the decisions we make and the consequences of those decisions. According to the Bible there are two paths we can pick; the right one and the wrong one. The right path leads to life, the wrong one lead to death.
Artists and Artistic Techniques:
Wassily Kandinsky's crayon drawing, Paul Klee, symbolism in art, Aboriginal Artist Ronnie Tjampitjinpa's line and symbol paintings, illustrator and author Ed Emberley and thumbprint art, and illustrator author Patrick McDonnell
Illustrate the Right and Wrong Path
Read the description of the right path and wrong path and have your children make a drawing illustrating what they think they might look like. Have your children show their pictures to the class and explain what they drew.
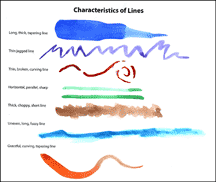
Identify Different Types and Characteristics of Lines
Read the descriptions and characteristics of lines, and make sure your children understand them. Have them look at the accompanying pictures and find lines in the pictures that match the descriptions. (Printables are available to members and as an instant download - see above.)
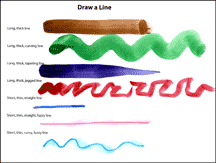
Practice Drawing Different Types of Lines Using Different Artistic Media
Lines can make us feel a certain way by the way they are drawn. They create emotions or feelings by their directions and character. Experiment with different media and tools to make lines with different characteristics. Chalk or pastels can make thick, fuzzy or blurry lines. Rub a little water over a magic marker line to make it fuzzy. Water and acrylic paint are great for making thick, tapering lines. Draw on a sheet of paper with a candle and then paint over the line with water color paint to make uneven choppy lines. Print out the line activity sheets or make up your own line descriptions.
(Printables are available to members and as an instant download - see above.)
"Dots Can Do a Lot - All About Lines" Itty Bitty Book
Print out the Itty Bitty Book Patterns, cut around the pages, but do not cut the pages. (Printables are available to members and as an instant download - see above.)

A Dot Can Do a Lot!
Look at the picture. What do you see?
A simple dot that says, "Look at me!"
But when a dot decides it's time to go
It makes a line that is sure to grow.
A dot that curves and makes a loop
Makes a line that looks like a hoop.
A excited dot that jumps up and down
Makes a zigzag line that looks like a crown...
©2012, Digital by Design, Inc.
Read the book to your children and then ask if they would like to illustrate their own Itty Bitty book.
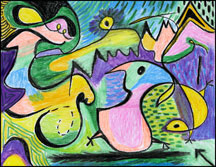
Study Wassily Kandinsky's Drawing 309 and Make a Kandinsky-Like Drawing Using a Black Crayon
Read the fact sheet about Wassily Kandinsky (Above under Folder Preparations) and then glue it to the inside of the folder.
(Printables are available to members and as an instant download - see above.)
Show your children Kandinsky's Drawing "309" made in 1940. Have them use their fingers to trace the black line around Kandinsky's the drawing. Ask your children the following question?
1. What media do think Kandinsky used to make the picture? (He used crayon.)
Have them observe the shapes formed by the intersecting lines. Note that Kandinsky colored in the smaller shapes with one color but broke up the bigger shapes with different colors. Some color areas extend through the lines such as in the green shapes. He used smaller shapes of color on the right side of the picture. Have your children look at each color individually and point out areas in the picture in which Kandinsky used each color.
2. What parts of the picture stand out, or what are the focal points in this picture?
3. Is there any color or colors that he used only once?
Tell your children to squint their eyes and look at the pictures. And ask the following?
4. Do you see larger shapes? (The darker colors will form larger shapes and the lighter colors will form larger shapes)
5. What areas of the pictures stand out more? Why? (The contrast between the light and dark colors and the use of opposite colors make areas stand out. The bright yellow shape on the left-hand side surrounded by the purple color is very prominent.)
6. Do any of the shapes remind them of anything?
7. How does the picture make you feel: happy, excited, scared, worried, or confused?
8. What do you like about the picture?
9. What don't you like about the picture?
10. After studying the picture, do you like it more or less?
11. Kandinsky named this picture "309", why do you think he named it that?
12. What would you name this picture?
Point out the fact sheet that the black line Kandinsky used in this picture creates movement, but he also creates movement through the placement of the colors. The eye will automatically see the darker and brighter colors first so those colors will create movement. Also colors of similar shades will create large moving shapes.
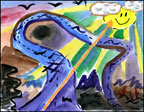
Have your children make their own pictures using black lines, starting with a long curvy black line drawn with a crayon or permanent marker. Then have them fill in the shapes or make their own shapes using other crayons or paint. Unlike Kandinsky's Drawing, encourage older children to vary their lines using, diagonals, vertical, zigzags, thick and thin, blurry, and broken lines. They may want to make it purely abstract or turn shapes and lines in to somewhat recognizable creatures or objects.
When they have finished their drawing or painting have them name it and sign it. Ask them the same questions about their drawing as you did about Kandinsky's drawing above.
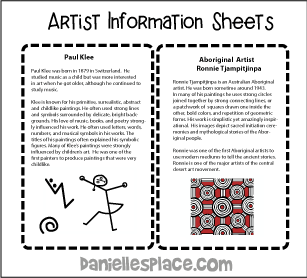
Study Paul Klee and Make a Drawing Using Symbols
Have your children look at the following painting by Paul Klee. Discuss his use of symbols in his paintings. Have them copy some of them onto a piece of paper. Ask them what they think some of the symbols might represent.
Ask them if they can think of symbols we use today, religious symbols, signs, letters, numbers, email symbols, etc.
Have your children draw symbols that have meaning to them on a piece of paper using a dark crayon or black marker. Then tell them to fill in the rest of the piece with colors using crayons, paint, or the media of their choice. They may want to connect the symbols with lines as in the painting "Day Music"
Around the Fish, Day Music, Young Moe, Dancing Girl, Heroic Roses, Red Waistcoat, Heroic Strokes of the Box
Find Lines in Your Environment
Help your children find lines in their environment. Take digital photographs of lines in your environment, finding a variety of lines – diagonal, horizontal, vertical, wavy, angular, repetitive, texture, etc.
If you don't have a camera, you can have your children look examples of lines in old magazines, cut them out and glue them to the outside of the fold-out flaps.
Study Aboriginal Artist Ronnie Tjampitjinpa
Ronnie Tjampitjinpa is an Australian Aboriginal Artist.He was born sometime around 1943. In many of his paintings he uses strong circles joined together by strong connecting lines, or a patchwork of squares drawn one inside the other, bold colors, and repetition of geometric forms.
His work is simplistic yet amazingly inspirational. His images depict sacred initiation ceremonies and mythological stories of the Aboriginal people.
Ronnie was one of the first Aboriginal artists to use modern mediums to tell the ancient stories. He is one of the major artists of the central desert art movement.
Show your children a Video of Ronnie Tjampitjinpa painting a large canvas, and some of his Paintings. Have your children use Ronnie's techniques to decorate their initials using letters and geometric shapes.
"Art" by Patrick McDonnell

Art - There's no stopping Art when he is inspired. He creates art using zigs, zags, scribbles, squiggle, dots, splotches, blotches, and curly cues.
Creative Activities:
1. Visit the Patrick McDonnell's Web Site and hear him read the book and Learn More about Him.
"Lines that Wiggle" by Candace Whitman

Lines that tickle, lines that sprout, bugs have lines that stick way out. Lines are everywhere you look -- check out the lines inside this book. This is a fun book for younger children to help them be aware of lines in art.
Encourage them to draw their own pictures use lines.
"Beautiful Oops" by Barney Saltzberg

Watch "Beautiful Oops" by Barney Saltzberg on Youtube
This adorable pop-up, lift-the-flap book is filled with surprises. A torn paper turns into an alligator's mouth, a spill turns into an elephant and a bent page into a penguin's head. This is a great book for children who are perfectionist; it will teach them that even mistakes can be made into something useful. They will actually be excited about the possibilities when they make a mistake.
1. Let your imagination run wild and experiment with you own oops, blobs, torn paper, folded paper, and spills to see what new creations you can come up with.
"Harold and the Purple Crayon" Crockett Johnson

"Harold and the Purple Crayon"
Watch "Harold and the Purple Crayon" on Youtube
1. Find diagonal lines that show depth. (road, and blanket)
2. Find short tapering lines that indicate sharpness. (porcupine, mouse's antlers)
3. Find jagged lines that look dangerous. (dragon's teeth, and mountain.)
4. Find wavy lines that indicate softness, calm, and comfort.
5. Have your children make their own version of this story.
Make Thumbprint Pictures

Watch a Documentary about Ed Emberley on Boingboing.net.
Ed Emberley's Complete Funprint Drawing Book Children will be amazed at the many pictures they can make using only their finger prints and simple lines. This activity is fun for all ages.
Also See Bible Art Lessons About
Point and Dot - "What's the Point?"
Shape - "It's Your Choice"
Color - "How Do You Feel?"
Value - "Light or Dark?"


