Crafts and Activities About Jesus for Sunday School
Bible Lessons, Crafts and Activities Relating to Jesus
Jesus Crafts and Activities
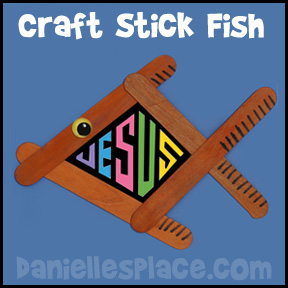
Jesus Craft Stick Fish
This craft is great for Vacation Bible School. They cost only pennies to make and allow room for creativity. These fish were made with jumbo craft sticks, but you can use regular-sized craft sticks instead.
What you will need:
Jumbo Colored Wood Craft Sticks (You can use the colored craft stick or let your children paint their own.)
Acrylic Paint and Paint Brushes if You are Using Craft Sticks that aren't Colored
Vegetable Oil and Paint Brushes if You are Making them Translucent
Tacky Glue, Printer Paper and/or Colored Paper, Colored Pencils and/or Markers, and Gems and Other Decorative Items (Optional)
How to Make the Craft Stick Fish:
1. Make a sample craft before class using the printable pattern. Depending on how much time you have, you can glue the fish together before class or have your children glue them together themselves. You can use the printable template, make your own, or just let your children glue them together the way they would like. If you use the craft sticks that aren't colored, let your children paint the sticks in class, or paint them ahead of time.
Member's ![]()
Instant Digital Download - ![]()
2. In class you can have your children draw a design for the inside of the fish, or use the "Jesus" pattern, color it, cut it out, and glue it to the back of the fish.
3. You can make the fish translucent by printing the Jesus pattern onto colored paper. (If your printer uses water soluble ink, make copies of the pattern using a Xerox machine.) Have your children glue the pattern to the back of the fish and then paint a thin layer of vegetable oil over the paper. Use a paper towel to soak up any excess oil. You can also use crepe paper in the same manner. When you hang the fish near a window it will glow
©2013, Digital by Design, Inc. -*See Copyright Information
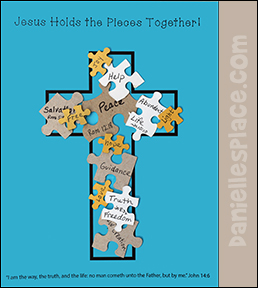
Jesus Holds the Pieces Together Puzzle Piece Cross Craft and Learning Activity
What you will need:
Card Stock (Heavy Paper)
Puzzle Pieces from Old Puzzles in Various Sizes
White Glue
Markers
How to Make the Puzzle Cross Craft
1. Print the pattern and Bible verse printout.
Member's ![]()
2. In class assign each child, or group of children, one verse to look up and discover what that verse tells us about how Jesus helps us.
4. Pick a child from each group to talk about the verse and then have all your children pick a puzzle piece and write a word from the verse that describes how Jesus helps us. Then have them glue it to the cross picture as shown in the picture above.
Verses Used for this Activity:Romans 12:18 - Peace, Romans 10:13 - save, John 8:32 - truth, Psalm 16:11 - joy, Jeremiah 29:11 - hope, etc.
Secret Message Bible Verse Craft Stick Craft

The craft sticks are taped together so that when the craft sticks are pushed together from the top and bottom of the stack they fan fold up into a compact stack of sticks.
What you will need:
Woodsies Mini Jumbo Craft Sticks -Natural 4.5" 50/Pkg - Use good quality craft sticks that lay flat. The 5/8" work perfect with the one-inch tape. *You can use the Woodsies Jumbo Craft Sticks with the 1.5 Inch - 3M Scotch Masking Tape for a bigger Canvas.
3M Scotch Masking Tape, 1-Inch - Other brands will work, but this tape works great! It is the exact color of the craft sticks. (Staple's Tape works better with the washable markers, but it is lighter than the stick and more transparent and doesn't cover the stick as well.)
Permanent Markers, Crayons, or Colored Pencils (The washable markers don't work well because they smear.)
Ribbon
How to Make the Folding Craft Stick Canvas:
1. If you are using the mini-jumbo craft sticks, cut the one-inch masking into 4-inch pieces.
2. Place two sticks together, side by side, and tape them together covering both the sticks with the tape.
3. Turn the two sticks over so that they are diagonal to you.
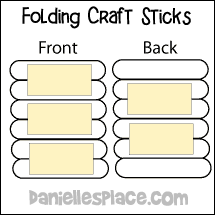
4. Place another craft stick next to and below the two sticks that you taped together. Use another piece of tape to tape the bottom two sticks together.
5. Turn all three sticks over diagonally and place another stick at the bottom of the row and tape the last two sticks together. Keep going until you have a whole row of sticks.
6. You can also cover the first and last stick in the row by placing tape over the stick and then folding it back over the stick. It is easier to write on the tape than the craft stick. The ink soaks into the sticks and blurs.
7. Draw out your design on the craft stick canvas with a pencil. If you make a mistake, you can erase it. When you are happy with your design paint it with the acrylic paint. When the acrylic paint is dry use a black marker to outline your shapes and write the words. You can use: "Mom, thanks for sticking up for me!" or "Mom, thanks for sticking by me!", or anything else you want.
©2012, Digital by Design, Inc. - See Copyright Information - Bloggers, if you use this craft idea or an adaptation, you must link back to this page for complete directions. If you use this technique, let us know and we will put a link to your blog.
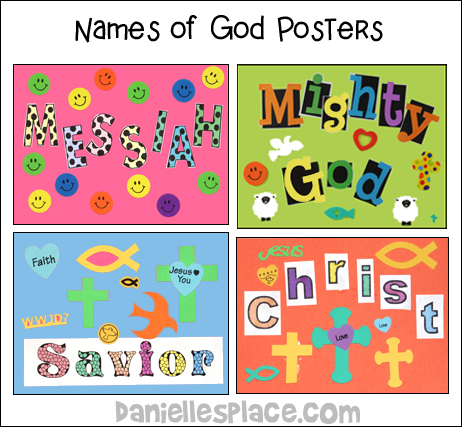
Names of God Posters
What you will need:
Printer Paper, Construction Paper, Religious Foam Shapes, Glue Sticks, and Foam Stickers 240/Pkg - Mini Church
How to make:
1. Print out names for Jesus using colorful letters and interesting fonts.
Members ![]()
Instant Digital Download - ![]() - Includes 8 pages of names that children cut out and glue to construction paper to make posters
- Includes 8 pages of names that children cut out and glue to construction paper to make posters
Patterns for the following names are available: Mighty God, Lord, Savior, Son of Man, Prince of Peace, Messiah, Mighty God, Christ, and Son of God.

2. In class have your children cut out and glue the letters to construction paper. Give them stickers or Craft Foam Shapes to decorate the rest of the page.
©2004, Digital by Design, Inc. -*See Copyright Information
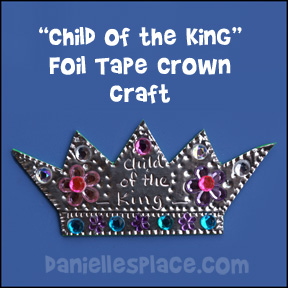
Jesus - King of King Crown Craft
What you will need:
Utensils to Engrave the Tape such as a Ballpoint Pen, Straws, the End of a Paintbrush, and the Tines of a Fork
Card Stock Paper (Heavy paper)
Scissors
Craft Gems or Faceted Acrylic Gemstones, 1/2 lb. (bag of 2000)
4-oz. Aleene's® Tacky Glue
Color Splash!® Bright Value Foam (pack of 12)
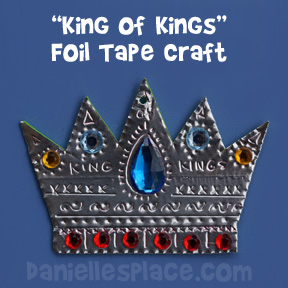
How to Make Foil Tape Crown:
1. Draw crown shapes on card stock (heavy paper) and cut them out.
Member's ![]()
2. Measure the crown templates and cut the foil tape the length of the templates. Peel off the backing from the tape being careful not to crease the tape. Stick the tape on the foam sheets smoothing them down so there are no bumps.
3. Place the template on the foil tape and trace around it. Cut out the crown shape.
4. Engrave the crowns with objects such as a straw, a pen, the tip of a paint brush, etc. by pressing the objects into the tape. Write words on the crown using a ballpoint pen.
5. To finish glue on gemstones with the tacky glue.
Copyright 2013, Digital by Design, Inc - See Copyright Information
Child of the King Craft
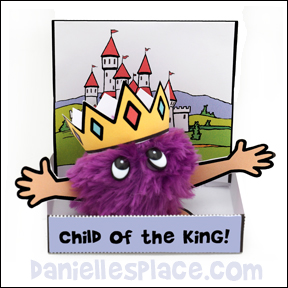
What you will need:
Card Stock
Color Printer of Colored Pencils
Tacky Glue
Two-inch Pom Poms (Bright Plush Pom Poms from Hobby Lobby) or Make Your Own Pom Poms (See Below.)
Sharp, Pointy Scissors
Wiggly Eyes or Doll Eyes
How to make the Child of the King Display:
Children color the box display and glue it together. They color the feet, arms, and crown patterns and glue them to the pom pom. To finish they add wiggly eyes
Member's ![]()
How to Make Your Own Pom Poms without a Pom Pom Maker:
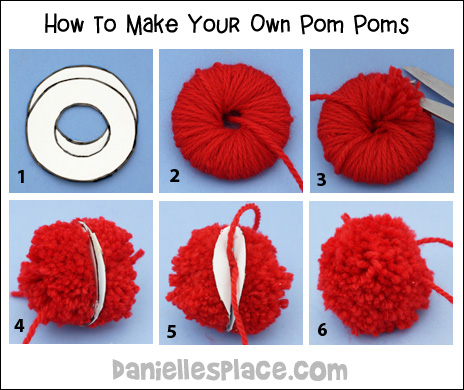
1. Draw two circles onto card board (Card board from cereal boxes work well) the size you would like your pom poms. Then draws circles inside the two circles. The bigger the inside circle the thicker your pom poms will come out.
2. Cut out the inside circles to make donut shapes.
3. Place the two donut shapes together and wind long pieces of yarn through the holes in the donut shapes and around the outside until you have fill up the hole with yarn. To keep the yarn ends secure just wind the yarn around the ends until the ends are covered by the yarn. Add new lengths of yarn the same way.
4. When you have the hole filled up with yarn cut around the outside edge of the donut shape with sharp scissors all the way down to the card board.
5. Separate the two donut shapes and insert a piece of yarn between the shapes. Tie the yarn pulling it as tight as you can.
6. Cut the card board shapes and pull them away from the pom pom.
7. To save time you can cut the donut shapes so that they aren't complete circles. In this way you will just slip the yarn through the cut slit instead of inserting the yarn through the hole. See this YouTube Video for a demonstration of this technique.
You can buy plastic pom pom makers in several different designs.
The Clover Small Pom Pom Maker allows you to wind one half of the donut shape at a time so you don't have to poke the yarn through hole, but it does take some maneuvering. You can see a video on YouTube here: https://www.youtube.com/watch?v=d2Ma-hgQIDU.
The Susan Bates Easy Wrap Pom Pom Maker is a little easier to use because the two sides of the pom pom are wrapped separately. Wrapping only one half of the circle saves a lot of time because you don't have to poke the yarn through the hole in the center of the donut shape. You can see a demonstration using this pom pom maker on YouTube here: https://www.youtube.com/watch?v=HaSqTUgFHi4.
SUSAN BATES has another pompom maker that is just plastic circles with a ridge in the middle. They are used the same way as the directions above.
Baby Jesus Crafts
Mary Tells Her Good News
1. Make a whispering tube out of a paper towel roll. Cover the roll with pretty paper and have the children decorate them with stickers, crayons, or markers. Instead of using paper towel rolls, you can cut pretty colors of poster board and roll it up to form a tube. Glue it together using a hot melt glue gun. Tell the story about how Mary told her good news. Discuss how we can tell people about Jesus.
2. Whisper Bible verses or short sentences through the tube and have the children repeat what you said.
3. Bring in baby items and discuss what each item is used for. Play a guessing game by removing one item when the children aren't looking and have them guess which one is missing.
©2003, Digital by Design, Inc. -*See Copyright Information
Jesus Grew and I am Growing Too
Concepts: Jesus grew and learned many things; you are growing
and learning to do many things. God made me special.
Outline each child's body on a big piece of paper (butcher paper used to cover bulletin boards) and then let them color it. Write the scripture verse Luke 2:40, "And the Child continued to grow and become strong, increasing in wisdom; and the grace of God was upon Him," on each sheet or paper before class.
This idea comes from Cindi VanWingerden
of Cincinnati, Ohio. She says, " I had one parent tell me that
they were happy to have a new one to replace one they had for a year
or so that the child would not get rid of until they got a new one!"
©2003, Digital by Design, Inc. -*See Copyright Information
Comments:
We used this project for a lesson about Jesus' love for us. We tapped two-feet pieces of butcher paper to the wall all around the room one right next to the other. On the top of the paper we wrote, "Jesus loves ______" whomever we happened to be tracing. We traced the child's body and had them use crayons to draw in the face and clothes. Most of the children seemed to enjoy the project. Some of the children spent at least 20 minutes on the project others were more interested in the play dough. We probably should have put up the play dough first.
I thank you for your site and myself and my daughter (7) have a lot of fun learning about the bible and Jesus together all the time, you have made the lessons fun and exciting my daughter is ADHD and even she is sitting still and focusing on what we are learning. Again thank you for your great site. Regards Jennifer Rixon
Jesus Goes to Church - Honor Your Parents
3D Church Craft
Go to the Church Crafts Page for a pattern and directions.
Make a Church and Play with Finger Puppets
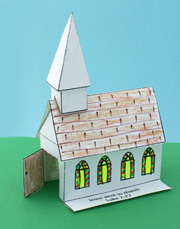
Draw a simple church outline with a mirror image of the outline above the roof line of the church. You are going to fold the outline on what would be the peak of the roof so that the church stands up on it's own. A Pattern for this church is also available on Daniellesplace.
Have children color the church, then fold. Attach it to a piece of cardboard for the floor. If you make each outline large enough you can make simple stick figure puppets out of craft sticks and card stock people shape cutouts for Jesus, Mary and Joseph for the children to play with in the church. Sent in by Bethany Davis
©2003, Digital by Design, Inc. -*See Copyright Information
Jesus Tempted in the Wilderness
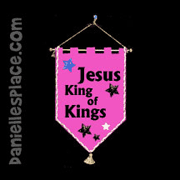
I used the "King of Kings" banner. I copied it to my paint program and erased the "King of Kings" and replaced it with "Always Do Right". I am going to have the children make the banner out of fun foam or felt and have them glue the words onto it and then decorate with glitter glue and other sequins and cording.
Member's ![]()
©2003, Digital by Design, Inc. -*See Copyright Information
Jesus Bingo Song
Using the tune from BINGO try this song. Have one letter each on a sheet of cardboard or construction paper to spell the name Jesus. Five children are chosen, each child holds one letter from the name Jesus. The following song is sung through once before any letter is removed. We start with the final S as the first letter to be removed so that the capital J is always in the children's mind and sight until the end of the song. When a letter is removed a clap is substituted for the missing letter. All letters are returned when the final line of the song is sung to spell out the name of Jesus. To keep the letters turned correctly a * is placed on the top of the paper to show the child which way the letter stands. (Stars are above us, our star points up to heaven).
"I have a friend who's always there,
And Jesus is his name-o
J-E-S-U-S, J-E-S-U-S, J-E-S-U-S
And Jesus is his name-o"
(Remove a letter and sing again, clap for missing letter/s)
After all letters have been removed five claps are given for the letters then slow down and help children return all letters to finish the song and sing "And Jesus is his name-o" (Sent in by Dian Dodson)
©2003, Digital by Design, Inc. -*See Copyright Information
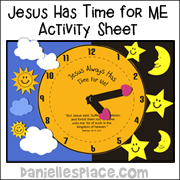
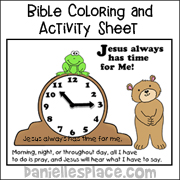
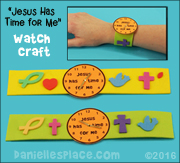
Jesus and Children - Jesus Has Time for Me
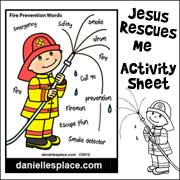
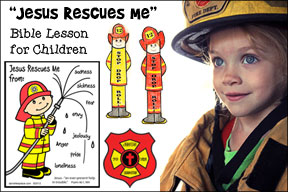
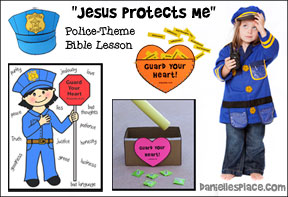
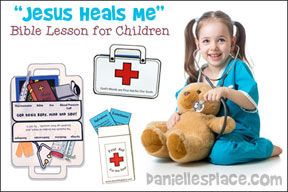
Jesus Rescues Me, Protects Me, and Heals Me Lessons